Snow Ghost Pie

Snow Ghost

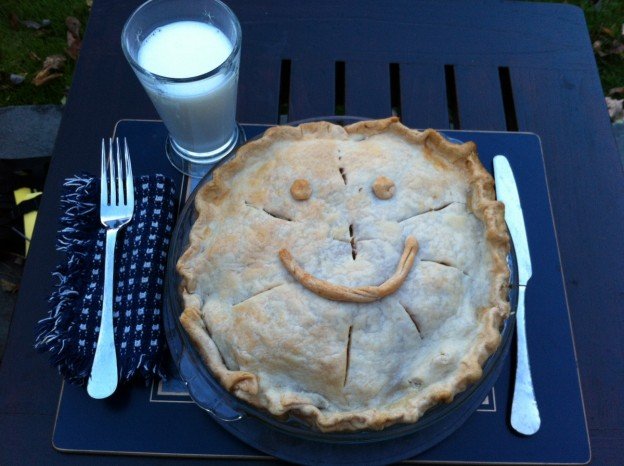
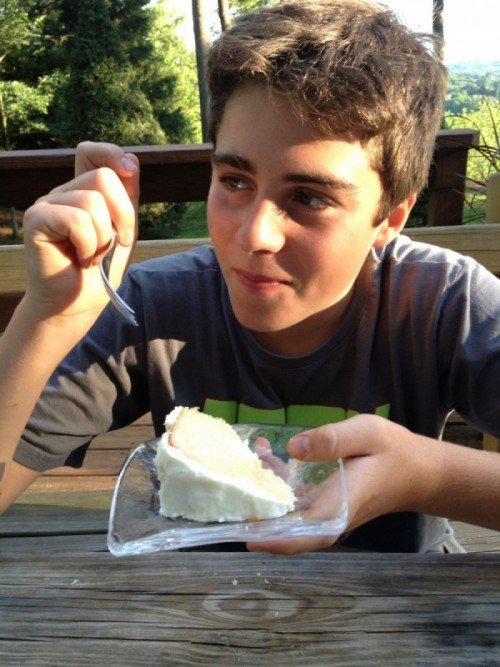
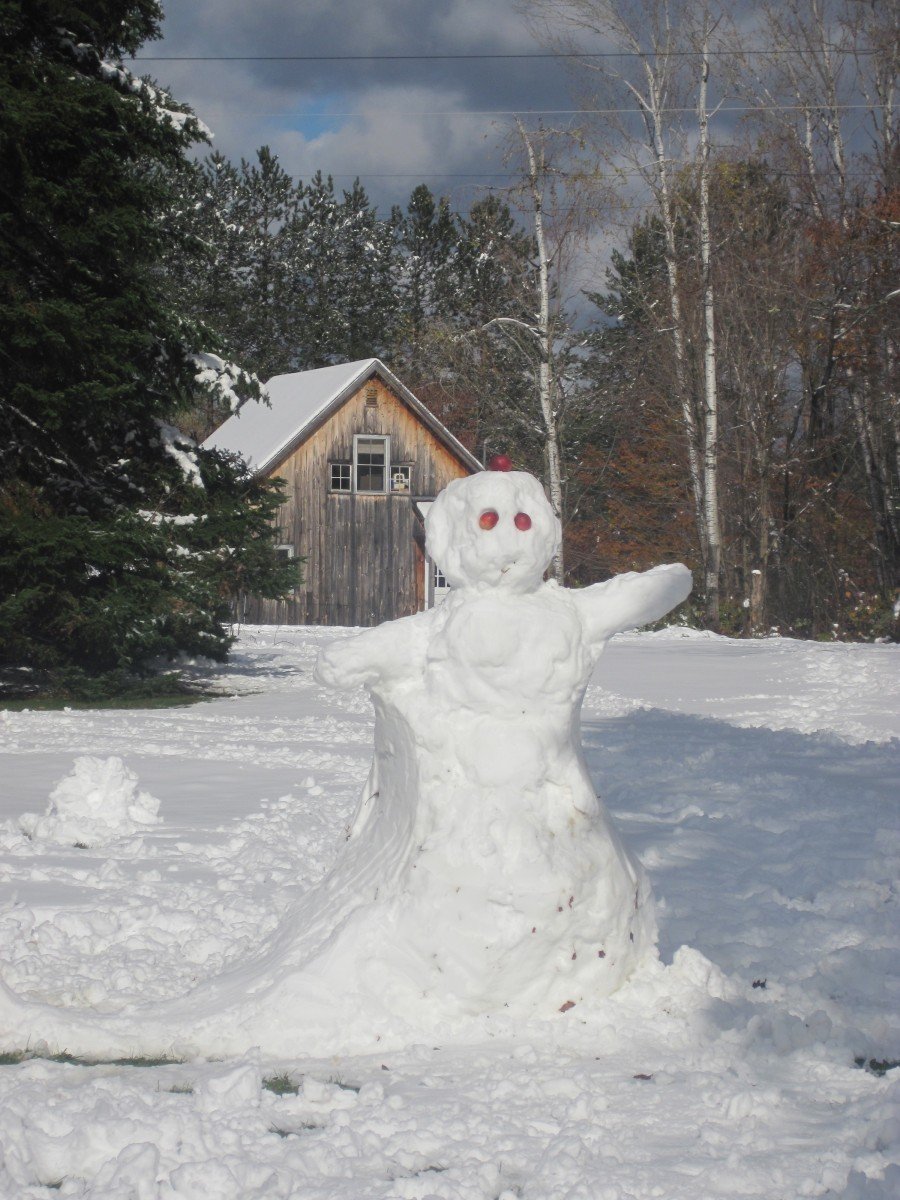
The first snow ghost of the season waits for his chance to steal a piece of pie.

Newsflash for you: We love winter.

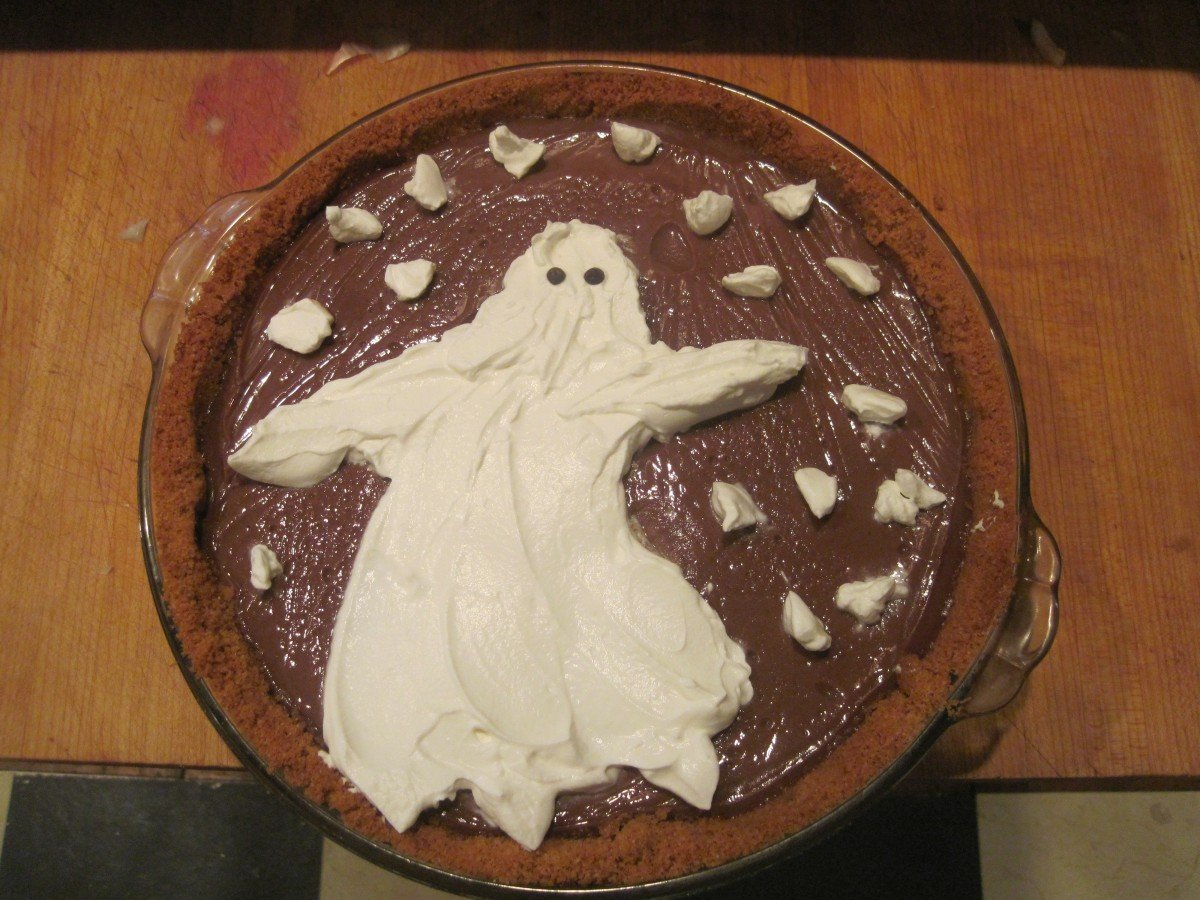
And we love snow even more. Every year, in a bid for the weather Gods to answer our prayers for the first snow, we make Snow Ghost Pie. It originally appeared—along with a legend of the snow ghost— in a Hershey’s ad circa 1972. I clearly remember reading the story then, and of course making and eating the chocolate pie which, incidentally, requires no shmancy ingredients. The pie is as brilliant as the story, which convinces kids to offer up the pie to the snow ghost (who in the story was really the creepy handyman who had enlisted the kid to steal a piece of his grandma’s cooling chocolate pie). At any rate, if the ghost takes a piece of the pie, it will keep snowing and you won’t have school the next day. Not surprisingly I am asked to make snow ghost pie—and jumpstart winter— a lot this time of year. The filling also makes a great chocolate pudding on its own, but it’s the decorating and ghost-baiting that makes it fun.

Snow Ghost Pie story

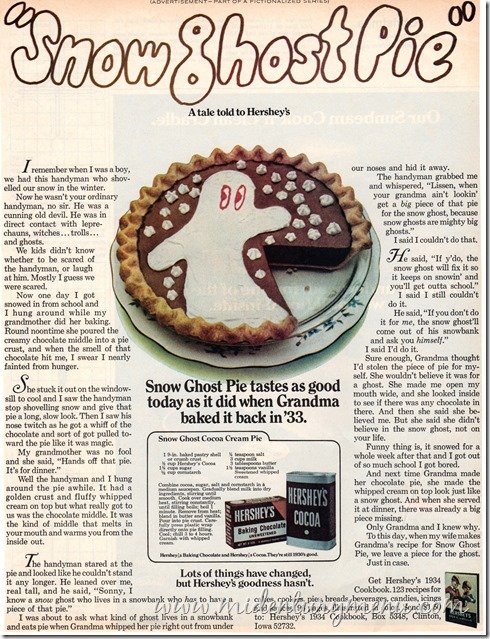
The story of the Snow Ghost, as told by Hersheys

Snow Ghost pie ad

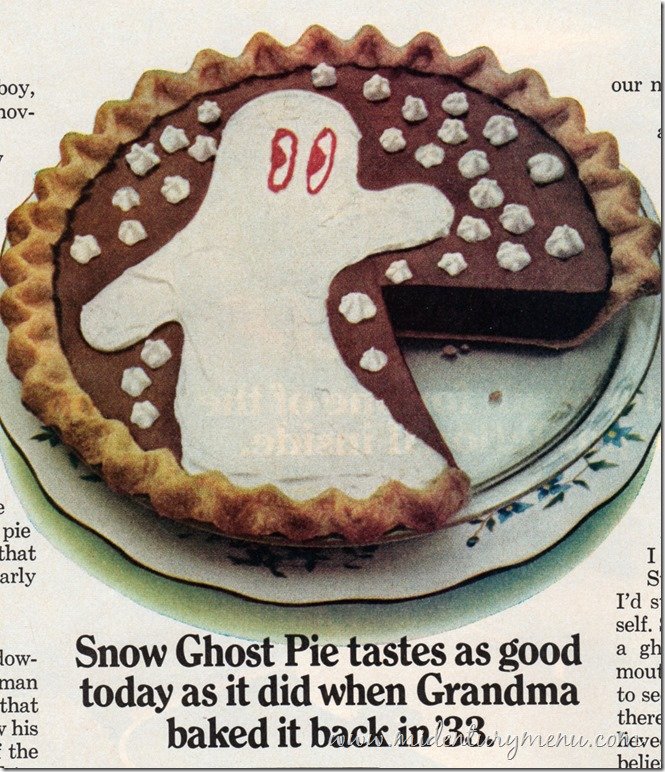
The original Snow Ghost Pie ad

 Ingredients

1 (9 inch) baked pastry shell or graham cracker/shortbread crust
1/2 cup Hershey cocoa
1 1/4 cup sugar
1/3 cup cornstarch
1/4 tsp. salt
3 cup milk
3 Tbsp. butter
1 1/2 tsp vanilla
1 1/2 sweetened whipped cream

Method

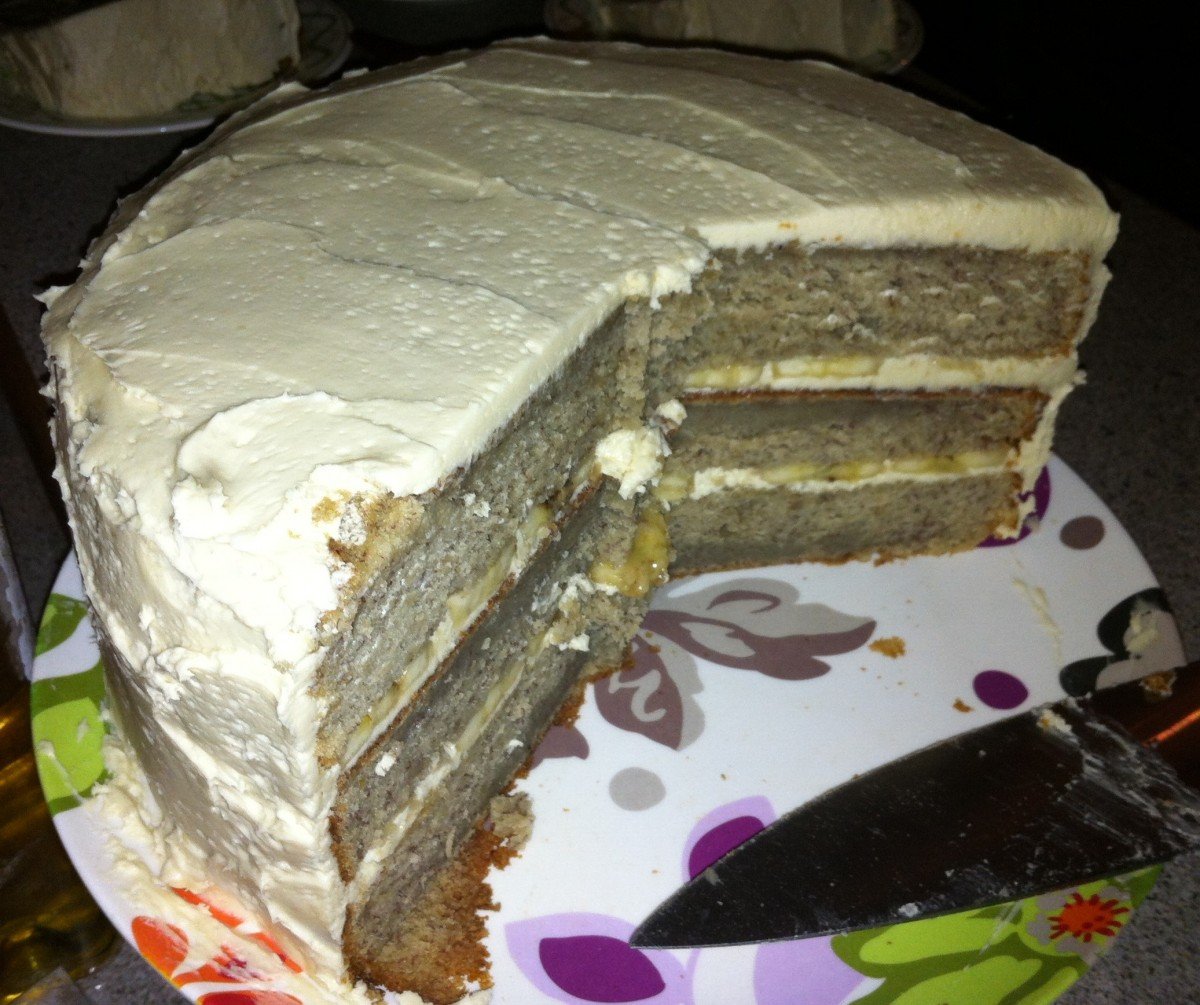
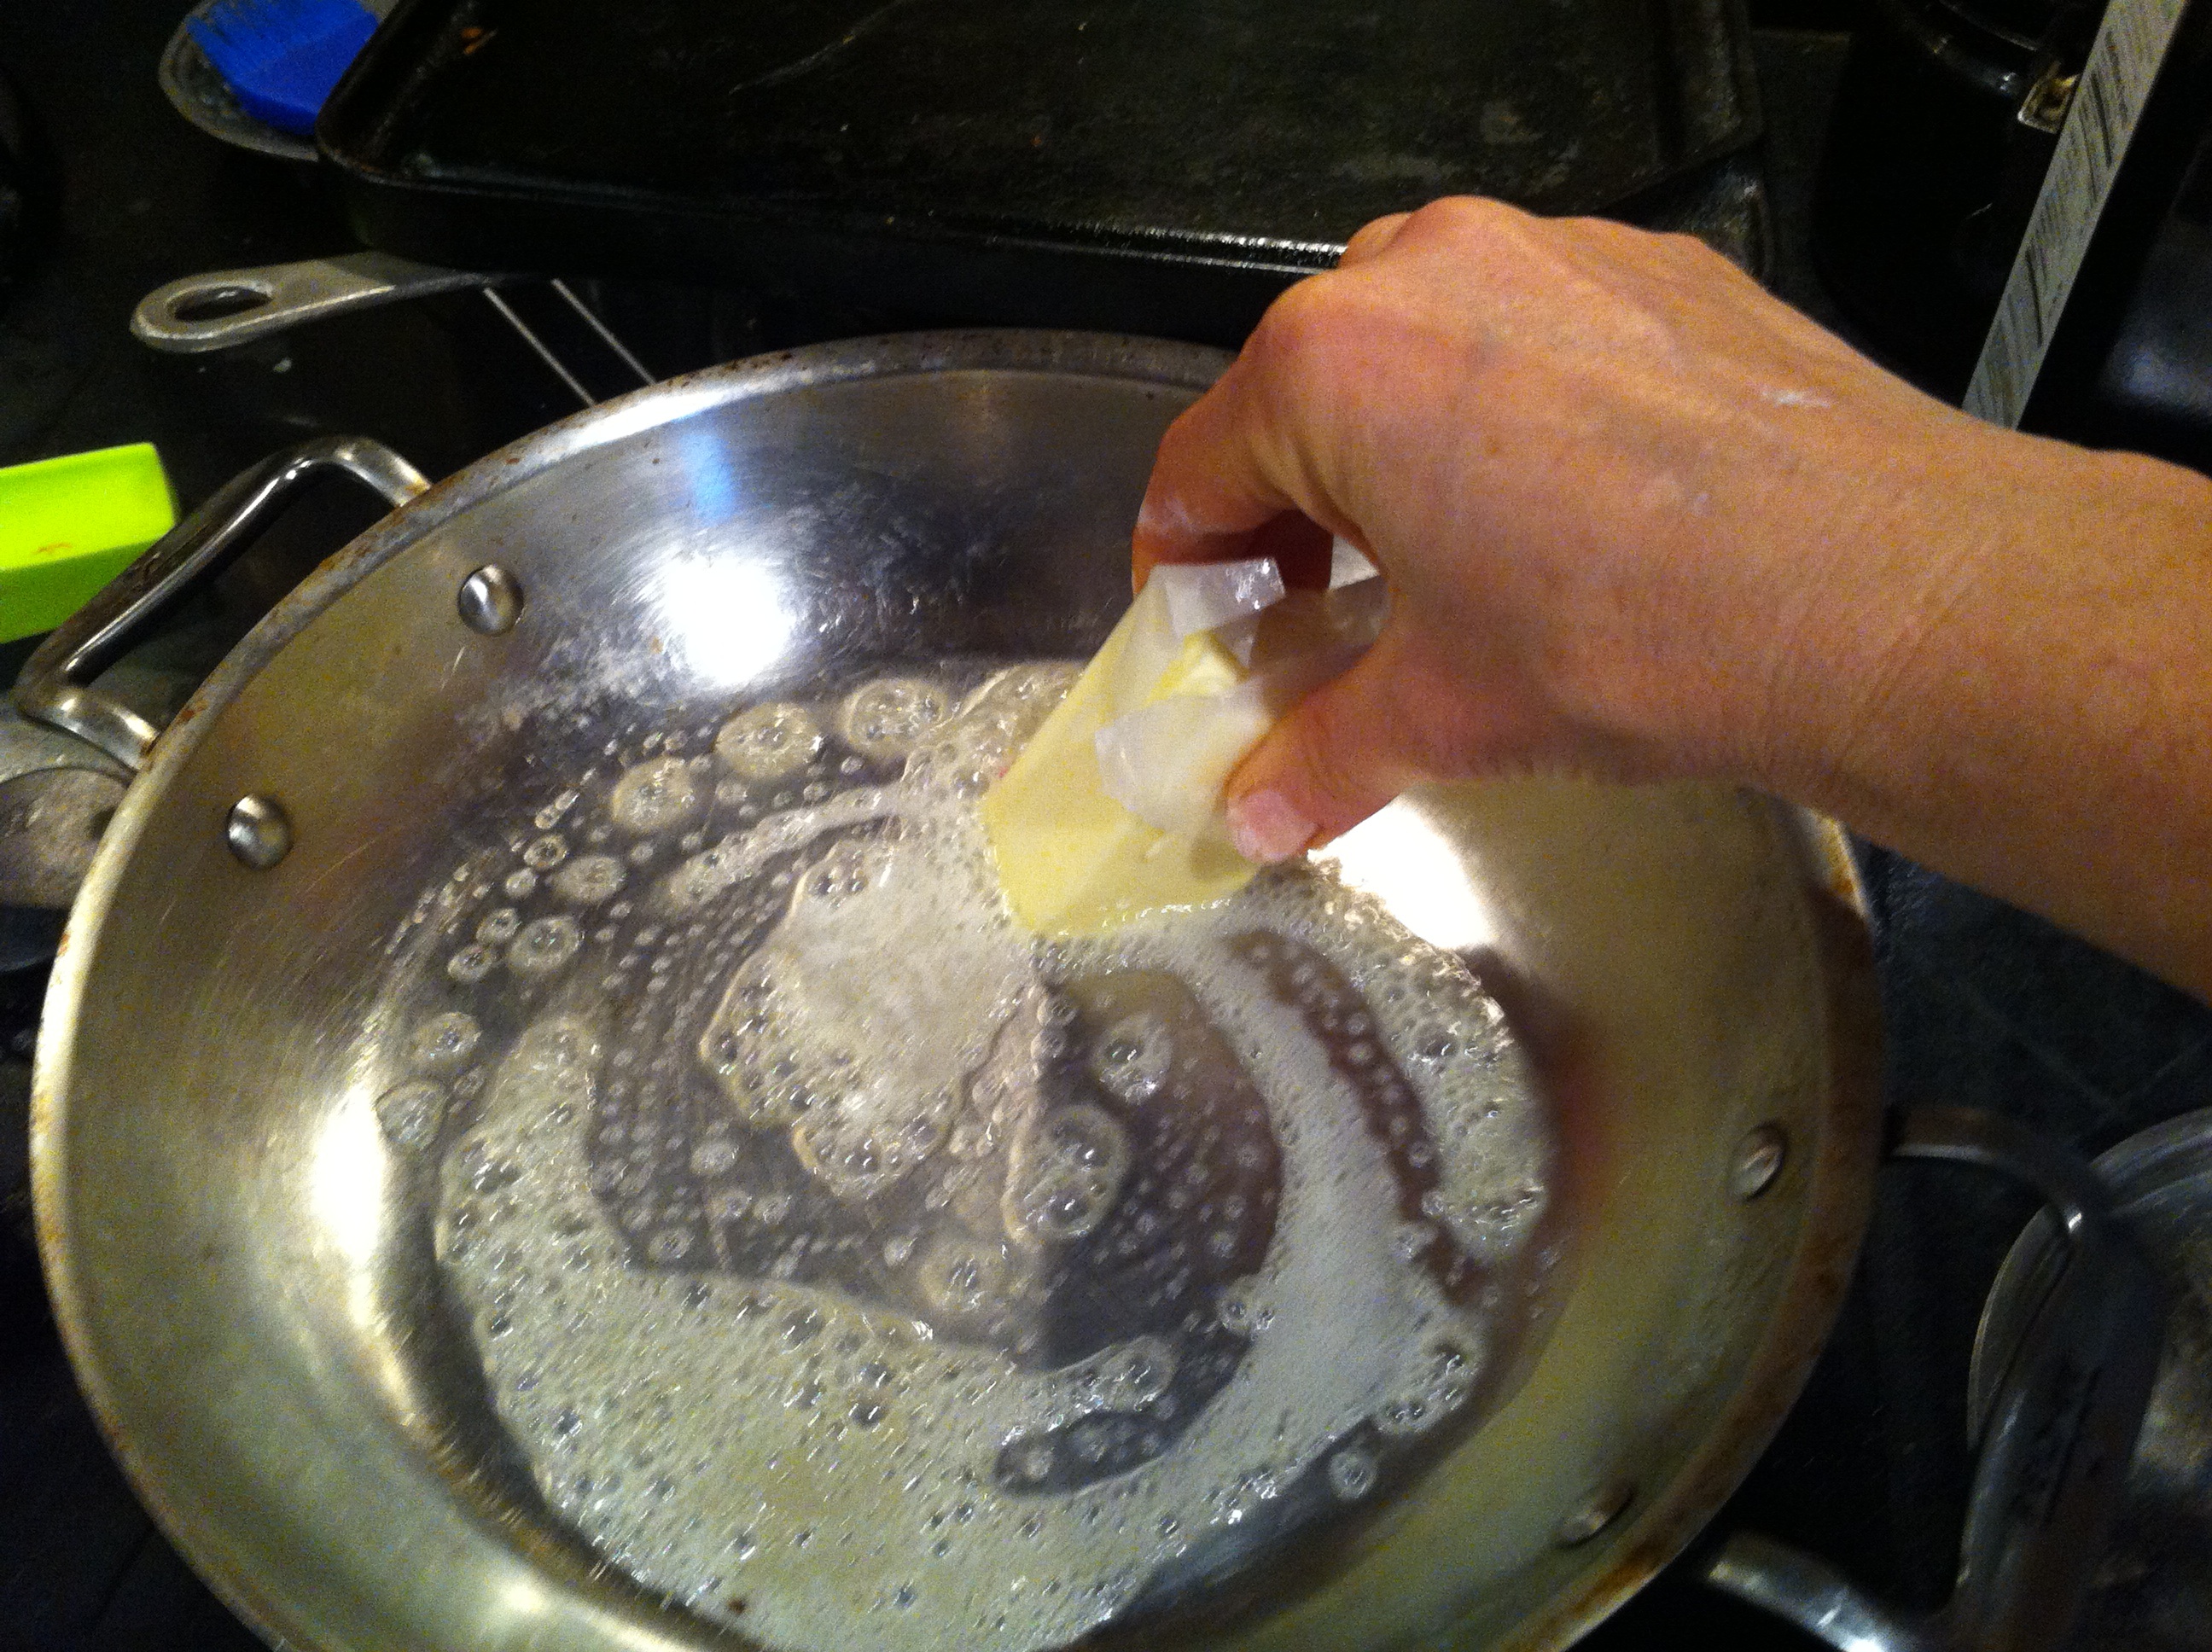
Combine cocoa, sugar, salt and cornstarch in a medium saucepan. Gradually blend milk into dry ingredients, stirring until smooth. Cook over medium heat, stirring constantly until filling boils; boil 1 minute.  Remove from heat, blend in butter and vanilla. Pour into  pie crust, carefully press plastic wrap directly into pie filling. Chill 3 to 4 hours.

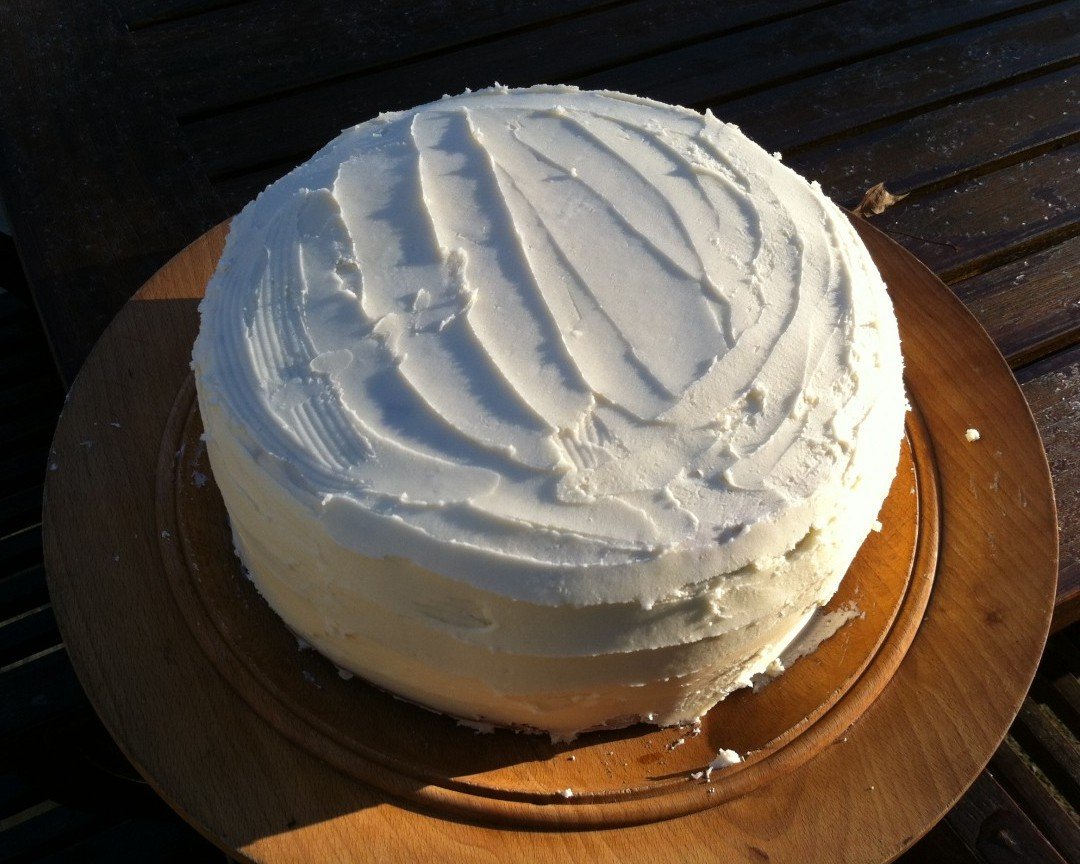
Garnish with whipped cream, creating a cute little snow ghost if you like. And now for the totally unnecessary step that is key to keeping the legend alive. Set pie outside again to “cool” after decorating. Do your best to forget about it for a bit then check to see if the snow ghost visited and took a piece.

Snow ghost pie after ghost

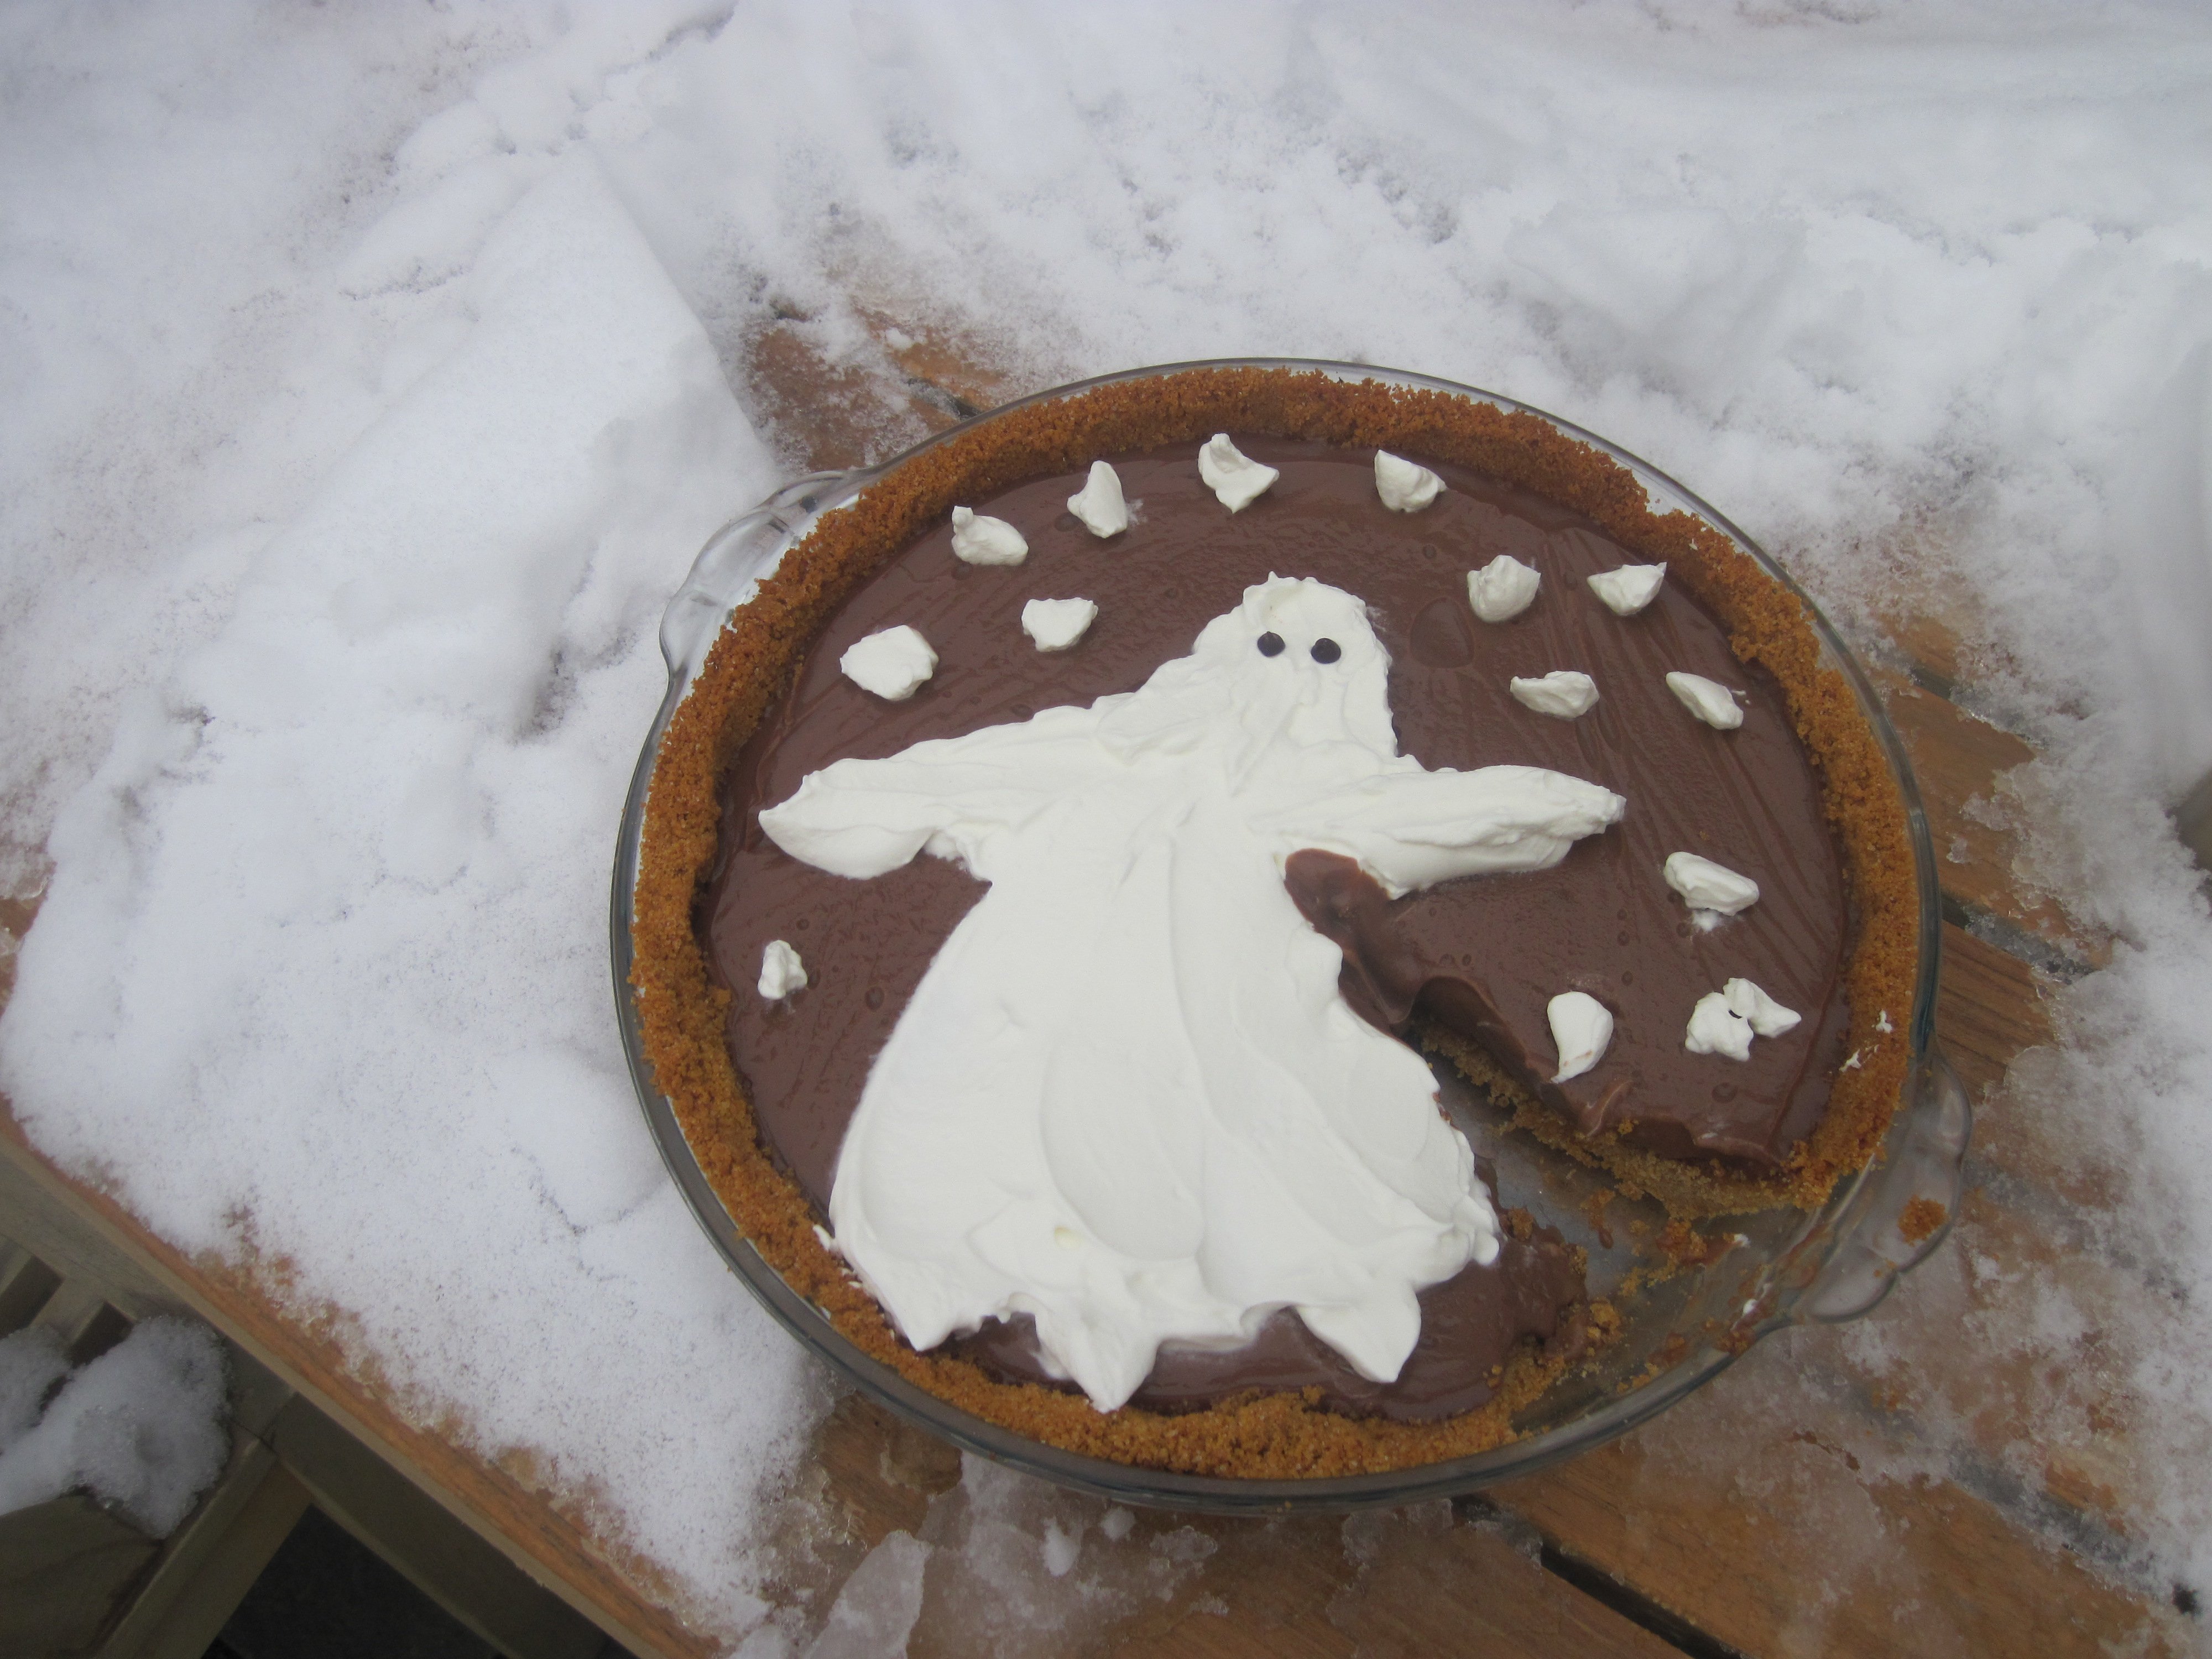
Apres ghost. He wasn’t very hungry this time.
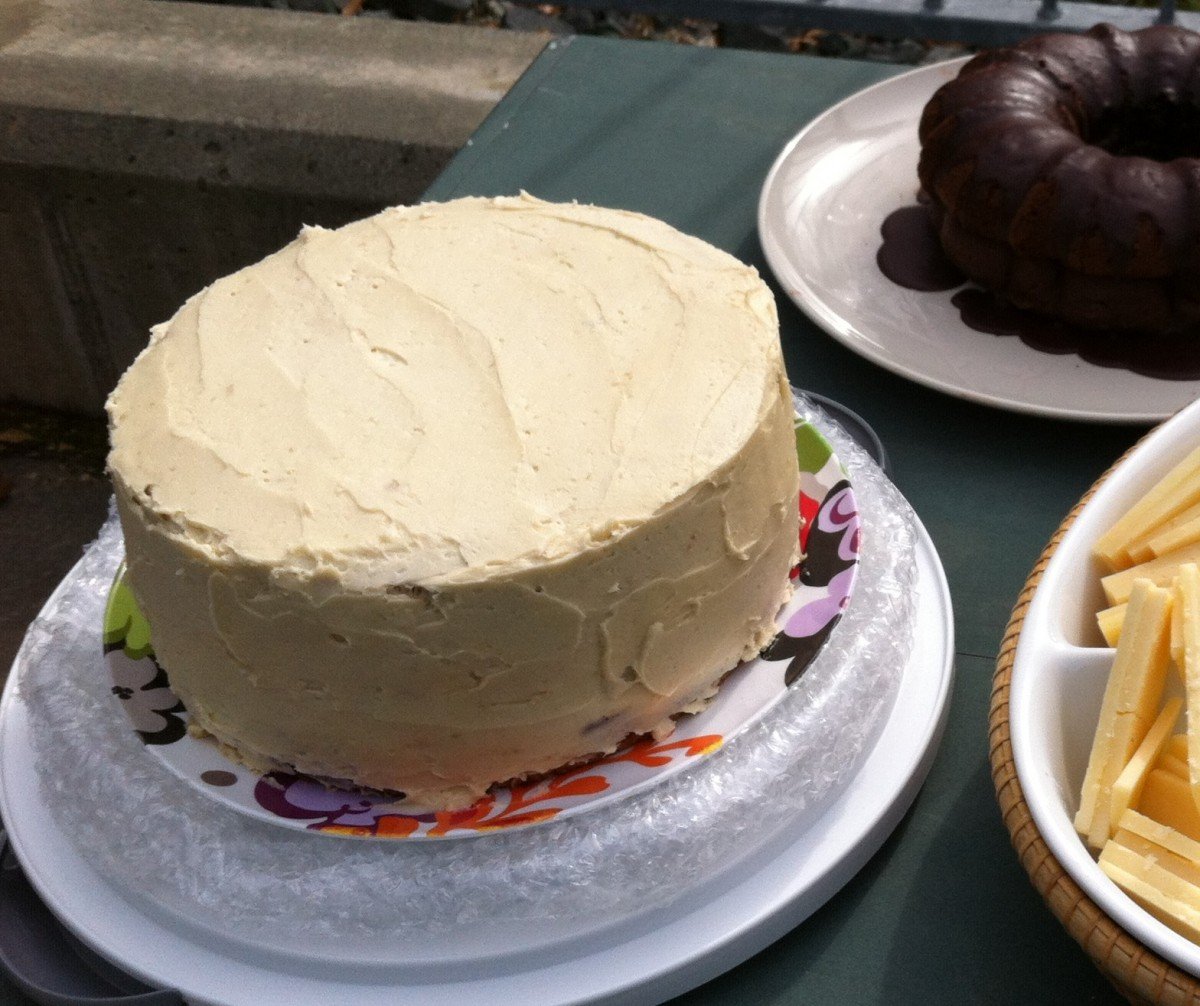
Snow ghost pie pre ghost

Pre-ghost pie


Bringing it:

This is an excellent dessert to bring to a family or kid gathering. Whip the cream and bring it separately so you can decorate the pie there and then set it out to “cool” before dessert. Just make sure it is not anywhere enticing to dogs (or squirrels).


Thai Coconut Corn Soup

Hiking weather, soup weather, Lonsesome lake

Baby it’s cold outside. Time to pack up some soup

Yes, soup for you! In looking at our Bring It repertoire one might think we never make soup. The fact is, especially this time of year I am something of a “Soup Nutsy,” cooking up soup and broth all the time and bossing it into as many family meals as possible. The problem is that I never use a recipe, which makes sharing the love problematic. I’ll work on that, as well as decent soup photos which apparently are no small feat.

In the meantime, I offer you this super excellent slightly spicy soup that can be made almost entirely out of non perishable pantry items, which allows you to plan ahead, stock up and whip it up in a pinch.

I discovered this while desperately searching for something vegan and gluten free to make for a friend recovering from surgery. The next time I made it was as a last minute punt for a moonlight winter hike. I threw it together in record time and chucked it in a Thermos. It was a huge hit.

The key is to resist any urge to use up the dirt cheap cattle feed grade frozen corn tucked away in your freezer and spring for the Birds Eye white and gold good stuff, or even the canned white shoepeg corn. Also, when I first made this I could not get to our super groovy coop for the Thai red curry paste so I used Tikki Masala curry paste in the International section. It’s milder so I used more and it was similarly excellent. And might I say, if gluten is your bag, baby, this goes excellently with Easiest French Bread Ever.

Ingredients

1 Tbsp light olive oil
3 cloves garlic, minced
4 to 5 scallions, white and green parts, thinly sliced
1 medium red bell pepper, cut into short, narrow strips
Two 15-ounce cans light coconut milk
1½ cups rice milk
One 16-ounce bag frozen corn
2 tsp good quality curry powder
1/4 tsp Thai red curry paste, more or less  to taste
1 tsp salt, or to taste
1/2 cup minced fresh cilantro

Method

Heat the oil in a small soup pot. Add the garlic, the white parts of the scallions, and the bell pepper. Sauté over medium-low heat  until softened and golden, about 2 to 3 minutes.

Add the coconut milk, rice milk, corn, curry powder, the green parts of the scallions. If using the curry paste, dissolve it in a small amount of water before adding to the soup.

Bring to a rapid simmer, then lower the heat. Cover and simmer gently for 5 minutes. Season with salt and remove from the heat.

Serve, passing around the cilantro for topping.

Yield: 6 servings.


Blue Ribbon Banana Cake

Blue-ribbon-banana-cake-amateur

Banana cake: the amateur version

Officially this is called double banana cake and it hails from a restaurant in Winnipeg via Bon Appetit’s Favorite Restaurant Recipes. That’s the official story of provenance. But in these parts, it is called *Blue Ribbon Banana Cake because it won first prize at the Sandwich Fair. If you have ever seen the line of entries for baking contests at this particular country fair, you are by now suitably impressed.

My dear friend, a humble, wildly talented cook and baker (whose masterpieces are created in a galley-sized kitchen) prefers to live in the witness protection program when it come to her prowess. So she spent years quietly contemplating entering one of her fabulous desserts in the fair. My only advice to her was to avoid the pie category, the judging of which I suspect is rife with nepotism. Pie, it seems, is the signature specialty of practically every revered country cook. And besides, who wants to spend weeks or months perfecting a pie crust when there are masses of women who can whip up a better one guided solely by instinct? After making this suggestion I tried her banana cake and there was no longer any doubt about how to make her fair debut.

With six bananas in the cake and two more layered in between, this cake is dense, moist and oh-so-fresh tasting. The real secret, however, is in the kosher salt, that gives both cake and frosting the blue ribbon sass. In deference to the champ, I made my version just as the recipes says and did not attempt to copy her tweak, which is to make it in three pans as a triple layer cake. Desserts are not my specialty, so the prospect of two layers of slippery bananas vs one was just too daunting. As it was, the actual blue ribbon winning cake had to be hastily rebuilt just prior to its fair entrance thanks to a surprise boulder in the parking field.

At any rate, if you have an occasion or a special meal or a whole lot of ripe bananas make this cake! And if you’re bringing it somewhere, do not expect to return with leftovers. Guests WILL divvy up any remains and spirit them away.

Blue-ribbon-banana-cake-pro

Blue Ribbon Banana cake: the Pro version. Even the grand marnier chocolate cake takes a back seat.

Double-banana- cake-served

The triple layer pro version, up close and personal.

 Ingredients

CAKE

1 1/2 cups (3 sticks) unsalted butter plus more for pans, room temperature
3 3/4 cups all-purpose flour
1 1/2 tsp baking soda
1 1/4 tsp kosher salt
2 1/4 cups sugar
6 large eggs
3 cups coarsely mashed very ripe bananas (about 6 large)
3/4 cup sour cream

FROSTING

1 cup (2 sticks) unsalted butter, room temperature
4 cups powdered sugar
1/2 cup heavy cream
1 tsp vanilla extract
1/2 tsp kosher salt
2 ripe but not mushy bananas, cut crosswise into 1/8-inch slices

Method

CAKE

Preheat oven to 325°. Butter two 8″-diameter cake pans with sides 2″ high. (The pro uses 3 pans for triple layer). Line bottoms of pans with parchment paper rounds. Whisk flour, baking soda, and salt in a large bowl. Using an electric mixer, beat 1 1/2 cups butter and sugar in another large bowl until light and fluffy, 2–3 minutes. Add eggs one at a time, beating to blend between additions. With mixer on low, gradually beat in flour mixture, scraping sides of bowl. Mix in bananas, then sour cream. Divide batter between pans.

Bake cakes until a tester inserted into the center comes out clean, 50–55 minutes. Let cool for 20 minutes in pans on wire racks.

Invert cakes onto wire racks; let cool completely. Remove parchment. Using a serrated knife, trim off rounded tops. (Slacker alert–I did not do this because my cakes were not very rounded. However, this is probably key to sound architecture.)

FROSTING

Using an electric mixer, beat first 5 ingredients in a large bowl until light and fluffy, 6–7 minutes.

Place 1 cake on a plate. Spread 1 cup frosting over. Arrange banana slices on top. Top with second cake. Spread a thin layer of frosting over top and sides of cake; chill for 30 minutes. Spread remaining frosting over top and sides of cakes.

Bring It!

After being in the fridge the cake is plenty sturdy and can simply be covered in plastic wrap on its platter. See story above and do position the cake wisely in case of any unforseen bumps. Those bananas can get mighty slippery.

*An observer did quietly admit that the first reaction by a judge upon tasting this cake was “Holy Crap!” Even though that sums up everyone’s first reaction to this cake, “Holy Crap Cake” just didn’t sound right.

Banana cake with first prize ribbons

To the victors, the spoils.


Pumpkin Millet Muffins

Pumpkin Patch extraordinaire!

Pumpkin Patch extraordinaire!

In case you haven’t noticed, there has been a common theme to many of my postings lately – MILLET!  I can’t get enough of the stuff. This millet muffin recipe rocks like all the other recipes containing this fabulous grain.  They add a crunch that makes everyone light up and smile.

In addition to my fondness for millet, I was feeling remiss in not posting a recipe with pumpkin yet this season.  I have cut, carved, scooped out, and cooked many a pumpkin over the past couple months so for this round, I took the cheater’s route and bought a can of pumpkin puree.  But no shame in making things easy for yourself, right?  And the canned pumpkin works really well!

I adapted this recipe from one of my favorite websites – Joy the Baker. She used chocolate chips in her recipe, which is a great way to go.  I decided to go the healthier route and use walnuts and raisins instead.   Either way, it’s a win-win.  These muffins are dense, filling, yummy, and mostly healthy.  Enjoy!

Makes about 16 smallish muffins

Ingredients

1/2 cup vegetable oil
1/2 cup honey
1/4 cup brown sugar
2 large eggs
1 cup pureed pumpkin
2 tsp pure vanilla extract
2 cups whole wheat flour
1/2 tsp salt
1 tsp baking soda
1 tsp ground cinnamon
1/4 tsp ground nutmeg
1/2 cup dry millet
1/4 cup buttermilk
1/4 generous cup chopped walnuts
1/4 generous cup cranberries

 Method

Preheat oven to 325 degrees and line muffin tins with paper or foil liners.

In a large bowl, mix together oil, honey, brown sugar, eggs, pureed pumpkin, and vanilla extract.

In a medium bowl, mix together flour, salt, baking soda, spices, and millet.

Add dry ingredients, all at once, to wet ingredients.  Add buttermilk and fold together.  When batter is almost completely mixed add in walnuts and cranberries.  Mix to combine well but do not over mix.

Spoon into prepared muffins tins.  Fill 3/4 full. Bake 20-24 minutes, until toothpick inserted into the center of a muffin comes out clean. Serve warm  and eat immediately  store in plastic bags and eat over several days, or freeze and pull them out as needed.


Guinness Fondue

Fondue Fixin's

Because we cannot live on bread alone, we have fondue.

Beer and cheese—it’s what’s for dinner. I realize I am pushing the season a bit with après ski fare, but we get really excited about the arrival of winter in this household. It’s also Friday, and in keeping with a tradition started by our dearly loved and sorely missed neighbors (come back from Sarajevo already you guys!), it’s the day of the week we collectively throw up our hands and say “Uncle!” to dinner planning. Friday is the day for take-out, appetizers, creative leftovers and raiding the Etna store on the way home. When it happens to be a chilly Friday It’s also a perfect night for fondue.

This came from an über healthy, fit mom who I never would have suspected loved beer and cheese so much. It made me like her immediately. Using a dark beer instead of wine is a different taste, and often more appealing to kids who don’t like the wine smell and taste. A little sweeter than traditional fondue, this is great with apples, grapes, potatoes, veggies, of course bread and quite possibly even cardboard. And it’s totally easy.

Ingredients

1 1/2 lb. Cabot cheddar (as sharp as you like it), grated
1 Tbsp flour
1 sprig fresh parsley
1 pinch garlic powder
1 tsp paprika
1 Tbsp butter
2 Tbsp green onion
1 cup Guinness beer- flat
2 tsp lemon juice
3 tsp worcestershire sauce

 Method

Open the beer today and let it get flat…

Combine flour, parsley, garlic powder and paprika.  Toss with cheese, set aside.

Saute butter & onion until soft – set aside

Warm, but do not boil beer, add lemon juice.  Slowly add cheese mixture, stirring constantly.  Do NOT let cheese come to a boil. Allow cheese to melt before adding more.

Add butter/ onion mixture when cheese is melted, turn up heat so cheese will thicken. Stir in worcestershire sauce. Transfer to fondue pot.

Bring It

Someone somewhere has to open a can of Guinness in the morning. Pre-grate and bag the cheese with garlic powder, flour, paprika and parsley. The rest of the chopping and prepping can be done with the group, by the group. You can be a really nice guest and do it all beforehand and arrived with pre-cut bags of veggies, bread, fruit etc. But that might make people envious of your organizational prowess. Your call.


3-3/2-2 Crepes

windoe-2

Four very good reasons to get out of bed in November.

Stick season. Oh yeah. It’s cold, there’s no snow on the ground and its too early for Christmas lights and cookie making therapy. What we need now is a reason to get out of bed. Boom—got you covered! I know, I know. Crepes sound so high maintenance, so NOT what the average person would contemplate whipping up, especially for a weekday breakfast. But I promise you these will set you free, and take barely more time than it takes to toast up some Eggo’s.

The timesaving is twofold. First, the recipe is so simple to remember that your won’t be futzing around finding it. And second, it makes enough that you can use the same batter for two or three days. And I know I said twofold but I forgot a major benny. On any given morning you probably have all the stuff on hand.

If you’re going for sweet you can fill these with any type of jam, or with a bit of granulated sugar. If you’re feeling more meaty cheesy than sweet, then go for a bit of ham and cheese. And if you’re feeling like you need some serious love from your peeps you can fill them with Nutella or Cholliesauce.

Trust me on this: you do NOT have to be French or kitchen savvy in any way to master these—all it takes is a few rounds of practice. If you blow a few just call it crepe shrapnel dust it with a lot of powdered sugar and move on.

Ok, here we go.

Ingredients

3 eggs
3 Tbsp melted butter
2 cups flour
2 cups milk

½ fresh lemon
A wrapped stick of butter for greasing pan (you wont use much of it).

Method

Whirl eggs in a blender. Add butter, flour and milk.

Heat a frying pan (I use my All-Clad double handled one) over medium heat. Hold a stick of butter and coat the hot pan to create a layer. Pour (or ladle) about 1/3 cup batter into pan and tilt the pan to coat the bottom evenly. When the sides lift easily flip entire crepe. Spread desired filling on half of crepe, and fold crepe in half then in quarter. Lift crepe from pan to a serving plate. Dust with powdered sugar and a squeeze of fresh lemon juice.

Butter-in-pan

Greasing the easy way.

crepes-side-1

Side 1, ready to flip.


crepes-side-two

Side 2, ready to fill.

crepes-with-jam

Blurry, but you get the idea.


Store the batter for tomorrow’s breakfast, for an afternoon snack or for any moment that stick season is getting to you. Slip a couple of crepes into a baggie for a great school snack too.

Kale and Brussels Sprout Salad


Kale and Brussels sprouts

It’s time to put down the candy corn and get your green on

The party is OVER. Bring on the kale!

Harsh, I know. And really, at this point does our world need another kale salad? After tasting this one I can happily say, yes! It’s simple, delicious, healthy, moderately addictive, loves to travel and is just a tad decadent with the cheese and almonds. And it is just the thing to rescue you from the Halloween sugar coma. Not that I’d know anything about that.

I highly recommend dressing this well before serving time. When I first had it at a picnic the salad was dressed and tossed before we went on an hour plus hike. It was perfect.  This originally came from Bon Appetit.

Makes 8 to 10 servings

Ingredients

1/4 cup fresh lemon juice
2 Tbsp Dijon mustard
1 Tbsp minced shallot
1 small garlic clove, finely grated
1/4 tsp kosher salt plus more for seasoning
Freshly ground black pepper
2 large bunches of Tuscan kale (about 1 1/2 pound total), center stem discarded, leaves thinly sliced. (I have used regular curly kale too and it was great.)
12 ounces brussels sprouts, trimmed, finely grated or shredded with a knife
1/2 cup extra-virgin olive oil, divided
1/3 cup almonds with skins, coarsely chopped
1 cup finely grated Pecorino

Method

Combine lemon juice, Dijon mustard, shallot, garlic, 1/4 teaspoon salt, and a pinch of pepper in a small bowl. Stir to blend; set aside to let flavors meld. Mix thinly sliced kale and shredded brussels sprouts in a large bowl.

Measure 1/2 cup oil into a cup. Spoon 1 tablespoon oil from cup into a small skillet; heat oil over medium-high heat. Add almonds to skillet and stir frequently until golden brown in spots, about 2 minutes. Transfer nuts to a paper towel–lined plate. Sprinkle almonds lightly with salt.

Slowly whisk remaining olive oil in cup into lemon-juice mixture. Season dressing to taste with salt and pepper.

Add dressing and cheese to kale mixture (see intro above for timing—the earlier the better); toss to coat. Season lightly with salt and pepper. Garnish with almonds.

Bring It!

Dressing, kale mixture, and toasted almonds can be prepared 8 hours ahead. Cover dressing and kale mixture separately and chill. Cover almonds and let stand at room temperature.

Halloween salad bowl

Goodbye October…

Kale Brussels sprouts salad

…Hello November!


Salted Caramel “Cholliesauce”


Halloween and Easter are my favorite holidays. The bar is low, family travel is typically not required and the popular traditions surrounding them involve candy. Candy makes people happy. Temporarily at least. So let’s live in the moment and make some creamy caramel sauce to celebrate Halloween and all the apples just begging to be dipped.

This particular golden elixir is a Bring It! all- star. It features only four ingredients, all of which—if not in your kitchen already—can be procured at a mini mart (ok, not the Maldon sea salt, but nobody will arrest you for using kosher salt). It is easy to make, you can memorize the recipe after one go round, it travels in its own storage jar and it will be a welcome contribution or hostess gift for any occasion. Oh, and it is fabuloso! Use it on ice cream and in 2-2/3-3 crepes (coming soon), drizzle it on pretty much anything or use it as a dip for pretzels, apples or just your spoon.

As for the name, it is a merging of our three sons’ names. We knew we wanted something to be called Cholliesauce, and after Sawyer took one taste he decided this was it. Ollie and Chauncey wholeheartedly agreed.


Ice cream: good

Ice cream: good

Ice cream with Cholliesauce: wayyyyyy better!

Ice cream with Cholliesauce: wayyyyyy better!

Ingredients

2 cups granulated sugar
12 Tbsp unsalted butter, at room temperature, cut into pieces
1 cup heavy cream, at room temperature
1 Tbsp fleur de sel or Maldon sea salt flakes

Method

1. First, make sure you have all of the ingredients ready. Once you start the caramel sauce you have to pay close attention so you don’t burn it. To begin, heat the sugar over medium high-heat in the bottom of a heavy 2-3 quart saucepan. When the sugar starts to melt, start whisking the sugar, making sure to reach into the sides of the pan. The sugar will clump up, but keep whisking. It will continue to melt. When the sugar is melted, stop whisking. You can swirl the pan to move the sugar around.

2. Continue cooking the sugar until it reaches a deep amber color. Make sure you watch the pan very closely. This is where it is easy to burn the caramel. If you are using a candy thermometer (I have tried but am better off eyeing it) you want the caramel to reach 350 degrees F.

3. As soon as the sugar reaches the dark amber color, carefully add the butter. Whisk until butter is melted. If the sugar gets stuck to the whisk, you can switch to a wooden spoon.

4. Remove the pan from the heat and slowly pour in the heavy cream. Whisk until cream is incorporated and caramel is smooth. Whisk in the fleur de sel or Maldon sea salt flakes.

5. Let the caramel sauce cool for about 10 minutes in the pan. Pour the caramel into a large jar or smaller jars and cool to room temperature. Put the salted caramel sauce in the refrigerator and store it there for about a month. Yeah, a month. Good luck with that.


Hard Cider Sangria

The great outdoors. Sort of at its greatest this time of year.

The great outdoors. Sort of at its greatest this time of year.


This week we had a bring-it fest—a group hike/farewell celebration with a picnic at the end. I am humbled by the culinary mojo of the women in this community…by their ability to make kale decadent, to transform a meat and cheese plate into a work of art and to master complex desserts that ought to be illegal. More importantly I love that they can bring it all with deftness and grace.

My contribution, as often is the case, was in the cocktail family. Also not surprisingly, given the time of year, it involved apples. Say hello to hard cider sangria, the step-down program from all those yummy summer drinks. This came from Food and Wine last October.

The only change I made was to triple it, so I could store and transport it in the same big Tupperware I use for freezer daquiris. I liked it so much I made another batch for book group the very next night.

Make it with grocery store hard cider and it is pretty sweet. You might want to cut it with some seltzer. Make it with a really good local hard cider in the wine aisle and it’s a tad more sophisticated (like we care) and less sweet. This recipe has been in my life for four days. Shockingly I have already made it both ways and it’s all good.

Ingredients

  • 1 cup quartered and thinly sliced unpeeled green, yellow and red apples
  • 1 navel orange—quartered and thinly sliced crosswise
  • 1 cup apple juice, chilled
  • 2 Tbsp fresh lemon juice
  • 1/4 cup apple brandy
  • One 22-ounce bottle hard apple cider, chilled
  • Ice

Method

In a pitcher, combine the apples with the orange, apple juice, lemon juice and brandy. Just before serving, add the hard cider. Serve in tall glasses over ice.

Same sangria, All dressed up for an indoor appearance.

Same sangria, All dressed up for an indoor appearance.

Picnic spread

A mere peek at a Bring It bonanza!

Game Day Pulled Pork

Game-day-pulled-pork

In honor of the first day of the World Series, and the official beginning of crock pot season, I present you with the only pulled pork recipe you will ever need. Known elsewhere as “Ultimate Cheater Pulled Pork” via the Splendid Table this recipe is, needless to say, easy. Ridiculously easy. And if you ask the butcher to cut your large hunk of pork into pieces (don’t mention that is it for pulled pork or he/she will try to dissuade you) you won’t have to mess up your pristine (right?) workspace, or even a  knife.

It’s so darned easy that I rebelled against the effort of making the barbecue sauce, opting instead for any of the dazzling array of bottled sauces. But don’t you know we had nary a capful of bbq sauce in the house tonight so I made the sauce and I think even monkeys could do it. If they were really jonesing for pulled pork, that is. At any rate, it’s good to at least know how to make bbq sauce so I recommended at least trying it once. Oh, if you want to make even more friends serve this with Easiest French Bread Ever or Peoples Choice Cornbread and Hero Slaw.

Ok, get the couch ready and find that remote. Here we go!

Game Day Pulled Pork As heard on the Splendid Table podcast, and further poached from The Bitten Word. If you want a picture of it look at theirs, because for the life of me I could not get a decent picture of pork.
Continue reading

People’s Choice Cornbread

Can you guess what season it is? Yep, tailgate season.

Can you guess what season it is? Yep, tailgate season.

Guess what day it is… No not that. It’s time to think about what you’re bringing to the tailgate or whatever event you are enjoying this weekend. I’m going to make it really easy on you. Bring this cornbread! After bringing it to a party a middle school kid actually sought me out on school grounds to ask how he could find the recipe to give to his mom. Any of you with middle schoolers know the magnitude of this. Suffice to say, this cornbread, like Hero Slaw, will make you popular…even in middle school.

I first had this, better known worldwide as Blanchard’s Caribbean Cornbread, at a tailgate and was immediately addicted. It’s pretty dangerous that way. You will notice it is most definitely NOT low fat, low calorie, gluten-free or anything like that, which makes it the perfect thing to share (and to not have lying around your own house in any emotionally weak moments). It is an excellent accompaniment to chili, soups, salads or just a glass of milk. And when you’ve had enough, it likes going to school in a lunchbox.

Before the recipe, however, a note on tailgates. For some reason tailgates seem to be a hall pass on healthy eating, an excuse to dive right into the goopy wings, crazy multi-cheese dips and bubbly meatballs of unknown composition. BUT it is also the perfect venue for a big roastarama with fall root vegetables and, say spicy chunky peanut dip or butternut squash hummus (coming soon). When you bring a big platter of roasted goodness with a few dips you won’t get hunted down at middle school but people will be psyched nonetheless.

So here it is. It works well as muffins but grease and flour the cups well or make your life easier and use liners. The only other note is to beware of addiction, as this almost crosses the bridge from bread to cake.

Ingredients

1 cup  all-purpose flour
1 cup  cornmeal
2 Tbsp baking powder
1 tsp salt
1⁄2 lb (2 sticks)  unsalted butter, at room temperature
3⁄4 cup  sugar
4  large eggs
1 1⁄2 cups  cream-style corn
1⁄2 cup  canned crushed pineapple, drained
1 cup  shredded Monterey jack cheese

Method

Preheat the oven to 325°. Butter and flour a 9-inch square glass cake pan (or up to 18 muffin cups.) Whisk together the flour, corn meal, baking powder and salt in a medium bowl and set aside.

In a mixer, cream the butter and sugar. While the mixer is running, add the eggs one at a time, beating well after each addition. Add the corn, pineapple and cheese and mix to blend. On a low speed, add the dry ingredients and mix until blended well.

Pour the batter into the prepared pan and bake until golden brown around the edges and a cake tester stuck in the center comes out clean, about 1 hour, checking at 50 minutes or so for doneness. (If your pan isn’t quite deep enough to hold the entire batch, just pour the extra into a muffin tin or mini loaf pan. If you’re making a double batch you can use a 9″ x 13″ pan and a smaller square pan.

Bring It!

These are a tad sticky, so if you are transporting muffins and not using liners be sure to separate each layer with parchment paper or plastic.

Cornbread shrapnel--that's what you get if you turn your back before taking some.

Cornbread shrapnel–that’s what you get if you turn your back before taking some.

Best Joni Mitchell Apple Pie

As apple season comes to a close it would be a crime to miss the topic of apple pie. And it would be more of a crime if you did not make an apple pie because you were daunted by making the crust. Despite what the aggro bakers say, it is not a crime to use Betty’s little helper, the refrigerated roll-out crust. I’ll never reveal them, but I know bakers at the highest level who resort to the Pillsbury solution on occasion with no damage to their reputations.

So let’s get to it. I made this pie with the last of our organic (read untended) pears and “Joni Mitchell” apples. You know, “…Give me spots on my apples, but let alone the birds and the bees now…”. I based it on the King Arthur Flour best apple pie recipe with the following slacker alterations:

Obviously, I skipped the homemade crust. I used pears and apples, did not peel them (they’re organic fergawdssake), and grated half the apples before I realized I had the wrong blade on the cuisinart. I subbed maple syrup for the apple cider syrup, used flour instead of “pie enhancer,” and subbed cinnamon and ginger for apple pie spice. Alright already! Here it is, and it was outstanding.

Ingredients

Crust:
Your favorite refrigerated roll-out pie crusts.

Filling:

3 1/4 pounds (about 9 whole apples, 10 cups) Cortland or other baking apples or pears, cored and sliced
3/4 cup (5 1/4 ounces) sugar
1 tsp cinnamon
1/2 tsp ground ginger
1/4 cup (scant) maple syrup
1 Tbsp rum (optional. I didn’t go there, but why not?)
2 Tbsp flour
1/8 tsp salt
2 tsp vanilla extract
juice of 1/2 lemon (about 2 Tbsp)

Method

To make the crust:  Take the box out of the fridge and let it warm up a bit.

To make the filling: In a large bowl, stir together the filling ingredients, mixing till well-combined. Set aside. (I LOVE that part!)

Assembly: Unfurl one piece of pie crust and lay it into a 9-inch pie plate. Spoon in the filling. Unfurl the other piece, lay it atop the filling, and seal and crimp the edges. Brush the top crust with milk, and sprinkle it with coarse sugar, if desired. Or, save out a bit of the crust, and cut decorative leaf designs, laying them in the center of the crust or around the edges. (yeah, right.)

Baking: Place the pie on a baking sheet to catch any drips. Bake in a preheated 425°F oven for 15 minutes. Reduce the heat to 375°F, and bake for an additional 45 minutes, or until the top is brown and filling is bubbly. Yield: 1 pie, about 10 servings.

pears-and-apple

Joni Mitchell apples and pears–not the prettiest, but darned tasty.


Crackle Bars

To balance all those healthy paleo and endurance crackers, I present to you a very unhealthy form of crack…er. This is ridiculously yummy and easy. Healthy? Not so much. Somebody brought a batch of this to book group and warned of its addictiveness. I started giving it as a neighborhood holiday gift and it quickly became an all-season, all-occasion favorite. It makes excellent bake sale material (which puts it in the Positive Snacks category), is darned good on a hike (add it to Better in a Backpack) and is a huge hit with hungry, sports-playing teenagers, who inspired the current batch.

Crackle-love

Child Labor–Happy and ready to spread.

And on the topic of kids, they can help you out here. They love the process of making it, especially spreading the melted chocolate chips (Hello bake sales!). It’s equally good with saltines or graham crackers, so use what you prefer or what is in your cupboard. These were introduced to me as “4th of July Bars” but the name did not stick. You do need to crack them to break them into pieces. And they’re made with crackers. The fact that they are as frighteningly addictive as something with a similar name is purely coincidental.

Ingredients

1 cup light brown sugar
1 cup butter
Saltines or graham crackers
12 oz milk chocolate chips (ultra cheapo brands do not always melt as well)
Chopped nuts, roasted and salted (your choice–I love tamari almonds but my kids prefer peanuts which are easy and cheap so I don’t argue.)

Method

Have ready a 13 x 9 pan: foil lined and lightly greased. Preheat oven to 400 degrees.

Line the pan with a single layer of crackers. (saltines fit perfectly)

Combine sugar and butter in saucepan.  Bring to a boil and boil for 4 minutes exactly – no more.

Pour boiled mixture over the crackers. Bake for 5 minutes – no longer!

Remove from oven and while very hot scatter the chocolate chips on the surface. Spread chips out evenly as they melt and soften.

Scatter with chopped nuts. Refrigerate until hardened.  Then cut or break into pieces.

Makes a bunch.

crack-cooling

The cool down phase.

crack-smooth

The smoothing phase.


Bring It!

Store in a gallon-sized ready to tote ziploc bag in the fridge, or in individual plastic baggies that you can dole out as necessary. Make it fancy with tissue paper and a ribbon.

Endurance Crackers

Caponata with Endurance crackers fresh from the cooler.

Caponata with Endurance crackers fresh from the cooler.

Because it is fall, and traditionally (for me) a time to cleanse (curse you watermelon sangria!), I was planning to do a cleans-y post. Mostly I needed a break from apple mania and an excuse to share the Endurance Crackers that I started making this summer and that, it turns out, are something of an Internet sensation. As far as I know they originally came from an excellent vegan site called Oh She Glows. I am very un-vegan but I love vegany things so naturally these seedy babies looked right up my alley. I made them a bunch this summer, and shared them around to universal approval from kids and adults, vegans and carnivores.  They are full of good stuff and free of all the usual perps—gluten, nuts, grains, sugar.

For a fleeting moment I even thought they would pass the paleo test.  But noooooooooo. Apparently chia seeds—like my beloved chickpeas and black beans—don’t make the cut. The little wonder food, secret pellets of the Incas, bearer of magical running power has a husk and therefore it’s a no-go with the cave man clan. But chia seeds are key to the whole gig because they have this crazy power of gelling things together which gives the simple mix a way to morph into a legit cracker.

Long intro. Here is the recipe, with advice and tweaks from myself and other cybercrackerphiles. There is even a sweet variation below (thank you Rowdy Baker) that is pretty tasty.  And paleo peeps, I have failed you again… unless…maybe…click here and see.

Original Endurance Crackers from Oh She Glows

Yields about 22-24 large crackers

Ingredients

½ cup chia seeds
½ cup sunflower seeds
½ cup pepita/pumpkin seeds
½ cup sesame seeds
1 cup water
1 large garlic clove, finely grated (I just used my garlic press.)
1 tsp grated sweet onion
¼ tsp. kosher salt (Crazy salt is darned good too.)
Olive oil for brushing, if desired

Optional: Herbamare, kelp granules and your choice of additional spices and fresh herbs to taste. (I’ve never jumped on the kelp wagon but have tried cumin, paprika and curry as well as chopped fresh rosemary, dried oregano, cracked pepper. You get the picture. One person adds a puree of six or so dates and cinnamon for a sweet version.)

Method

Preheat oven to 325° and line a large baking sheet with parchment paper.

In a large bowl, mix the seeds together. In a separate small bowl, mix the water, grated garlic and grated onion. Whisk well.

Add the water mixture to the seed mixture; stir until thick and combined. Season with salt and optional spices/fresh herbs.

Spread the mixture onto the prepared baking sheet with the back of a spoon (or your hands) until it’s less than ¼” thick.* It may be little runny, but just keep smoothing. If it becomes too thin in parts, just patch them up.  Bake for 30 minutes. Remove from oven. Loosen with a long flat spatula or pizza peel, cover with another greased or parchment lined cookie sheet, and invert. Alternatively cut into smaller squares and flip. Don’t worry if it breaks in a few places. They’re crackers, right?

At this point, you can deeply score the surface into whatever size crackers you like (diamonds are shmancy. Rectangles and squares are perfectly fine.) This is also when you can go pro and brush the surface lightly with oil to make them nice and crispy.

Bake for another 30 minutes, watching closely after about 25 minutes. The bottoms with be lightly golden in color. Allow to cool completely on the pan and break into pieces. Store in a covered container. They freeze well too.

*Newbie cracker maker? Make it even easier on yourself by using two baking sheets and forming smaller, easier to flip rectangles.

Sweet Version, care of The Rowdy Baker

½ cup raw sunflower seeds
½ cup raw sesame seeds
½ cup raw pumpkin seeds
½ cup raw chia seeds
1 tsp kosher salt
1 cup water
5 ounces dark (at least 70% cocoa) chocolate, finely chopped
1 cup raisins (optional)

Method

Prepare as above through final cooking and then:

Remove from oven and sprinkle evenly with the chopped chocolate. Wait a few minutes and then spread with a flat spatula. Sprinkle with raisins if desired.

When the chocolate has hardened (you may refrigerate it if you wish, to hurry it along) break into pieces and store in an airtight container.


Paleo Crack…ers

Plate of possibly paleo,  definitely delicious crackers

Plate of possibly paleo, definitely delicious crackers

And then it happened. Just when I thought I would never find a decent snack that would pass the paleo test (note: I do not have the discipline to be a paleo eater, but in case I find it someday I want to be sure I could eat something other than bacon, cauliflower and coconut oil), I found these crackers. Even better than how good they are, is the fact that they contain no exotic or expensive ingredients—sorta what you would expect from a site called “brokeassgourmet.”  Gabi, the aforementioned gourmet, describes her Simple Seed Crackers crackers as “shortbready” which I thought was odd, but after my 8th cracker or so I must say I agree. I suspect the sesame seeds may be in a gray area with paleos (they have a husk and all—see chia seed reality check in Endurance Crackers), but I’m going to enjoy these for a few days before I ask.

Paleo Crack AKA Simple Seed Crackers straight from brokeassgourmet.com

 Ingredients

1 cup unsalted roasted dry, shelled sunflower seeds (you could also use salted ones, but then make sure to use a bit less salt when you mix the dough)
1 cup sesame seeds
1/4 medium onion, minced
1/2 tsp salt, plus more for sprinkling
1/2 tsp pepper
2 Tbsp water (or more as needed)
extra virgin olive oil, for brushing
(FYI: Total Cost of Ingredients –$3.50)

Method

Preheat oven to 350 degrees. Place sunflower seeds in a food processor and process for about 2 minutes, until smooth (the mixture will resemble a dry peanut butter). Add onion, sesame seeds, salt, pepper and water and pulse or stir, just until a thick, paste-like dough comes together.

Uniform thickness is key.

Uniform thickness is key.

Place the dough on a piece of parchment paper and shape into a thick rectangle or square, to guide the dough’s shape while you roll it. Place a second piece of parchment paper over the dough and roll with a rolling pin until the dough is about 1/8” thick.

Remove the top piece of parchment paper and use a sharp knife or pizza cutter to lightly score (but not cut all the way through) the dough into squares (any size will work—mine were 2 1/2” squares). Slide the parchment paper with the dough on it onto a baking sheet and bake for 17-20 minutes, or until golden-brown (be careful not to let the crackers get too dark—burned sesame seeds have a foul flavor).

Let cool for 10 minutes, then gently break apart along the scored lines (don’t worry if they’re imperfect—they’ll still be delicious).

Makes 24-32 crackers, depending on size.


apples

Apple Cheddar Scones

Summer is skipping out and it’s just plain sad every year. But on the bright side, it’s apple season! We’ve only got a row of apple trees—six or so, with two pear trees thrown in—but darned if that doesn’t serve up more fruit than I can handle. It hasn’t even gotten chilly yet and already the apple fest has begun. We’ve made applesauce, apple cider, apple cider syrup (yum!), apple muffins, apple pie, apple compote and just now the first batch of apple cheddar scones. Oooh baby–they are the ultimate in apple goodness. Sadly, they don’t use many apples (get into cider and sauce for that), and they have a few more steps than my favorite slacker scones. They even require eggs fergawdssake, which is so un scone-y. But they’re worth it, and they work any time of day for any type of occasion, from picnic to shmancy party.  This recipe, slightly tweaked at every stop, came via The Bitten Word and they got it from a book called The Perfect Finish. So there’s the provenance. If you need apples come on over.

Ingredients

Makes 6 generous scones (at least 8 normal sized ones).

2 firm tart apples (1 pound. I used about 5 small ones)
1 1/2 cups all-purpose flour
1/4 cup sugar plus 1 1/2 tablespoons for sprinkling
1/2 Tbsp baking powder
1/2 tsp salt plus additional for egg wash
6 Tbsp unsalted butter, chilled and cut into 1/2-inch cubes plus additional for baking sheet if not lining it with parchment
1/2 cup sharp cheddar, shredded (white is recommended, rogue westerners.)
1/4 cup heavy cream
2 large eggs

Method

Position a rack at the center of oven and preheat oven to 375 °F. Line baking sheet with parchment paper.

Peel and core apples, then cut them into chunks. Placed them in a single layer on a baking sheet lined with parchment paper and bake them until they take on a little color and feel dry to the touch, about 20 minutes. They will be about half-baked. Let them cool completely (in the fridge if you are eager). Leave oven on.

roasted-apples

roasted-apples

Sift or whisk flour, sugar, baking powder and salt together. Set aside. Place butter in the bowl of an electric mixer with a paddle attachment (or a hand mixer or by hand, but it is more work), along with cooled apple chunks, cheese, cream and one egg. Sprinkle flour mixture over the top and mix on low speed until the dough just comes together. Do not overmix.

Generously flour your counter top and place the scone dough on top of it. Sprinkle with flour. Use a rolling pin to gently roll (or use your hands to pat) the dough into a 1 1/4-inch thick, 6-inch circle. Cut circle into 6 wedges. Transfer them to a baking sheet that has either been buttered or lined with a fresh sheet of parchment paper. Leave at least 2 inches between each scone.

scones pre baking

Ready to bake

Beat remaining egg in a small bowl with a pinch of salt. Brush the scones with egg wash and sprinkle them with remaining tablespoon of sugar. (I have blown off the egg wash on occasion, which is just fine, but it actually does make it better.) Bake until firm and golden, about 30 minutes. With a spatula, lift them to a wire rack to cool for 10 minutes. Eat. Enjoy. Repeat.

Bring It!

Baked apple cheddar scones

Fully baked and ready to be demolished

Scones can be made ahead of time and stored unbaked in the freezer until you need them. Just take them on their baking sheet and at your destination brush them with the egg wash, sprinkle them with sugar, and bake them still frozen for just a couple extra minutes. Full disclosure, I have never done this, but it seems like a good idea. I hear these are not so awesome the next day, but ours have never lasted long enough to test that.


Zucchini Corn Summer Swansong Salad

Corn-zucchini-salad-meal

It’s the end of summer, you can’t go a day without eating corn because it’s so darned good, and zucchinis appear in your car when your back is turned. What’s a girl to do? Make this salad! I almost didn’t make it because it looked so simple. That was a week ago and now I’ve made it three times. I even put it to the Bring It test, delivering it with a loaf of easiest french bread ever. It meets all the Bring It criteria, especially the part about being EASY.

Recipe from Giada De Laurentis via the Food Network

Ingredients

Vinaigrette:
2 tablespoons fresh lemon juice
1/4 cup extra-virgin olive oil
1/2 teaspoon salt
1/4 teaspoon freshly ground black pepper

Salad:
1 cup garbanzo beans
2 medium zucchini, diced into 1/4-inch pieces
1/2 cup fresh corn kernels (cut off leftover cobs from last night’s BBQ)
1/2 small red onion, thinly sliced, rinsed
5 romaine lettuce leaves, cut crosswise into 1/2-inch strips
1 ounce Parmesan, crumbled into 1/4-inch pieces

Method

For the Vinaigrette: In a small bowl, whisk together the lemon juice, olive oil, salt, and pepper until combined.

For the Salad: Place the garbanzo beans, zucchini, corn, red onion, and lettuce in a large salad bowl. Pour the vinaigrette over the salad and toss well. Garnish with the crumbled Parmesan cheese and serve.

Dressed salad and sliced romaine. These two should really get together

Dressed salad and sliced romaine. These two should really get together


Bring It!

Cut the romaine and put it in a sealed container. Combine all other ingredients (except the parmesan), toss with dressing and put in another sealed container. I actually like to let it sit a bit in the fridge to make the onions less aggressive and to let the flavors all schmooze together. Just before serving combine both containers into a serving bowl, toss and add the parm on top. To be totally honest I have yet to add the parm but I’ll bet that takes this over the top.

Watermelon Sangria

I don’t think it’s going to get any better than this. Summer that is. And whatever else I might find to put in this glass. This recipe comes straight from Joy the Baker, with gratitude and reverence. If you don’t follow Joy you should. She’s smart, funny, and wildly successful at creating ridiculously good food and drink.  And she does not fuss. When I saw this recipe I immediately thought, “Great! A way to use up those three half bottles of Limoncello in my freezer.” Flash forward a month later and there I am making up an excuse to go to the grocery store so I can really go next door and buy Limoncello.

Trust me though, this is worth a new bottle of Limoncello. So as I said this comes straight from Joy the Baker BUT I have notes for practicality. Joy lives in urban California where a “small” watermelon is the size of a small melon. I live in rural NH where a small watermelon is the size of a large baby. Plan accordingly. Joy muddles things artfully in stages and I slammed all the fruit together in a blender.

Also, if you’re wondering if you can store the leftovers a la freezer daquiris, wonder no more. Yes! In fact the entire first batch (which my impatient not-gonna-go-to-the-store-one-more-time self made with boxed pinot grigio and no strawberries) went straight to the freezer and was a darned good consolation prize between batches. It has no high fructose corn syrup laden limeade in it though, so the texture ends up more icy.

Enough said. Dig out that Limoncello and prepare to be refreshed!

Limoncello. Out with the old, in with the new.

Limoncello. Out with the old, in with the new.

The rose of choice. French, screw top, cheap. All good!

The rose of choice. French, screw top, cheap. All good!


Watermelon Strawberry Citrus Sangria 

makes a big bunch

Ingredients

4 cups watermelon juice, from one small watermelon (see note above)
1 pound fresh strawberries, hulled and sliced
1 bottle Rosé wine, not too sweet is best
1 cup vodka
1 cup limoncello or Cointreau
juice of 2 oranges
juice of 1 lime
1 orange sliced
1 lime sliced

Method

Slice a watermelon into large chunks.  Reserve a few smaller chunks for the sangria jar and for garnish.  Blend watermelon chunks with a handful of sliced strawberries until smooth.  Depending on the size of your blender, you may need to blend the fruit in two batches. Strain fruit juice through a fine mesh strainer and into a large measuring cup. You’ll need about 4 cups of watermelon/strawberry juice.

In a large container stir together, watermelon/strawberry juice, wine, vodka, limoncello, orange juice, and lime juice. Stir in the remaining sliced strawberries, a few watermelon chunks, sliced oranges, and sliced lime. Chill thoroughly before serving.  Serve over ice.

Sicilian Caponata

crackers-caponata-served

Sicilian caponata with endurance crackers

In case you can’t get to Italy this weekend this is your consolation prize.

It’s another find from Sunset magazine. So good, so satisfying. I started making this because I have a slight obsession with eggplant and because we were visiting Vegans (with a capital V–they were serious). I quickly realized this was equally appealing to carnivores, and downright meaty in texture and heartiness. The Vegans had to share. A vat of this in the fridge, with or without the toasts and ricotta cheese, and you are set to make a meal out of pretty much anything. Perfect for bruschetta deconstructed and as a spread/filling/topping with crackers, wraps, omelets, tortillas, or accompanied by your carb vehicle of choice.

Ingredients

1  loaf (1 lb.) crusty Italian bread such as ciabatta, cut into 1/3-in.-thick slices
About 6 tbsp. olive oil, divided
1  large eggplant, cut into 1/2-in. dice (about 4 cups)
2  Tbsp minced garlic
1  cup  chopped celery
1  cup  chopped red bell pepper
1  cup  chopped green olives (a few pulses in the food processor works too)
1/4 cup red-wine vinegar
1/4 cup tomato paste
1/2  cup  raisins
1/2  cup  toasted pine nuts
2 tsp kosher salt
2 tsp sugar
1/4 cup chopped fresh basil
1/4 cup chopped fresh oregano
1/4 cup chopped fresh flat-leaf parsley
1 cup ricotta cheese (or whipped cream cheese)

Method

Preheat oven to 350°. Lay bread on a baking sheet and drizzle with about 2 tbsp. oil. Bake until toasted and light golden brown, about 5 minutes. Set aside.

Heat 2 Tsp oil in a large nonstick frying pan over medium-high heat. Cook eggplant, stirring often, until softened and starting to brown, about 8 minutes. Transfer to a bowl and set aside.

In the same pan, cook garlic in remaining 2 Tsp oil, stirring, until fragrant, about 1 minute. Add celery, bell pepper, and olives, stirring to combine, and cook until softened, 5 to 8 minutes. Stir in 1/4 cup water, the vinegar, tomato paste, raisins, and pine nuts and cook until heated through. Stir in reserved eggplant, salt, and sugar, then mix in herbs.

Serve caponata with ricotta on the toasted bread (technically I think that turns it into bruschetta.)

Bring it!

Spoon cooled caponata into one big or several small mason jars and make a label if you’re feeling fancy. Official word is to chill caponata up to 2 days in the fridge and store toasts airtight up to 2 days but I’ve pushed it out way longer with no scary consequences.

Caponata with Endurance crackers fresh from the cooler.

Caponata with Endurance crackers fresh from the cooler.


Glazed Lemon Cake

Sawyer on his 2nd piece!

Sawyer on his 2nd piece!


Edie’s son told her she had to post “those bacon wrapped thingies” on our blog.  My son told me I had to post “that lemon-y lemon cake”.  He said that lemon cake is the best dessert he has ever tasted IN HIS LIFE!  At 13, he’s not exactly a connoisseur but, he’s been around long enough and sampled enough desserts to be a trusted source.  So here it is, courtesy of my son Sawyer, the Glazed Lemon Cake straight from the Silver Palate Cookbook. If you own the cookbook, grab it off your shelf and make this cake now.  If you don’t own the cookbook, you should strongly consider this purchase. Every recipe is a winner. In the meantime, here is the recipe, straight up, no modifications.  And my motto…..if you have lemons, make lemon cake!

Ingredients

2 sticks salted butter, softened
2 cups sugar
3 eggs
3 cups all-purpose flour, sifted
½ tsp baking soda
½ tsp salt
1 cup buttermilk
2 tightly packed Tbsp grated lemon zest
2 Tbsp fresh lemon juice
Lemon Icing (see below)

Method

Preheat oven to 325 and grease 10 inch tube pan. Cream butter and sugar until light and fluffy.  Beat in eggs, one at a time, blending well after each addition.

Sift together flour, baking soda, and salt. Stir dry ingredients into egg mixture alternating with buttermilk, beginning and ending with dry ingredients. Add lemon zest and lemon juice.

Pour batter into prepared tube pan. Place in oven and bake for 1 hour 5 minutes or until cake pulls away from the sides of the pan and a tester inserted into the middle of the cake comes out clean. (I only bake this cake for 50-55 mins but my oven tends to cook things faster than what most recipes call for – so check cake early to see if it’s done early),

Cook cake in pan for 10 minutes.  Remove cake from pan and spread icing on it while cake is still hot.

Lemon Icing

1 pound confectioners’ sugar
1 stick salted butter, softened
3 tightly packed Tbsp grated lemon zest
½ cup fresh lemon juice

Method

Cream sugar and butter thoroughly.  Mix in lemon zest and juice. Spread on warm cake.


Pucker up!

Pucker up!

Lemon cake pre frosting

Lemon cake pre frosting

Lemon cake frosted

Lemon cake frosted

Editorial comments from Sue

The frosting can pack quite a PUCKER. You can tone it down a bit depending on your tastes by cutting the lemon zest and lemon juice amounts by maybe a third.  We all love the pucker at my house so we go full tilt.

Bring It!

Full disclosure, this cake is a bit of a mess.  Bringing this cake from your kitchen to a party, well, it might not be pretty but it will still taste great. If you have one of those round cake Tupperware containers, perfect. Use that.  Or, you can bring the cake unfrosted on a plate wrapped in foil. Transport the icing in a separate container and frost when you get there. Also, adding fresh fruit to the top, such as blueberries or strawberries would be a great addition.  Enjoy and pucker up!

Spicy, Chunky Peanut Dip for the Fair

Oxen at Hanover Center Fair

A couple of locals

The Hanover Center Fair is the first stop on the ox pulling circuit and a slice of country life. Book sale, fair food, bouncy house, kids games, clowns, old cars, crafters, live music, cotton candy, parade, snowcones–it’s got it all. It also happens to be in our front yard, and so it’s a natural way to open patio season with a bang. This dip came from the first page of an appetizer book I bought one year at the fair in the church book sale. It’s so darned good I never bothered to get past page 1. It’s great as a dip with fresh or roasted veggies. And it’s E…Z! Leaving you more time to enjoy the fair and some frosty summer cheer!

Ingredients

1/2 cup chunky peanut butter
1/4 cup dry sherry
2 Tbsp honey
2 Tbsp white or red wine vinegar
2 Tbsp flavorless cooking oil
1 Tbsp dark sesame oil
1 Tbsp soy sauce
1 tsp Asian chile sauce
2 cloves garlic minced
2 Tbsp finely minced ginger
2 Tbsp finely minced green onion

Method

In a small bowl combine ingredients until well blended. If necessary thin with a few tsp cold water. Store in refrigerator. Will keep for up to one week in fridge.

Friday night fair food

Friday night fair food

Yoga Cookies

Yoga Cookies

These cookies came from my sister Amy who asked me to bring dessert to a gathering of primarily yoga instructors.  As you can imagine, yoga instructors have a focus on healthy food that cannot be deterred. I knew immediately that bringing Whoopie Pies or Double Chocolate Mousse Cake were out of the question. And so I turned to my sister, Yogi that she is, and asked for help. She sent me the recipe below which comes from her friend Anne Novak, an accomplished Kundalini yoga instructor, who lives and practices in northwestern Connecticut.  For a link to other recipes from Anne click here.

Ingredients

1 cup whole wheat flour
3/4 cup brown sugar or honey (use brown sugar to make these vegan)
2 cups oats
1/2 cup ground flaxseed
1 cup dried fruit (cranberries, blueberries, raisins, whatever you have on hand)
1 cup nuts (almonds, walnuts, pecans, again whatever strikes your fancy at the time)
1/2 cup sunflower seeds
1 cup shredded cocount (or as Edie has coined it, “vegan bacon”) (optional)
2 cups dark chocolate (optional)
2 tsp each cinnamon and ground ginger
1/2 tsp nutmeg
1/2 tsp baking powder
1/2 tsp salt
3/4 cup oil (sunflower or any good quality vegetable oil will do)
1 cup soymilk, almond milk, coconut milk, or regular milk

Method

Mix dry ingredients. If using honey, mix oil and honey together, then mix with dry ingredients.
Mix well, then add whatever milk product you’ve selected. Allow batter to sit for 10 mins.

Form 2 inch round balls on oiled cookie sheet (or use parchment paper). NOTE: They will be sort of runny before you bake but this is okay! Bake at 400 degrees for 10 minutes. Do a couple Downward Dogs while they bake.

Bring It!

You can put these in a fancy little bag with a bow or put in a cookie tin to deliver.  And you don’t have to be a Yogi to enjoy. These are great with or without regular yoga practice.  Namaste!


Summahhhhhh! Brilliant Frozen Daquiris

Freezer-daquiri-cup

Sandy’s Daquiris

“With a batch of these, and a peanut butter pie in your freezer you’re ready for anything.” That’s Sandy wisdom, and around here we love Sandy. First we love her for bringing her daughter, the fabulous Suzi, into the world. Before Suzi this neighborhood was a lot more like the Wizard of Oz before the Yellow Brick Road scene. Now, it is full on Technicolor. Anyway, we also love Sandy for bringing freezer daquiris into our lives. It is not unusual in our hamlet to see frozen Tupperware vats getting walked from house to house in the summer, the surplus from one party inspiring the next. As Sandy’s (also fabulous) son-in-law says, “The great thing is that it’s always just ready in the freezer. So, you know, at 2 or so on a Sunday after you’ve cut the lawn…” You might want to nab him for any serious chores before he cuts the grass.

This is Sandy’s basic recipe, with some freelance suggestions.

Ingredients

2 cups white rum (or white firewater of choice)
24 oz. Squirt (Fresca for New Englanders)
1 12-oz can frozen pink lemonade or limeade (one of each if making a double batch)
3 Tbsp fresh lemon juice
2 cups pineapple juice (or any combo of juices…half ruby red grapefruit makes it darned pretty)

Method

Mix together and freeze in a big rectangular Tupperware stirring every 2 hours. (Count on at least 10 hours and up to a day, depending on the container.  I do not bother stirring it until just before serving.) Depending on the party you can use 3 cups rum*, and try adding stuff such as grapefruit juice.

*This is the only place I take issue with Sandy. I’d say the party may depend on the three cups of rum. Go with it!)

Bring It!

Now, here’s the brilliant part. Use this frozen block of daquiris as ice and internal structure when packing a cooler for the lake/cabin/weekend escape. At your destination chunk it up with a serving spoon or simply let it thaw into a pitcher of perfect drinkable slurpees. Lifechanging I tell you. And who do you think is always welcome back at that lakehouse? You got it.

Brilliant for cooler packing, but also as a great way to store leftover cocktails that you can then revisit/re-serve at will. (See fabulous son-in-law note above)

Freezer-daquiri-block

Freezer-daquiri-breakup


Summahhhhhhhhhh!

Summahhhhhhhhhh!

Simply Sue’s Granola

granola-with-berries-small

I have baked granola from what seems like the beginning of time. It is easy to make and even easier to give away. Everyone loves when I show up with a bag or two. My sister even hides it from the rest of her family so as to get the whole bag for herself (you have to know my sister, the most self-less person on the planet except when it comes to my granola). The thing I like most is you can add whatever you like or whatever you have on hand that day. I often add seeds – some combination of flax, pumpkin, or sesame seeds. This granola is healthy, crunchy, sweet but not too sweet, and so yummy. Make it in huge batches – you won’t be sorry!

Ingredients

3 cups old-fashioned oats
1 cup coarsely chopped nuts of your choice
1/2 cup unsweetened coconut
3/4 teaspoon ground cinnamon
1/4 teaspoon (generous) salt (key ingredient)
1/3 cup honey or maple syrup
2 tablespoons vegetable oil
1 tsp vanilla
1 cup assorted dried fruit

Method

Preheat oven to 300°F. Mix oats, nuts, coconut, cinnamon, and salt in large bowl. Stir honey and oil together with vanilla in a separate bowl. Pour honey mixture over oat mixture; toss. Spread on baking sheet. Bake until golden, stirring every 10 minutes, about 40 minutes. Take out of oven and stir a few times while it is cooling so it doesn’t stick together. Once cool, mix in fruit.

Ready to go in the oven, yum....

Ready to go in the oven, yum….

Toasted coconut (vegan bacon)

Toasted coconut (vegan bacon)

Bring It!

To transport, zip lock bag works great. If you want to get fancy, make a label and stick it on the front of the bag. You can also package it in mason jars with a ribbon and everyone will love it.

Eliteam Banana Yogurt Bread

Good friends, good food.

Good friends, good food.

Hot from the oven. Mmmm mmm good!

Hot from the oven. Mmmm mmm good!


This recipe comes with a big shout out to Doug and Kelley Lewis who every summer for the past 24 years have psyched up the sportiest of sporty youths at their Eliteam training camps in Vermont (and now Park City). Doug is a two-time Olympic Downhill Racer and World Champ bronze medalist, so he’s got the creds. But he’s also got charisma, boundless energy, an infectious positive attitude and an equally impressively awesome wife Kelley who makes it all happen.

The camp challenges kids with ropes courses in the woods, climbing walls, agility and obstacle courses, mountain biking, yoga and team building. But Eliteam goes well beyond mere sweat and smiles. What gives Eliteam serious chops is its goal to develop healthy, confident, “complete” athletes by incorporating sports psychology, sports physiology and sports nutrition into the mix.

All this means that Doug could be the Patron Saint of Positive Snacks, a concept inspired by Positive Tracks  that we are all about. Here’s what he says on the topic: “As athletes, what they get out of their bodies on the race hill or on the field of play depends on what they put into their bodies. Nutrition is critical to performance. At ELITEAM we teach them the foundations of good nutrition so they are better informed when shopping, cooking and eating before training and competition. It would be such a waste of time to train so hard for an entire year and then sabotage your race day with a poorly planned breakfast.”

These photos from a recent camp session show athletes taking on the kitchen to make Yogurt Banana Bread, which is healthy and, as you can tell from the pictures,  fun to make. “The campers get a lot of pride eating what they baked,” says Kelley. “Plus it tastes soooooooo good!”

Campers-in-the-mix

FUN! It’s all part of the mix.

Camper-baker-boy


I
ngredients

3/4 cup sugar
2 eggs
1/4 cup butter
1/4 cup applesauce
1 1/2 teaspoon vanilla
3/4 cup white flour
3/4 cup whole wheat flour
1 Tbsp wheat germ (optional)
1 Tbsp wheat bran or oat bran (optional)
1 teaspoon baking soda
1/2 teaspoon salt
1 cup mashed banana (approx. 2 large bananas)
1/2 cup Greek yogurt (plain or flavored)
1/4 cup chocolate chips (optional)
1/4 cup chopped walnuts (optional)

Method

Preheat oven to 350 degrees. Grease or spray one 5×9 inch loaf pan. In a large bowl, cream butter, sugar, eggs, applesauce and vanilla.

Add all dry ingredients, then mashed bananas, yogurt, chocolate chips & nuts. Mix well and pout into prepared pan. Bake at 350 degrees for approximately one hour. Let cool, if you can. As Kelley reminds us this bread, like most, is best eaten right out of the oven when it is warm.  Enjoy!

Makes 1 large loaf.

 PS: Check out the Eliteamers at last year’s CHaD Hero Half event last fall. Teamshot

Positive Tracks  doubled their fundraising efforts for CHaD (Children’s Hospital at Dartmouth) and everyone got the chance to dress up in capes and work out. Want a piece of that? Then join them this October!


Pickled Fig, Creamy Cheese and Crunchy Nut Crostini

The happy figs at comfycooks.com

The happy figs at comfycooks.com


Inspired by Bon Appetit, but with much artistic license for slackers who will not likely track down Robiola cheese and will not make a special trip for pistachios. See Bruschetta Deconstructed for in-depth coverage on the topic.

Ingredients

12 slices ciabatta bread (or the toasts here)
1/2 cup red wine vinegar
2 Tbsp sugar
6 dried figs (or twice that depending on the size of fig.)
1/4 cup water
2 Tbsp pistachios, toasted and shelled (or almonds, walnuts or filberts)
1/4 cup extra-virgin olive oil
Robiola cheese (any soft brie-like cheese, or even cream cheese will work)

Method

Combine red wine vinegar, sugar, and dried figs with 1/4 cup water in a saucepan; bring to a simmer. Remove from heat and let sit until figs soften, about 30 minutes.
Halve figs lengthwise if small. Slice larger figs into several flat pieces.
Finely crush pistachios and combine with extra-virgin olive oil.
Grill bread slices (or use these toasts).
Smear room-temperature Robiola cheese onto warm toasts. Top with halved figs. Drizzle with pistachios and oil.

Bring it!

Store and transport figs and nuts in their own to-go containers, bring toasts in a ziploc bag and bring cheese in its original package. To make prep very easy pre-slice figs and return them to their liquid so they can steep in comfort.

The fig and nut combo is delish melted with sharp cheddar in quesadillas or on pizzas as an appetizer.

Bacon Wrapped Dates

bacon-wrapped-dates

Sue describes herself as “almost vegetarian” so she will not be looking at this post. I suggest others of the veggie persuasion do the same. Now, for the rest of you, listen up, because we are talking sweet, chewy, salty, crispy and bacony all in one bite. You need to know this recipe. In fact when my son heard I was starting a food blog the first thing he said was, “You HAVE to put those bacon wrapped thingies in there.” So here they are.

Ingredients

1 lb bacon (not thick cut)
3/4 lb or so pitted dates. I used Deglet because that is what is readily available (read cheapest).
**Optional: Almonds or chunks of softish cheese

The amounts here vary on the size of the dates. Wrapping anything in bacon is not a perfect science. Roll with it.

Method

With your handy kitchen shears, cut the entire slab of sliced bacon into thirds crosswise.

Wrap-ready bacon

Wrap-ready bacon


bacon and dates on baking pan


Wrap each date in one piece of bacon and place it seamside down on a baking sheet. Toothpicks make this process neat and easy but are not necessary.*

Bake at 400 for 10-15 minutes or until its all you can do to not reach in and grab one off the pan. Nobody but nobody likes raw bacon, but these will crisp up a bit as they sit, so don’t overdo it.

Yield: It varies depending on the bacon you use, but 1 lb of Mackenzie bacon is 16 slices, times 3, which with my math makes 48 nuggets of bacony bliss.

Bring it!

Pre cook them on the baking sheet, then transfer to an oven safe serving dish, and cover with foil. If it’s a long drive pop them into a warm over for a few minutes at your destination. These will even lure kids off the trampoline.

*Make ahead: You can knock these off up to this point first thing in the morning. Cover the pan in plastic wrap and put it in the fridge until you are ready to bake them.

**Ramp it up: If you’re feeling nutty, stuff a smidge of cheese or an almond in the vacated pit space of each date before wrapping them. Honestly, dealing with cheese is a bit of a pain, and sometimes involves slicing the date, so while yummy I opt for the almond variation if anything. Those babies nestle right into the date like they’re heading into a mummy bag. If you really want to escalate this brush the outsides with maple syrup before baking.

But trust me, you won’t get complaints from the simple two-ingredient version.


Bruschetta Deconstructed

toasted-toastsWe’re taking liberties and calling every iteration of tasty stuff delivered on small pieces of toast “bruschetta.” This is of course not a purist approach. Some of my all-time favorites in that family of apps are called “crostini” which is technically grilled bread. And many of the best bruschetta or crostini fixins are just as good on flatbread, pizza crust, tortillas, pita chips, baked mochi or really any other carb vehicle. They’re also good on planks of taro or sweet potatoes or even rolled up in a leaf of romaine for our paleo friends.

But because we don’t want to leave anyone hanging on how to make bruschetta, crostini or whatever you want to call it we are simply offering up a good basic method for making appetizer-worthy toasts, and an illuminating crostini blurb in Bon Appetit to help you avoid common mistakes that threaten to RUIN EVERYTHING, if you are so inclined to have toasts ruin anything in your life.

Ingredients

Take a loaf of Easiest French Bread Ever, or a store bought baguette-like loaf that is not too airy inside. You want to have a solid surface for toppings. Slice thin (1/2″ thick or less), but again remember this bread has a job to do, so it has to have some heft. Arrange as many slices as you can on a baking sheet by fitting them together with Tetrus-like space management. Brush lightly with olive oil and sprinkle some kosher salt over all.

Bake in a 350-400 degree oven until just beginning to brown. Oven temp is not critical, which allows you to bake these up while you are baking other things. Cooking time will vary according to temperature, but at 350 degrees start looking at the toasts after 15 minutes. Cool and use immediately or pack away for later.

Method

Its nice to have pre-made hors d’oeuvres, but sometimes its also nice to allow guest to create their own combinations…especially when you are short on time. If you go the DIY route just present a few pre-made masterpieces as a guide and offer each component with the proper implement.

First Layer: Here you are creating a base of flavor and also a barrier between the toast and toppings that are often steeped in juice or vinegar or something that could turn toast to mush on contact. A spreadable consistency for your base material makes your job easier and allows for build-your-own-options. Fancy, creamy, goat, blue and brie-like cheeses are great, as is plain old cream cheese mixed with herbs, spices, dried fruit or whatever sounds good to you. Whipped lemony feta à la Ina Garten is a good place to start as well.

Second Layer: This is the really good stuff. Pickled figs, tomatoes and fresh herbs, caponata, marinated fruit, citrusy/herb-infused anything. Insert purr sound here. There are so many possibilities, including the ever-popular and oh-so-easy Funitella Bruschetta.

Third Layer: This is all about crunch. Toasted nuts or seeds, a pinch of something salty, fried, candied or otherwise decadent (turn away Sue…pssst–crumbled bacon!) Pull out whatever favorite topper is in your pantry arsenal. Steal an idea from the “pickled fig crostini” and keep a small stash of your favorite toasted nuts, chopped fine then lubed up with olive oil and a sprinkle of salt. That’s a worthy topper for pretty much anything, unless you hate nuts, in which case you might want to avoid anything I bring.

Bring it!

Pack the toasts in a good ziploc bag, and bring all other mixtures in their own separate sealed travel containers, or covered serving bowls. Make sure the crispy/crunchy stuff is isolated to maintain its mojo. And don’t forget the serving tray, spreaders, spoons and knives if needed.

roasted-veggies

Roastarama

I never mean to go overboard in the kitchen, but when my compulsions kick in one thing leads to another and events like “roastarama” ensue. I have a thing about making use of a good hot oven. It may stem from not having a working microwave or it may go way back to some primal cavewoman worship of the discretionary use of fire and heat.

Whatever the cause, I find myself uncomfortable firing up an oven without using much of its interior real estate. This happened most recently when I set about simply roasting a pile of beets, after being inspired by some luscious looking recipes including balsamic roasted beets on Stone Soup.

Ingredients and Method

roasted beets
Balsamic roasted beets

The beets only filled up one baking dish so I figured I might as well roast the remaining beet with the parsnips and sweet potatoes that were kicking around too. Then I looked at the grape tomatoes languishing on the counter and made a pan of them with garlic and onions. And then I remembered the portabella mushrooms that were drifting around in the veggie drawer, having never made an appearance with the all male guest list at my last bbq. All of a sudden my oven was full, the kitchen smelled great and I veggies-containedwas set up with days worth of salad and sandwich fixings, pizza and bruschetta toppings, omelet fillings etc.

The beauty of it is that the whole mess of extra veggies (except the mushrooms, see below) followed the same basic protocol: Cut them into largish pieces, spread them on a rimmed baking sheet, drizzle with olive oil, scootch them around to distribute then give them a sprinkle of kosher salt. They all went in at 400 degrees for about 45 minutes. When they look and smell amazing, they’re done.

Continue reading

Hero Slaw

Behold the humble cabbage that became a neighborhood icon. It all started when I found this recipe in Sunset magazine. (When you are a west coast girl living in the east, Sunset is like crack, with all its pictures of patio parties, seaside picnics and year round outdoor showers.) I started making it one summer and people loved it. They asked for the recipe, cautiously, which was the first time I realized some people guard their recipes like state secrets. As if one person’s resolve is any match for google. Anyway, I made it more and people kept asking.

But as many times as I emailed the recipe, nobody ever made the slaw. It was as if I was the only one with neighborhood rights to it. One friend claimed she had tried to make it but it “just wasn’t the same.” Nobody took ownership for making it, but they darned well knew about it. One time I brought the slaw to an end of school party and realized I had forgotten the dressing at home. As I headed to my car to retrieve it back at my house, one of the other guests quickly looked in the fridge and pulled out some ranch dressing. “Here!” she said helpfully. “This will work fine.” The assembled mothers looked at her like she had just proposed year round school. “No,” said another woman shaking her head with resignation. “She needs to go home.”

I always sent the recipe along with its original name, but it became “Edie’s Slaw” by reputation. Then one time I paused before hitting send, and changed the title to “Edie’s Slaw.” I have never been great at self-promotion, but I figured with all the dicing and slicing I deserved some credit, right?

Still, I never felt comfortable with putting my name on something just because I saw it first. It was our neighbor and plumber who solved both the distribution and naming issues. He had tasted the slaw at a mutual friend’s house and one time when he came to fix our frozen pipes he mentioned how much he liked the slaw. I passed along the recipe. A few years passed, and as far as I could tell I remained sole bearer of the slaw. Finally, one summer I ran into the plumber on a non-professional basis, and he said he needed to make a confession.

“I bring that slaw to every barbecue I go to in the summer,” he admitted sheepishly. “And I feel so guilty, because every time I’m the hero, even though I tell people it’s not really mine.”

“It’s yours,” I assured him. “Run with it!”

That’s when I decided to name it “Hero Slaw” and leave it at that. Not two days later a woman I barely knew waved me down as I made my way home: “I made your slaw again yesterday. It’s great!” So here it is, your key to getting an invite to every pot luck you desire.
Continue reading

Funitella Bruschetta

Red alert, in June 2020!!!

This was one of my very first posts on Bring It, and just today, nearly seven years later, I discovered from a friend that it has a giant hole in it. It’s fixed now below, to put in the step where you pour the tomato mixture over the feta before baking. Wow! I am so sorry for all those raw tomatoes the devoted have consumed over the years, though, as Uschi will attest, it’s kind of awesome that way too. And now for the real Funitella Bruschetta…

This was my first course in neighborhood recipe dynamics. I got it from Pierces Inn, and they later scoffed at taking any credit since they got it from another neighbor in Etna. As I let myself become locally famous for my bruschetta another neighbor went to visit my parents in Squaw Valley where he rode the funky tram-like gondola called the Funitel. In a flash of inspiration the next time I saw him, on our patio enjoying said dish, he dubbed it “Funitella,” which sort of tied it to my Squaw Valley roots. It later became funitella bruschetta, which gave a better clue about the recipe type, while also sounding like a stripper or a hot Austin Powers agent.

Ingredients

  • 35 oz canned tomatoes, well drained over a sieve. (Petite dice is ideal but not necessary. I use a combi of regular, and burgundy+olive oil, or Italian herb tomatoes)
  • ½ cup olive oil (I use a bit less)
  • 1/4 cup balsamic vinegar (I use more…enough that Pierce’s Inn disowns the recipe as made by me. Your call to taste.)
  • 4 garlic cloves minced or pressed
  • A good handful fresh basil, chopped fine
  • Coarse salt and pepper to taste
  • Chunk of feta cheese (enough to crumble over the bottom surface of your dish)

Method

The tomato mixture

The tomato mixture

feta-in-dish

The feta. These two really ought to meet…


Mix all ingredients except feta. Let it sit awhile if you can to combine flavors. Crumble feta in the bottom of a shallow baking dish. Pour tomato mixture over the feta, in an even(ish) layer. Bake uncovered at 350 for 20 minutes. Top with shaved Parmesan if desired. Serve on top of bruschetta toasts (ideally made from easiest french bread ever).

Bring It!

I always serve it in the Simon Pearce round white dish the fabulous Suzi gave me. It just seems better in a friend’s dish. You can also bring it deconstructed, in separate containers and quickly assemble it at your destination. Any leftover tomatoes are awesome in omelets, quesadillas, salads, etc.

Easiest French Bread Ever

RED ALERT NOTE! This was originally published with the wrong flour measurement. It is corrected here, and please accept my sincere apologies for the gluteny messes that ensued from mistake.  I owe y’all some bread flour!

The title says it all. If you are intimidated by the thought of making bread, but you really like the idea of busting out homemade bread, start here! It is a no knead bread that takes way less time than other bread recipes, and, like the very best friends, is totally low maintenance. You can cut the second rise time,  leave it in the loaf pans way too long, manhandle it into the unruliest looking loaves imaginable and it still turns out tasty. And whose going to complain about looks when you bring fresh bread? That’s right–nobody!

Ingredients:

  • 6 cups bread flour
  • 1 Tbsp EACH sugar, salt (a little less) and instant yeast
  • 3 cups warm water

Method:

Mix in large bowl—it will be wet enough that you only have to use a wooden spoon.  Mix until [wet] ball forms. Don’t waste time over mixing and do not knead.  Cover with towel and let rise about 1 1/2 hours.

rising-dough-french-breadDough is risen and ready to be punched/shaped.


French-loaves-rising 

Very imperfect loaves rising in their pan

Sprinkle dough liberally with more flour. Punch down and divide the mass in ball-like halves. It’ll still be wet and will get your hands goopy. Grab one ball at a time and pull/shape/plop it onto a French bread loaf pan coated with non-stick spray (or give the ozone layer a break and just wipe it with some vegetable oil. Let loaves rise about another hour. If it overflows just fold the overflow back over the loaf. * Trust the process. It’ll be fine, though you may have funky shaped loaves the first few times.

French-bread-baked

Golden and delicious. Turn your back and there’s already a piece missing.

Preheat oven to 450 degrees.  Bake about 20 minutes or until it’s deep golden brown. Let cool in pan and then gently pry it out with a small spatula or metal frosting spreader.

As mentioned above some of us have fudged the timing mightily— roughly wrestled over-risen loaves back in their place; cooked it too long or brought it partially baked and finished it by warming it at the place we are visiting. It’s always a hit. The only must is that you get the French or Italian bread pan. It’s a $20 investment that will change your life…or somebody else’s life if you give them a pan along with a freshly baked loaf. Mmmmmm–Good idea!

*At this point if you realize your math was off and what were you thinking–pick-up is in an hour!– just pop the pan in the fridge and come back to it.

Bring it!

Make it a double gift by bringing it in its own loaf pan (see above), or wrap it in a nice dishtowel and wedge it into the bag of whatever else is making the trip.

Mourning Glory Millet Muffins

millet-muffin-done

I recently delivered muffins to a friend who lost a loved one . She said it was the only thing she could eat while coping with the sadness of her loss. She was actually rationing them so as to make them last longer. I thought, good god…I better make more muffins so as to end the rationing and maybe bring her a little peace during this difficult time. And so, the Mourning Glory Millet Muffin was born. You can give muffins to anyone to ease their pain whether the situation be injury, illness, sympathy, or just to say you are thinking of someone.

Ingredients

2 ¼ cups whole wheat pastry flour
½ cup raw millet
1 tsp baking powder
1 tsp baking soda
½ tsp salt
1 cup yogurt (I use Fage No Fat Plain Greek)
3 egg whites
½ cup vegetable oil
½ cup honey
Grated zest plus 2 TBSP lemon (optional)
Handful nuts and/or dried fruit (whatever you have on hand)

Method

Preheat oven to 400 degrees. Grease muffin pans. Mix dry ingredients in a bowl. Mix wet ingredients in a separate bowl. Stir together. Add nuts and dried fruit. Bake 13-15 minutes.

Bring It!

No real instructions needed – just wrap them in foil, put them in a basket or gift bag, add a card, and deliver. That’s all there is too it.