Monthly Archives: February 2017

Snow Day Lemon Mousse

Light and fresh, like the snow we dream about!

This comes straight outta Steamboat, from Rocky Mountain Tania, who describes this lemon mousse as, “Amazing. Easy, light and such a counter balance to heavy winter food.”  Tania says she’s  embarrassed how much she makes this, but who in the world would be embarrassed by this thing of beauty?

The coolest thing about it is that it involves fresh snow. I just got back a trip west, where there is plenty of that, and I have high hopes that the return of cold temps to the east this week will bring some of the white stuff here as well. To all of you who are wishing for the opposite…C’mon man! Just give us one more month. Then we can all feel good about the meltdown.

Chilled Lemon Mousse

Adapted from Cook’s Magazine, with full photo, recipe and commentary credit to food and photo sensei Tania Coffey.

You will need:
A one quart soufflé dish (or any 1-1½ qt serving bowl)
A Kitchenaid with whipping attachment (or this recipe could be a real pain)
snow (or a good ice-maker) to put in a big bowl for chilling custard quickly

Ingredients:

  • Juice from 3 lemons (1/2 cup)
  • Zest from one lemon (3 tsps)
  • 1 packet (1/4 oz) gelatin
  • 1 cup whole milk
  • 3/4 cup sugar divided*
  • 2 large egg yolks (3 small) plus 5 large egg whites at room temperature
  • 1/4 tsp cornstarch
  • pinch cream of tarter
  • 3/4 cup heavy cream chilled
  • mint, raspberries or finely chopped pistachios for garnish

Method:

Leave eggs out for a couple of hours to bring to room temperature.
Zest one lemon
Add zest to the 1/2 cup of lemon juice and sprinkle pack of gelatin over juice.  Stir and set aside to soften.

Heat milk and 1/2 cup of sugar in a medium saucepan over medium-low heat.
stir occasionally until the sugar dissolves (5 min)
Meanwhile, whisk together the yolks, 2 Tablespoons sugar and the cornstarch in a medium-large bowl until pale yellow and thickened.
Whisking constantly slowly add the hot milk to the yolks (a rubber bottomed bowl is so great here so it doesn’t move while you are whisking and pouring).
Return the egg yolk-milk mixture to the pan and cook over medium low heat, stirring constantly until the foam dissipates to a thin layer and the mixture thickens to the consistency of heavy cream (185 on an instant read thermometer).  About 4 minutes. Do not over cook here or it will get lumpy or worse.

Pour the mixture into a medium-large bowl (I use the already dirty one) and add the lemon/gelatin mixture and stir.

Chilling’ in the snow. Sooooo cool!

Set the bowl in a larger bowl of snow (sorry, if you don’t have fresh snow ice water works well).  Stir occasionally to cool.

While the custard is chilling crank up the Kitchenaid with the whipping attachment.
Beat the egg whites and cream of tarter at medium speed until foamy (1 minute)
Increase speed to medium high.
*Add 2 Tablespoons of sugar (I usually skip this addition because I like the mousse super tangy not sweet) and beat until glossy and the whites hold soft peaks.
Don’t over beat.

Remove custard from snow/ice bath.
Gently whisk in one third of the egg whites.
Then fold in the remaining whites with a rubber spatula.

In the same mixer bowl (don’t bother cleaning it) beat the cream on medium high speed until soft peaks form when whisk is lifted (2-3 minutes).
Fold the cream into the custard/egg white mixture until no white streaks remain.

Pour into a 1 quart soufflé dish (or any 1 1/2 quart serving bowl).  Refrigerate.

For best texture chill for 1-2 hours

Garnish as desired. PS. This recipe makes you look like a pro—try it quickly!

Squaw Valley USA, a looooong way from meltdown.

Morning Paper Oatmeal Raisin Cookies

The oatmeal cookie lid: one of many ways to keep warm this winter.


One of the greatest sources for food and drink recipes is the Wall St Journal. Who knew? Really, cocktails are their sweet spot, but they have a sophisticated spin on pretty much everything. Consequently, you don’t find a lot of cookies there, but when you do, you know they’re going to be good.

These cookies delivered, and turn out to be somewhat addictive, even for someone who is not a huge oatmeal raisin fan. It may have been the overdose of cinnamon, or the salt, or the plumped up raisins. It probably had little to do with the oats, but you never know. They even passed the suspicious kid test. 

I waited a long time to post these because the recipe, when strictly followed, asks you to leave the dough in the fridge for four days. Four DAYS. This is really handy for those tough Monday afternoons when you say to yourself, “Boy I feel like a warm oatmeal cookie…on Friday.” Needless to say, I have made many batches of these, and it took until today to achieve the recommended four day incubation.

Was it worth the wait? I did indeed notice the flavor was even better than the young, unseasoned cookies. BUT they are also really good with a one day rest, and even a zero day rest. I will leave the waiting up to you.

A few notes here: The mixer with the paddle attachment is real, as is the extra large egg. This dough is pretty crumbly, so pro mixing and the extra bit of egg both help. If you only have large eggs, just beat up another one and add a bit of it in. Then have yourself a hearty ¾ egg omelet or cook it up and add it to your salad. Or, if you are not pathologically averse food waste (as I am), just put it down the drain.

On cookie size: The original calls for a ¼ cup scoop. Those are massive cookies. I prefer to make mine golf ball sized and smoosh them as suggested, with a bit of parchment paper.

On refrigerating: It says to scoop them first. If you don’t happen to have that kind of real estate in your fridge, refrigerate the batter in a bowl and scoop just before baking.

Finally, on cooking time: 14 minutes was about right for my normal sized cookies, but start checking them at 12. Err on the side of underdone and they will firm up a bit as they cool.

Oatmeal Raisin Cookies

From Adapted by the Wall St. Journal from Sadelle’s, New York City.
Active Time: 10-15 minutes
Total Time: 1 hour, plus 4 days for chilling dough
Makes: 14 massive cookies. Or wayyyy more normal sized ones.

Ingredients:

  • 1 cup raisins
  • 1¼ cups all-purpose flour
  • 1 tablespoon plus 1 teaspoon ground cinnamon (yes this is a lot, and it is key!)
  • 2 teaspoons baking soda
  • 1½ teaspoons fine sea salt
  • 1½ sticks slightly softened butter
  • 1 cup light brown sugar, firmly packed
  • 6 tablespoons granulated sugar
  • 2 cups old-fashioned or rolled oats
  • 1 extra-large egg
  • 1½ teaspoons vanilla extract

 Method:

  1. Soak raisins in hot water for 30 minutes, then drain.
  2. Meanwhile, in a small bowl, sift together flour, cinnamon, baking soda and salt.
  3. Using an electric mixer fitted with paddle attachment, cream together butter and sugars on medium speed until light and fluffy, scraping down frequently. Take care not to overbeat.
  4. Add flour mixture to creamed butter and sugar and mix on low speed until combined. Mix in oats, followed by drained raisins, egg and vanilla.
  5. Use a ¼-cup measure to scoop dough onto a parchment-paper lined baking sheet. (See note above. Golf ball sized makes a regular-sized cookie.) Flatten each blob with base of measuring cup or your hand and a square of parchment paper. Cover baking sheet with plastic wrap and refrigerate 4 days (optional).
  6. To bake cookies: Preheat oven to 350 degrees. Bake until cookies are golden-brown on the outside but still soft in the middle, about 17 minutes (12-14 for smaller cookies). Remove from oven and let rest on baking sheet a few minutes, then transfer to a rack to cool.

A whole plate of yum, looking a little funky with a filter.


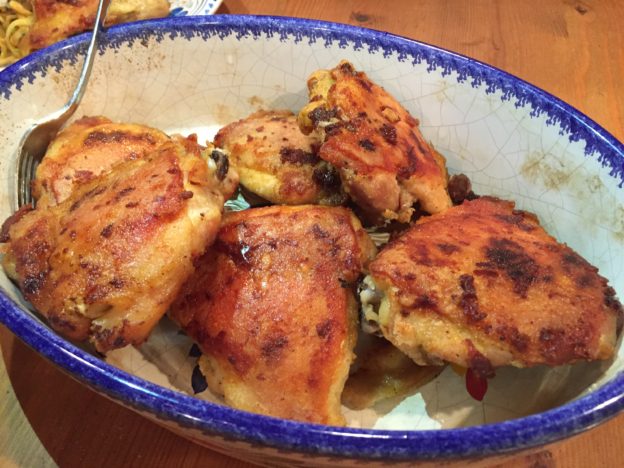
Inner Beauty Oven Fried Chicken

Confession: I’ve been wanting to share this recipe for a long time, but it wasn’t pretty enough. Just try to make fried chicken look appealing without a food stylist and studio lighting. If you succeed, let me know!

Let’s not let looks get in the way of substance because this, my friends, is a recipe you need to know…especially with Super Bowl, ski lodge lunch and après ski snack season upon us. (It will be equally useful for summer picnics, but we’re staying on message. And PS, see some Super Bowl recipe ideas way below.)

This recipe, by way of Food52, takes totally simple ingredients, and only asks that you adhere to an equally simple but all-important method:

 You brine it, you pat it, you coat it, you shake it hard and you bake it…in a hot oven on a hot roasting pan glistening with just enough melted butter. Oh, and you flip it. Because, you know, “chestnut golden brown” on only one side is just mean.

 My chicken took longer than 40 minutes for the first side to brown up, so use your good judgment on that. AND for max browning and crispiness be sure to use a metal roasting pan or rimmed baking sheet that gives each piece of chicken its space. I did some test pieces in a ceramic baking dish and they were not A-Team material.

 This totally passed the man test, the boy test, the boy-man test, the leftover test, the hot from the oven and cold from the fridge test, and the straight outta Tupperware in the lodge test. Be beautiful inside and out: Make this chicken!

Serves 4, or 3 big eaters

Provenance: From Food52 and Judy Hesser, whose daughter Amanda included it in her book Cooking for Mr Latte .

Ingredients:

  • 3 tablespoons sea salt (divided, plus more for serving)
  • 8 bone-in, skin-on chicken thighs (as good as you can get)
  • 2 tablespoons unsalted butter
  • 1/2 cup all-purpose flour
  • 1 teaspoon coarsely ground black pepper (plus more for serving)
  • Optional: grated Parmesan cheese and grated fresh lemon zest (I have not yet tried this variation but it looks awesome)

Method:

  1. In the morning, combine 2 tablespoons salt and about a cup of warm water in a large bowl or container. Stir to dissolve the salt. Trim the chicken of excess skin and fat. Add the chicken to the bowl. Cover with very cold water and add a tray of ice cubes. Swish around with your hand to disperse them. Chill in the refrigerator until dinner time.
  2. Preheat your oven to 400°F (200°C). Remove the chicken from the fridge and pat dry completely with paper towels (you can lay them on a clean dish towel to get off a lot of the moisture). Put the butter in a roasting pan large enough to fit the chicken in one layer (if you crowd them, they will stew vs. crisp). Place the pan in the oven. In a 1-gallon freezer bag, pour in the flour, remaining 1 tablespoon salt and pepper (along with the parm and lemon zest if you are using.) Give it a good shake. Add the chicken pieces two at a time and shake them until thoroughly coated. As you lift them out of the bag, shake them off vigorously. This is vital. You do not want a gummy coating. Line them up on a plate, and repeat with the rest.
  3. Lay the chicken pieces in the roasting pan, skin side down, and oven-fry until a chestnut brown and crisp on the bottom, about 40 minutes (sometimes it takes as long as an hour). Don’t flip them until this happens. Use a thin spatula to scrape them up off the pan and turn them; cook the other side until the bottom is browned, which will take less time, around 20 minutes. Remove the pieces from the oven as they finish cooking, and place on a plate lined with paper towels. Just before serving, grind fresh pepper over top and sprinkle lightly with sea salt.

SUPER BOWL BONUS

And speaking of the Super Bowl…If you need some ideas for how to prep for your couch or wherever you are headed, you might want to consider Crock Pot Chicken Taco Chili (so easy and feeds a crowd), Peoples Choice Corn Bread (not so easy but so worth it. You WILL be the halftime star). Game Day Wings, because, WINGS, Buffalo Chicken Meatballs because HOT SAUCE and potato bites because TATERZZZ! For some healthy snacking get your Hail Mary Coconut, your Nootch Popcorn and your Party Time Hummus on. Have a great weekend all!