Monthly Archives: March 2014

Bombproof Mac and Cheese

Bombproof mac and cheese

Still chili? A little cranky even? Crunchy-topped mac and cheese to the rescue!

Here it is, the end of March, and we’re still in search of comfort food. Well, I for one will take depressing rain at the end of March over depressing rain in February any day! All well and good, but it leaves us with depressing rain. Which leaves us with a need for mac and cheese. My kids would argue that this need is equally urgent in any season. Their gold standard for homemade mac and cheese involves the crunchy breadcrumbs on top and absolutely no green of any kind. Boys, as long as we hold the parsley your ship has come in.

This recipe comes straight from a fellow ski racer Mom in Colorado who frequently finds herself with a houseful of hungry teenagers. As she says, “The true beauty of this is that two ski race dads dumped the whole casserole in a crock pot at Winter Park and served it for lunch with a ladle into plastic cups—genius!” Dads in a ski lodge dishing out hot food into plastic cups? I am so in! Thank you Tania (who clearly knows that parsley can be a deal killer) and I hope you are seeing some sun out in Colorado.

 And now, we bring you…

Bombproof No-Boil Mac and Cheese   

From Bon Appetit, by way of our Rocky Mtn correspondent Tania

Makes 8 servings

Ingredients

1/2 cup butter divided
1/4 flour
3 cup whole milk
3 cups water
1 Tbsp kosher salt
1 tsp pepper
1 lb elbow mac (or bigger tubes like rigatoni, medium shells, etc)
2 cups shredded cheddar divided
2 cloves garlic chopped
1 cup panko
2 Tbsp chopped flat leaf parsley (never used it)

Method

Preheat oven to 400.

Melt 1/4 c butter in a large saucepan over med-high heat. Add flour whisking constantly for 1 min. Whisk in milk and 3 c water and bring to a boil. Reduce to a simmer, cook, whisking often, for 10 min.  It should be a thin glossy sauce. Add salt and pepper. Remove sauce from heat.

Toss pasta and 1 1/2 cups of cheese in a 3 quart baking dish.  Pour sauce over pasta.  It should be submerged.  Don’t stir.  Cover with foil and bake 20 min.

Meanwhile, melt 1/4 c butter in large skillet over med heat.  Add garlic, panko and parsley and toss to combine. Season with salt and pepper.

Remove foil from dish.  Sprinkle with remaining cheese.  Cover with panko mixture.
Bake, uncovered, for 10 more minutes or until pasta is tender, edges are bubbling and top is golden brown.

Mint Chocolate Milk

Mint chocolate milk

The first of many satisfied and non-paying customers for mint chocolate milk.

Oh to hell with it. I know Sue just posted the ridiculously decadent Peanut Butter Krispy Fudge Bars, and that we all need something super green and good for us right now. But it’s still snowing outside, and when I made this batch of chocolate milk syrup my son took one sip and said, “MOM! You should sell this!” to which I responded, “Ok, that’ll be one dollar please.” He slurped it down without a flinch.

The next day his friend came over and had at it with much approval. So, I made another batch and the rest of the family got wind of it so that, too, disappeared. By the time I was making my third batch I had the bright idea of doubling it. (Yeah, yeah…I’m not the quickest bunny). But the point is, this stuff is good! And it’s probably way better than a green smoothie for washing down a Peanut Butter Krispy Fudge Bar.

Strangely enough, this too (like the crazy-good bars) comes from Joy the Baker. I guess I am fixated on joy right now. All joys—the person, the state of being, the act of mixing chocolate in milk, which is always pure joy.

I promise—the smoothies will come in due time, as will spring. But for now and until then, let there be plenty of chocolate. Incidentally, I have not received one dime from my children, but I think they love me more than they did before this all started. 

Mint chocolate milk

A nice, cold, swirling glass of mint chocolate milk–the antidote for a late spring.

Mint Chocolate Milk

Makes about 1 1/2 cups chocolate sauce

Ingredients

3/4 cup light brown sugar, packed
1/4 cup granulated sugar
1 cup unsweetened cocoa powder (I have used natural, Dutch process and a combo of both)Pinch of salt
1 cup water
1 Tbsp pure vanilla extract (real,real,real!)
1/2 tsp pure peppermint extract (did I mention real?)
Whole or reduced fat cow’s milk, soy milk, or almond milk

Method

In a medium saucepan, whisk together sugars, cocoa powder, and salt.  Place saucepan over low heat and add water.  Whisk until thoroughly combined and no lumps remain.

Bring the chocolate mixture to a low boil, whisking frequently. Whisk for 8 to 10 minutes, until mixture is thickened.

Remove from heat and whisk in vanilla and peppermint extracts.  Allow to cool to room temperature.

Transfer to an airtight jar and refrigerate until ready to use.

To make chocolate milk, stir together 2 tablespoons of chocolate syrup per one cup of cold milk.  Stir and enjoy!

chocolate milk vs green smoothie

Chocolate milk vs green smoothie. Two yummy earth tones, two forms of therapy. Which would you choose?

Clean Livin’ Edamame Citrus Avocado Salad

edamame-citrus-avocado-salad

Bring on the sun, the citrus, the color. Hello Spring, goodbye scurvy!

I was going to riff about the psychically curative powers of the Shamrock Shake yesterday, but if you know anything about McDondald’s supply chains, that ship has sailed. After St. Patty’s Day the shakes are only available on a hit and miss basis until each outlet runs out. But keep asking through the month–you may get lucky!

The intended post was actually going to be about grown up shamrock shakes, aka green smoothies. So that’s coming at you soon, in a version that is entirely drinkable thanks to some trial and error and the eventual abandonment of expensive hard to clean juicers. Yeah baby, something to live for.

In the meantime let’s stick with the green theme. In fact, we need color all the way around right about now…big time…which makes this salad from Joy the Baker the perfect candidate. Fresh, colorful, crunchy, juicy, healthy, easy to make and easy to bring. It’s got it all. Except for bacon, which probably would taste darned good in it too. But let’s give the Vegans a shout out and run with it as is.

Note: This says it serves two, but it serves more as a side salad, and if you double up on ingredients there will still be plenty of dressing.

Note Part Deux: If you want to be pro about segmenting citrus check out the Kitchn’s  How to Segment Citrus. If not just peel, cut and be happy.

Clean Livin’ Edamame Citrus Salad

serves 2

Ingredients

About 2 cups leafy greens (I used arugula. Remember–just love the one you’re with)
1 grapefruit, segmented
1 blood orange, segmented (Cara Cara oranges rock as well)
1 cup shelled edamame
2 celery stalks, sliced
1 small (or half of a large) ripe avocado, peeled and sliced

For the Dressing

3 tablespoons finely diced shallots
1 tablespoon honey (for vegans substitute a bit of agave)
1 tablespoon dijon or whole grain mustard
2 tablespoons apple cider vinegar
1/4 cup plus 1 tablespoon olive oil
sea salt and fresh cracked black pepper

Method

In a medium bowl, combine all of the salad ingredients:  greens, citrus segments, edamame, celery, and avocado.

In a small jar with a tight-fitting lid combine shallots, honey, mustard, vinegar, olive oil, a pinch of salt, and a few pinches of pepper.  Place the lid on the jar and shake it up until the mixture is emulsified. Taste the dressing and season to taste, adding more salt, pepper, or acid as necessary.  Pour the dressing (as much as you’d life) over the salad.  Sprinkle with salt and pepper.  Enjoy immediately!

Bonus recipe

Shamrock Shake

Shamrock Shake. Therapy in a cup.

Homemade Shamrock Shake

thanks to Epicurious and Paul B

Ingredients

1 1/2 cups vanilla ice cream
1/2 cup whole milk
10 drops green food coloring
1 teaspoon peppermint extract
Whipped cream (optional)
1 maraschino cherry

Method

In a blender, combine the vanilla ice cream, milk, green food coloring, and peppermint extract, and process until smooth, about 30 seconds. Pour the shake into a glass and top with the whipped cream and maraschino cherry.

Pain Perdu…ooh la la!

pain perdu

Pain perdu with warm maple syrup. Perfect for after Round 1 of shoveling.

 OK, some kids out there have been making a lot of snow ghost pies, because this winter thing is not slowing down! As we head into snow day #2 of the week, I feel it necessary to post one more cozy breakfast food, just because. Yes, this has been a very carb-heavy spell on Bring It, and I promise, the green is coming. But for now we still need some comfort food to get us over the snowbank and into spring.

So, voila! Here is another episode of overnight breakfast brilliance (with a fancy French name at no extra charge.) This came from Gourmet circa 2003. Imagine yourself at a friend’s house for a weekend. Big dinner Saturday night. As you are cleaning up afterwards, finishing a glass of wine, take one of the dishes you have just washed and instead of putting it away, butter it (with the nice soft butter that’s lying around), lay the uneaten baguette slices in it, and whip up the super easy custard to pour over it. Then stash the whole thing in the fridge. Nobody even noticed what you were doing and the next morning, Ta da! Pain perdu. AKA baked French toast for those of us on this side of the pond.

If you are not at a friend’s house having a big dinner party you can still whip this up and be a hero in your own home. Use whatever bread you have (you know, love the one you’re with), and don’t be afraid to use the rest of that Maple Oat Breakfast Bread for a double shot of maple.

Pain Perdu

Ingredients

1 – 13 to 14 inch long loaf of soft-crust supermarket Italian bread (without seeds)
1/2 stick (1/4 cup) softened unsalted butter
2 large eggs
1 2/3 cups whole milk
1/4 tsp salt
3 Tbsp sugar
Handful of chopped walnuts or pecans (optional)

Method

Cut 12 1-inch thick diagonal slices from bread (don’t use ends).

Butter 1 side of each slice and arrange slices, buttered sides up, in 1 layer in a buttered 13 by 9 inch glass baking dish, squeezing them in slightly to fit.

Whisk together eggs, milk and 1/4 tsp. salt until combined well, then pour evenly over bread.

Chill, covered until bread has absorbed all of custard – at least one hour and up to 1 day, depending on bread.

In the morning:  Take pan out of the refrigerator to bring  to room temperature and preheat oven to 425 degrees.

Sprinkle bread with 3 tablespoons of sugar. Sprinkle on chopped nuts, if using.

Bake, uncovered in middle of oven until bread is puffed, and top is golden – about 20 to 25 minutes. Serve immediately with topping and syrup of choice (as long as it involves real maple).

Pain Perdu

A breakfast puzzle? Main non! C’est pain perdu. This batch was made with maple oat breakfast bread.


Mexican Lasagna

Crowd pleasing for sure!

Crowd pleasing for sure!

I love Mexican food!  Well, everything except for the Chimichanga – why you’d fry all that wonderful food is a mystery to me. But other than that, Mexican is way at the top of my list.  This recipe for Mexican lasagna is great and super easy.  Tortillas replace the normal lasagna noodle, salsa replaces the normal red sauce, and jack cheese replaces the normal mozzarella.  You can add anything from ground beef to lots of veggies (that’s me!) to many different kind of Tex Mex sides….think black beans, corn, chili peppers, and lots of cilantro.  Plus you can make this to bring anywhere.   Don’t forget to bring a small bottle of hot sauce for those that want to ramp up the spice.  I eat this lasagna with a bottle of chipotle Cholula hot sauce in one hand and a fork in the other.  Bueno!

Ingredients

1 cup fresh cilantro
4 scalllions, coarsely chopped
10 oz fresh baby spinach
 8 corn tortillas (6 inch)
1 can (15.5 oz) black beans, drained and rinsed
2 cup of your favorite salsa (Green Mountain Gringo Medium is the only kind I buy!)
2 cups pepper jack cheese 

Method

1) Preheat oven to 425 degrees.   

2) Coat bottom of baking pan with oil or cooking spray.

3) Spread 1/2 cup of salsa on the bottom of the pan and cover with tortillas (they will overlap).

4) Layer with cilantro, scallions, spinach, beans, cheese, salsa.  Try to divide the fillings so that you have enough for 2 layers plus some cheese to sprinkle on top. Once you’ve put down one layer, start your second layer with tortillas and then add the fillings. End with cheese on top.

5) Cover with foil and bake 25-30 minutes; remove foil and continue baking until golden 15-20 minutes more. Cool 5 minutes before serving if your crowd can wait!

Maple oat breakfast bread

Maple Oat Breakfast Bread

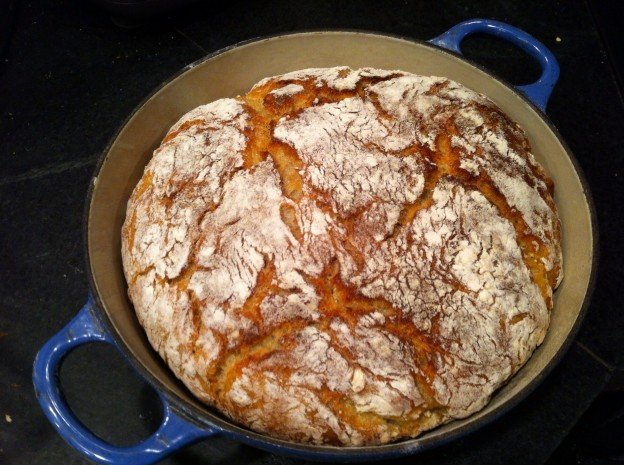
This recipe had me at maple. I’m a simple person really. But maple syrup, oats and melted butter all cozied up into a crusty loaf of bread (that requires minimal effort and even less skill to make) would win over even the most complex of characters. There is no more appropriate time to celebrate maple syrup than on Vermont Town Meeting Day, the traditional time to tap one’s maple trees. It also happens to be when everyone needs a little comfort food to push through the final sub-zero throes of winter.

This comes from the “no knead” family of bread recipes, which, as you can imagine, is the only bread family in my recipe box. The no knead process is very easy but does require a few things, namely time (not work time, just hang time for the dough), a heavy duty cooking crock and a really hot oven. The perfect scenario is to take 5 minutes and mix all the ingredients at night then bake up a fresh loaf in the morning. Second to that is mixing the dough in the morning and baking it up for dinner. Either way, you’ll have plenty of time to get out there to the town hall and vote on wind farms, beaver dams and moose quotas.

Recipe tweaked from King Arthur Flour via Food52

Makes 1 large loaf

Ingredients

5 cups all-purpose flour (you can replace a couple cups with whole wheat if you wish)
11/2 cups rolled oats
1/3 cup maple syrup (preferably grade B)
1/4 cup melted butter or olive oil
2 tsp salt
1/2 tsp instant yeast
2 1/4 cups room temperature water

Method

1. Combine all of the ingredients in a large bowl and stir well until it becomes a tacky, messy dough. (You can also use your hands to work everything together.)

2. Cover with plastic wrap and allow to rise at room temperature) until poofed and bubbly, 8 hours or overnight.

3. Gently scrape the dough out onto a well floured surface and shape into a round loaf. Place the loaf on a well floured towel and allow to sit for an hour.

4. In the meantime preheat your oven to 450F with a 10-inch (about 8-quart) Dutch oven or baking crock with lid in it. When the dough is ready and the oven is hot, turn the dough off of the towel into the hot Dutch oven and cover with the lid. Bake covered for 30 minutes, then remove the lid and continue to bake until the crust is deep brown, another 15-30 minutes.

5. Remove the bread from the oven, turn it out of the pot and allow to cool completely before slicing.

Maple oat breakfast bread

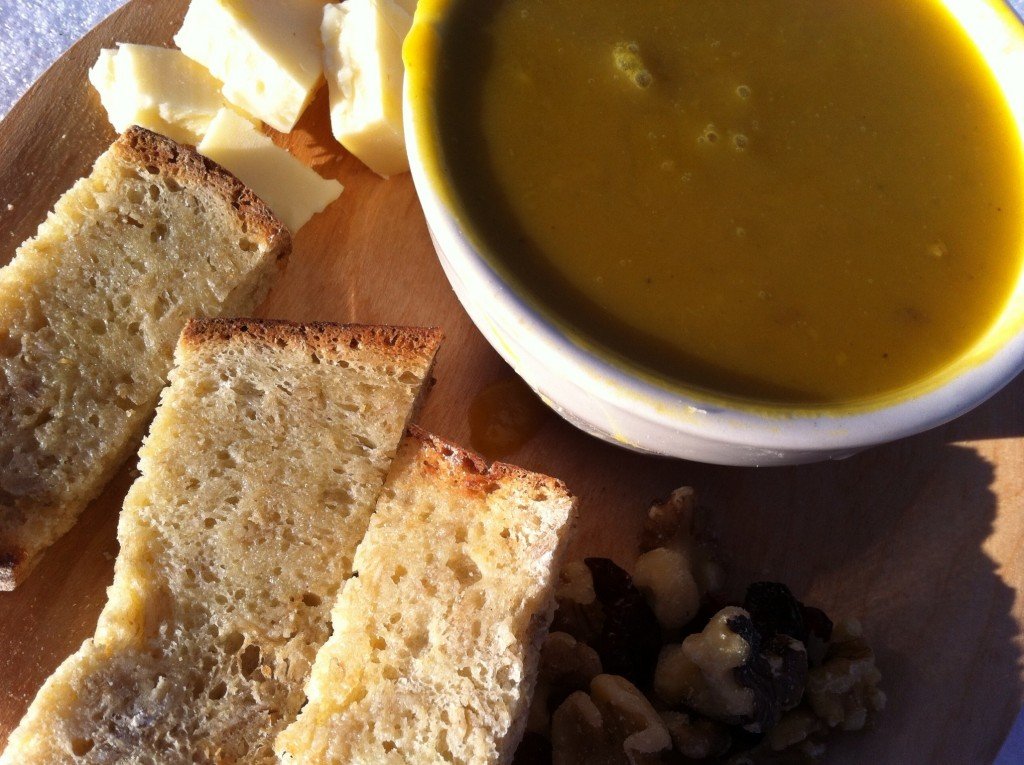
A fine lunch on a sunny late winter day.