Monthly Archives: April 2014

Garam Masala Roasted Chickpeas

garam masala roasted chickpeas

It’s chickpeas. It’s feta. It’s olives. It’s a Mediterranean feast!

This is mean. I probably shouldn’t admit it, but this was supposed to be a fun post about highballs. The drinks, that is. All was going swimmingly until my research detected a procedural discrepancy on the shaken vs. stirred question (which has little place in a discussion of highballs, but nonetheless opened up a gushing artery of doubt). On top of that my R&D was a little challenging so early in the week. So the good news is, there is a fabulous highball post in your near future (perhaps in time for Derby Day). The even better new is….

We’ve got chickpeas! Oh yeah baby, hold me back. Honestly, I have been experimenting with roasted chickpea recipes off and on for several years. My quest for the perfect, crunchy chickpea snack started in a crockpot, moved to a pot of oil and then settled on a roasting pan. The results were always ok, but texturally not quite right. Too moist and underdone, or dryly overdone. Nevertheless, my kids ate them by the handful whenever I did make them so I was inspired to continue.

Then yesterday, just when my highball mission seemed irretrievably stymied, I came across this recipe that I had torn out of Sunset magazine way back and never tried. It turns out the secret lies in—here’s a shocker—plenty of olive oil. These are the closest I have gotten to chickpea perfection and they make your house smell really good. And they’re easy. And cheap. And if you make them now you’ll have something healthy to go with your highballs this weekend.

Roasted Chickpeas with Garam Masala

From Sunset Magazine

Makes 3 cups

Ingredients

4 cans (15 oz. each) chickpeas (garbanzos), rinsed and drained well
6 Tbsp olive oil
2 tsp garam masala
About 1 tsp fine sea salt

Method

1. Preheat oven to 350°. Gently roll chickpeas in batches between clean kitchen towels to blot dry and slough off papery skins; discard skins. (Edie note: rubbing off the skins is good, and dries the chickpeas, but if you don’t feel like picking through for the skins just roast them up too.) Divide chickpeas between 2 rimmed baking sheets. To each pan, add 3 tbsp. oil, 1 tsp. garam masala, and 1/2 tsp. salt and mix well to coat. Spread in an even layer.

2. Bake, stirring occasionally, until chickpeas are crisp all the way through, 75 to 80 minutes. Add more salt to taste if you like. Serve warm or at room temperature.

Note: These are also great on salads or as a component of lunch deconstructed.

Bring It 

Store up to 1 week, chilled airtight. (Edie here again. Chill shmill. Just put them in a Tupperware and leave them within easy reach of your kids.)


Spring Roll Salad

Eli showing us how it's done at the Coop Cooking class

Eli showing us how it’s done at the Coop Cooking class


I was inspired to make this spring roll salad after taking a cooking class at my local food Coop. The class was so fun and the instructor was terrific. I highly recommend taking a class there if you haven’t done so already. Above is a photo of our instructor, Eli Sunrise Morse, in his element, teaching our class. For more information on the cooking classes, click here.

After this class I thought I’d start my spring posts with this light and refreshing Spring Roll Salad. This noodle salad can be served as a main meal or a side dish, either cold or at room temperature (very versatile!). It has all the ingredients of a spring roll but you use rice noodles instead of rice papers, and you eat it with a fork or chopsticks (depending on your chop stick prowess). The great thing about a spring roll salad is that you won’t need to worry about dipping the spring roll in the sauce and losing all the ingredients into the sauce bowl (don’t you hate when the contents of the spring roll end up in the sauce and then you have to fish them out).

This spring roll salad is fully loaded with roasted shallots, roasted shiitake mushrooms, peanut sauce, and a tamarind dipping sauce. If you are short on time, I’d skip this recipe and go right to one of our other salads such as the jicama slaw or the edamame citrus salad. However, if you have time, it will be time well spent. The shiitake mushrooms are the real clincher to this whole deal. They taste like bacon and even non-mushroom lovers were scarfing them down.

Ingredients

1 lb fresh shiitake mushrooms
3 Tbsp extra virgin olive oil
3 Tbsp shoyu
12 oz fettuccine style rice noodles
3 carrots, sliced into matchsticks
3 Tbsp chopped fresh mint
3 Tbsp chopped fresh cilantro
3 Tbsp chopped fresh chives
Roasted shallot peanut sauce (recipe follows)
Tamarind dipping sauce (recipe follows)
1/2 cup dry-roasted peanuts, chopped, for garnish

Method

Preheat oven to 375 degrees. Cut stems of shiitake mushrooms and discard or save for another use (stock). Thinly slice the mushroom caps for a total of 5 cups sliced. Toss shiitakes in a bowl with olive oil and shoyu. Spread mushrooms on baking sheet and place in oven. Roast, stirring twice, until mushrooms are bacon-like (what is bacon-like…. believe me, you will know it when you see it and taste it!). Place mushrooms in a small bowl and set aside.

Bring pot of water to rolling boil. Cook rice noodles according to package (I waited until sauces were done to cook the noodles because you are going to want to toss the sauces on immediate to make sure the noodles don’t stick).

Ingredients Roasted Shallot Peanut Sauce

3 medium shallots
1 cup unsweetened coconut milk
1/2 cup smooth peanut butter
3 Tbsp sugar
1/2 tsp cayenne
1 Tbsp shoyu
2 Tbsp fresh lime juice

Method

Preheat oven to 375 degrees. Place shallots on parchment covered baking sheet and roast until they are very tender and juices have started to ooze out, about 30-35 minutes. Let shallots cool and then squeeze pulp out of skins. Place shallot pulp and all other ingredients in food processor and blend until smooth. The sauce will keep, covered and refrigerated for up to one week. Warm before serving.

Ingredients Tamarind Dipping Sauce

2 Tbsp sugar
6 Tbsp water
1 Tbsp fresh lime juice
1 Tbsp tamarind concentrate
1 Tbsp shoyu
1 tsp fresh chopped cilantro
1 clove garlic, minced
1 tsp slivered seeded serrano chili or Thai Bird chili
(*note I used jalapeno because that is what I had on hand)

Method

Combine sugar and water in small sauce pan and warm over medium heat until sugar is dissolved. Remove from pan and mix in lime juice, tamarind, shoyu. Stir until smooth. Let mixture cool slightly then add cilantro, garlic, and chili. This sauce will also keep covered and refrigerated for up to one week.

Final Prep

Toss noodles, carrots, and herbs. Then add both sauces and mix until well blended. Sprinkle with bacon, I mean mushrooms, and peanuts to top it off.

So darn good….

Cranberry Buttermilk Scones

Idaho cobs

Scones, coffee and the first rays of sun. It doesn’t start out better than this. 

Oh the weekend. It is so full of promise, especially if you start it with hot-from-the-oven scones. It can be darned good with a box of Life cereal too, but why not bust out the extra credit points when you can?

These scones first caught my attention in a spiral bound Vermont community cookbook, and mostly because they did not involve eggs. The hacks I have made include using the food processor to cut the butter into the dry ingredients and blowing off the glaze altogether. I am sure the glaze is good, and that working the dough like Laura Ingalls Wilder has some merit but really, do we need overkill? Let me rephrase…do we need overkill in our scones?

Make these, blow off the cereal and enjoy the weekend.

 Ingredients

3 cups King Arthur Unbleached All-Purpose Flour
1/3 cup plus 2 tablespoons sugar, divided
2-1/2 teaspoons baking powder
3/4 teaspoon salt
1/2 teaspoon baking soda
3/4 cup cold butter
1 cup buttermilk
1 cup dried cranberries
1 teaspoon grated orange peel
1 tablespoon milk
1/4 teaspoon ground cinnamon

Method

In a bowl, combine the flour, 1/3 cup sugar, baking powder, salt and
baking soda; cut in butter until mixture is crumbly. Stir in the
buttermilk just until combined. Fold in the cranberries and orange
peel.
 
Turn onto a floured surface; divide dough in half. Pat each half
into a 6-in. circle. Cut each circle into six wedges. Separate
wedges and place 1 in. apart on a lightly greased baking sheet.
Brush with milk. Combine the cinnamon and remaining sugar; sprinkle
over scones. Bake at 400° for 15-20 minutes or until golden
brown. Remove from pan to a wire rack. Serve warm. Yield: 1 dozen.

Jicama Slaw

Add a little Jicama to your repertoire this spring!

Add a little Jicama to your repertoire this spring!

How many of you (I’m not counting you, Californians) first pronounced jicama with a “J”?  I know I did and I was quickly corrected.  It’s HEE-KAH-MA.  You only make that mistake once!  This edible root resembles a turnip.  It has a thin brown skin and crisp, juicy, white flesh that is mild in flavor. Think of it as a cross between a water chestnut and a pear.  To prepare, remove the skin with a vegetable peeler and then cut the flesh into cubes, strips, or shred.  You can cook it or serve it cold.  And, big bonus here, it doesn’t become soggy or brown after cutting so you won’t have to worry about advance prep.  Serve this slaw with Jerk Ribs, on a fish taco, in sushi, in stir fries, or as a side.

Below is a recipe for Jicama slaw.  This side dish has a great kick and you’ll be super hip with jicama which is all the rage these days!

Ingredients

8 oz jicama, peeled and coarsely shredded
1 medium carrot, coarsely shredded
1 small red pepper, stemmed, seeded, and thinly sliced
1 small red onion, halved lengthwise and thinly sliced
2 Tbsp extra virgin olive oil
2 Tbsp fresh lime juice
1/2 tsp sugar
1/4 tsp cumin
1/4 tsp kosher salt
1/4 tsp fresh ground black pepper

Method

Mix jicama, carrot, pepper and onion in a bowl.  Whisk olive oil, lime juice, sugar, and spices in separate bowl.  Pour dressing on vegetables. Serve.

The Bread of Life, or “That’s Life” Bread

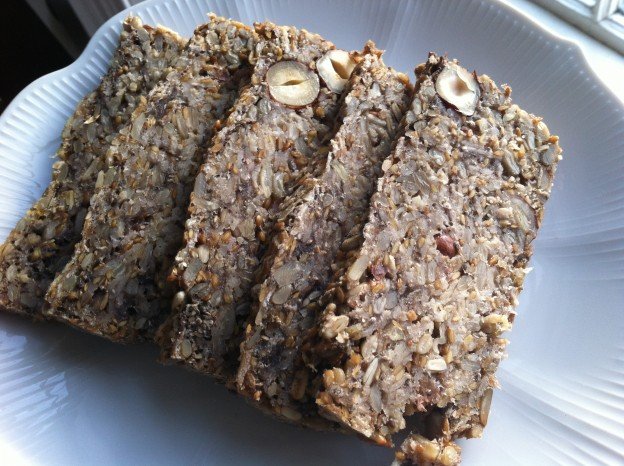
Bread of Life, sliced

Life changing, addictive or pure dirt? It’s your call. I’ll take options 1 and 2.

Elsewhere on the Internet (namely on My New Roots) this seedy, flourless, unleavened, barely sweet and totally nutrition-packed bread is called the “Lifechanging Loaf of Bread.” That is quite a claim and one that begs to be debunked, particularly by my own family, some of whom refer to this as my “dirt bread.”

What can I say? Haters gonna hate. That’s life; hence, the abbreviated name for this bread. But for the right person—and you know who you are—this is, if not lifechanging, at least addictive. It relies on oats, chia seeds and psylium husks to hang together and get its breadiness. Whole hazelnuts give it texture and a touch of maple syrup makes it all just right. Toast it, or not, and top it with butter, honey, cheese, caramelized onion, roasted veggies or pretty much anything and give yourself a big fat gold star for healthy eating. Go you!

I’ll leave it to Sara Britton to answer any questions about substitutions and how in the heck she came to experiment with psylium husks. I will tell you, however, to find them in CVS with the Metamucil. Be sure to get the unflavored variety, unless you want your bread to actually taste like Metamucil.

A few other notes: She uses coconut oil or ghee (which I can’t pronounce let alone find) but you can also use butter; I add chopped dates for some chewiness and sweetness; she uses a flexible loaf pan for both mixing and baking. I don’t have one of those so I just used a regular loaf pan and lined the bottom with parchment paper to ease the first turnout (totally worth the effort, unless you want a bonus botched loaf to snack on); finally, I lived large and mixed it all in a bowl, which took away the stress of mixing in tight spaces, which I hate.

And now, just to go on record, for me this is absolutely addictive and perhaps even lifechanging, on a slow day that is.

That’s Life Bread

From My New Roots
Makes 1 loaf

Ingredients

1 cup / 135g sunflower seeds (or 1/2 cup each pumpkin seeds and sunnies)
½ cup / 90g flax seeds
½ cup / 65g hazelnuts or almonds, roughly chopped or sliced*
**½ cup dried dates or dried fruit of choice, roughly chopped 
1 ½ cups / 145g rolled oats
2 Tbsp chia seeds
4 Tbsp psyllium seed husks (3 Tbsp. if using psyllium husk powder)
1 tsp fine grain sea salt (add ½ tsp. if using coarse salt)
1 Tbsp maple syrup
3 Tbsp melted coconut oil or ghee (or butter)
1 ½ cups / 350ml water

*update: sliced almonds are my go-to for ease of both prep and slicing
**next update: Dates or dried fruit are optional but now an essential part of my dirt bread experience.

Method

1. In a flexible, silicon loaf pan (or a parchment lined regular loaf pan), combine all dry ingredients, stirring well. Whisk maple syrup, oil and water together in a measuring cup. Add this to the dry ingredients and mix very well until everything is completely soaked and dough becomes very thick (if the dough is too thick to stir, add one or two teaspoons of water until the dough is manageable). Smooth out the top with the back of a spoon. Let sit out on the counter for at least 2 hours, or all day or overnight. To ensure the dough is ready, it should retain its shape even when you pull the sides of the loaf pan away from it it.
2. Preheat oven to 350°F / 175°C.
3. Place loaf pan in the oven on the middle rack, and bake for 20 minutes. Remove bread from loaf pan, place it upside down directly on the rack and bake for another 30-40 minutes. Bread is done when it sounds hollow when tapped. Let cool completely before slicing (difficult, but important).
4. Store bread in a tightly sealed container for up to five days. Freezes well too – slice before freezing for quick and easy toast!

Bring It

As mentioned above, for the right person this is the perfect host/hostess gift. If you’re bringing it to a mixed crowd you can always cover your bases (and maximize fans) by adding a loaf of easiest french bread ever or maple oat breakfast bread

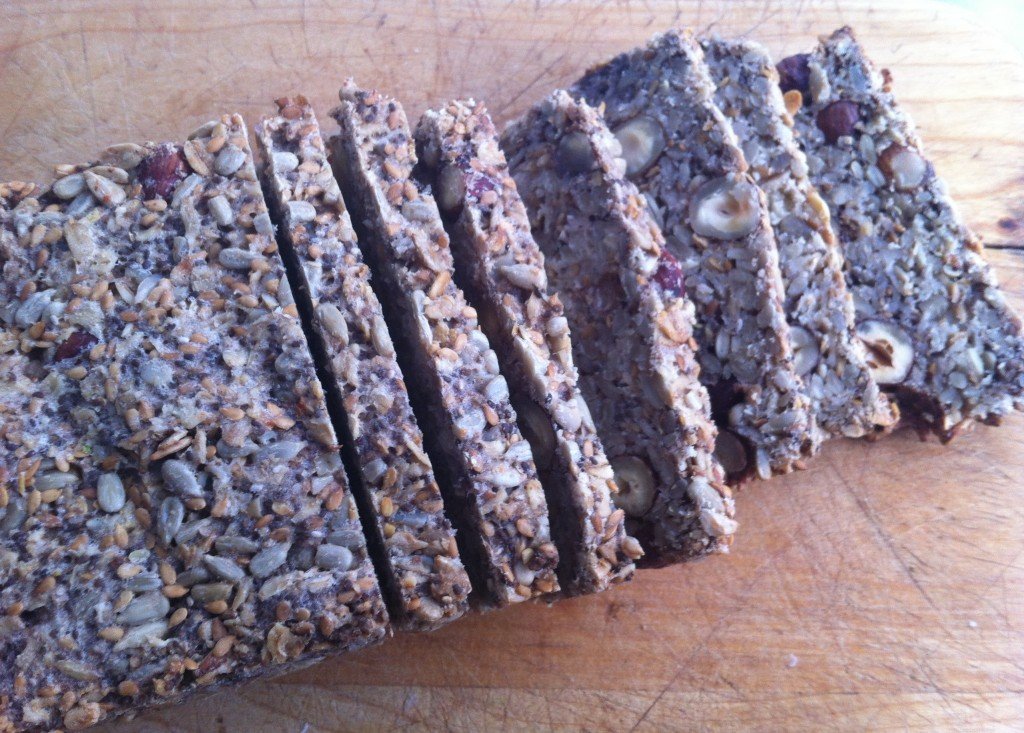
Life Bread by the loaf

Living the Bread of Life, one slice at a time.

Jerk Ribs

What a way to kick off the grilling season!

What a way to kick off the grilling season!

Okay, not the post you would expect from a vegetarian, but my meat-eating boys love these ribs.  They ask for them repeatedly.  And every time I serve to guests or bring anywhere, I get asked for the recipe.  These puppies are good (so I’ve been told!).  Plus, what is easier than mixing some spices in a jar, rubbing it onto the meat, and throwing the whole mess in the oven or onto the grill. It really doesn’t get any easier than that.  You can prep these ribs in about 5 minutes and that is it.

So, this post is about as quick and easy as the recipe – enjoy!

Ingredients

2  lbs pork loin back ribs
1 Tbsp dried minced onion
1 1/2 tsp onion powder
2 tsp thyme
1 tsp salt
1 tsp allspice
1/4 tsp nutmeg
1/4 tsp cinnamon
1 1/2 tsp sugar
1 tsp black pepper
1/2 tsp cayenne

Method

Preheat oven to 350 degrees or preheat grill to medium low. In small jar with tight fitting lid, shake together all dry ingredients until well mixed.  Rub dry mixture onto all surfaces of ribs.  Make a container for ribs by taking double layer of heavy duty foil just large enough to hold ribs; crimp edges to make 1” sides. Place ribs on shallow baking pan with rack and bake for 1 1/4 to 1 1/2 hours. Or place on grill for same amount of time. Cut into 1 rib portions. Serve!

Balsamic Black Beans

Balsamic black beans

Fiesta- It’s always the right thing to do. And frijoles Italiano are the right thing to bring.

Let’s be honest. It is never too early to prepare for Cinco de Mayo. If you haven’t perfected your margs, your guac, your mango salsa, your chicken enchiladas there’s still some time. But you’ve got to get on it! I’m going to take on the black bean situation for you and solve it the easy way.

Buy yourself a can of Pastene black beans (playing it incognito in the Italian section), turn the can around, and make the recipe that’s always been right there. It’s easy, fresh and the balsamic gives it a zing that makes these beans more abondanza than just plain bueno. Ok, I have no idea if abondanza is even a word, but they used it in an Olive Garden commercial so I’m going with it.

These beans are great as a dip for chips or sturdy veggies, as a filling for quesadillas, as a component of lunch deconstructed, as a topping for huevos or as something to put on your spoon as you stand in front of the fridge craving protein. By the way if you see limes on sale, go long! I hear they are in short supply in Mexico and you’ll be needing lots of those tangy babies in the weeks ahead.

 Ingredients

1 15.5 oz. can black beans
3 Tbsp olive oil
1 medium onion
1Tbsp balsamic vinegar
1/2 jar (7 oz. size) roasted red peppers, diced
1/4 cup (or more) chopped celery
salt and pepper to taste
dash of oregano
splash of maple syrup (optional, unless you are in New England, then mandatory)

Method

Saute onion and celery in olive oil until clear. Add roasted peppers and cook for a very short time. Add beans (with liquid), vinegar and seasonings. Simmer for 5-10 minutes.

Pastene black beans

Not so secret Pastene family recipe

Pastene black beans

Black Beauties