Monthly Archives: January 2014

slow cooker chicken chili

Fi-Fi to the Rescue (with chicken taco chili)

I have a friend (and you know who you are) who refers to her slow cooker as FiFi, short for “Fix It and Fugget It.” Of course, she is on her second slow cooker because she forgot about FiFi for three months while it was filled with leftover Chicken Marbella. But let’s fuggedabout that image right now, and focus on dinner….tonight…with zero effort. This recipe comes from Amy, who I am calling right out because she deserves credit on at least two fronts.

First, Amy appreciates the vast the difference between crockpot cookery and crockpot warmery, an issue discussed in the Fast and Slow Lasagna post. Other than chopping up one onion (and some cilantro unless you are a slacker like me and blew it right off), the only effort involved here is opening cans, and FiFi is the only dish called into service.

Second, Amy offered up a recipe that is as delish as it is easy. With a whole lot of cold winter nights and aprés ski opportunities in the forecast, and with the Super Bowl right around the corner this comes just in time. We ate this for dinner, for lunch the next two days and were not the least bit relieved when it was gone.

Ingredients

Makes 10 servings

1 onion, chopped
1 16-oz can black beans
1 16-oz can kidney beans
1 16-oz can of cannelli beans (use whatever combo of beans you have)
1 8-oz can tomato sauce
10 oz package frozen corn kernels (canned works too)
2 14.5-oz cans diced tomatoes
1 packet taco seasoning
1 Tbsp cumin
1 Tbsp chili powder
4 boneless skinless chicken breasts (or equivalent weight boneless, skinless thighs)
chopped fresh cilantro (for overachievers)

Method

Combine beans, onion, corn, tomato sauce, cumin, chili powder and taco seasoning in a slow cooker. Place chicken on top and cover. Cook on low for 10 hours or on high for 6 hours. Half an hour before serving, remove chicken and shred. Return chicken to slow cooker and stir in. Top with fresh cilantro. Dig deep and serve with cheese and sour cream to show you care.

OK we're ready. Bring on FiFi's finest chicken chili!

OK we’re ready. Bring on FiFi’s finest chicken chili!

Lunch, Deconstructed

Deconstructed lunch

Deconstructed lunch elements, waiting to meet each other.

Lunch can take me down, especially in winter. When we are scrambling to get out the door to training or a race, the idea of preparing lunch, after making breakfast, cleaning up and gathering/loading gear is a major buzz kill. But the penalty for not making lunch is hunger or French Fries. Lots of French Fries. NOT that I have anything against French Fries, and particularly the ones at the Dartmouth Skiway that must be double fried because they are so good. But we all know, the sad, cumulative consequence of too many French Fries.

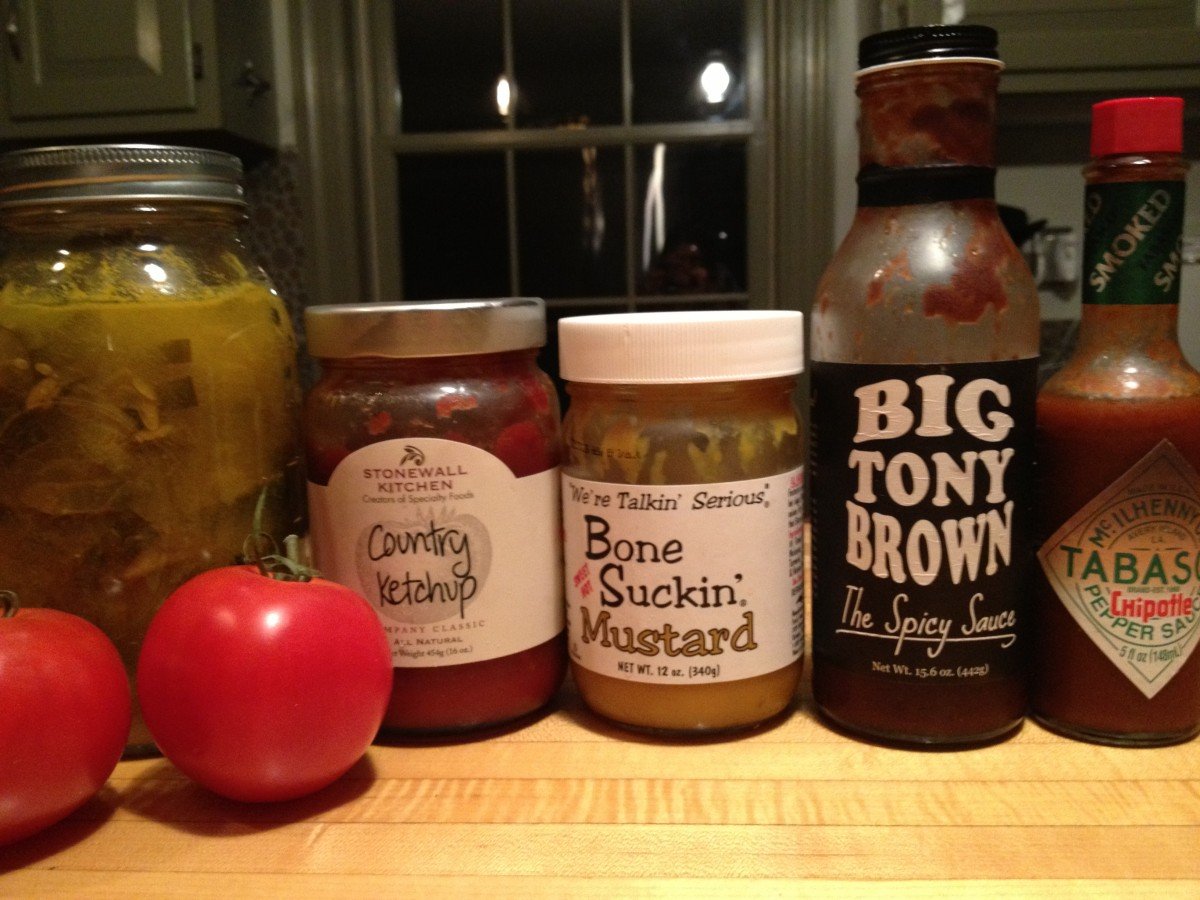
My solution is (to try at least) to have a fridge full or delicious and healthy lunch fixings, ready to be combined the night before, or easily enough in the morning. Below are basic recipes for some essential elements, along with suggestions for the makings of the best darned lunch you can cram into a takeout container.  The recipes for the beets, lentils and onions come from Stone Soup. Build an arsenal of sauces from Get Saucy With Me to have on hand and you’re good to go, to the Skiway and beyond.

Skiway Deconstructed Lunch Basics:

  • Baked Sweet Potatoes
  • Roasted Beets
  • Massaged Kale
  • Parisian Lentils
  • Balsamic Onions

A few suggestions for other awesome things to have on hand:

  • Roasted nuts and seeds
  • Avocado
  • Roasted vegetables
  • Cooked grains like brown rice, quinoa and millet
  • Hummus
  • Hard boiled eggs
  • Chopped olives or tapenade
  • Cooked BACON, chicken and other protein. Did I say bacon?
Salads for two, in brilliant take out containers. Dressing in a repurposed caper bottle.

Salads for two, in brilliant take out containers. Dressing in a repurposed caper bottle.

Sweet Potatoes

Ingredients

  • However many sweet potatoes you want to cook in your hot oven.

Method

Turn oven on to 400.

Wash potatoes and dry them with a paper towel. Prick all over with a fork. (One exploded potato will cure you from ever forgetting this step.) Put potatoes on a cookie sheet to catch the goo that escapes from the holes. Line the sheet with foil if you want zero cleanup.

Bake potatoes for about an hour, squeezing them to test for doneness starting at about 45 minutes. I like mine to have some structural integrity for slicing later.

When done, let potatoes cool. They can be easily peeled by hand if desired. Store covered in the fridge.

Massaged Kale

There are many methods for this so don’t worry too much about the ingredient measurements or timing. Some recipes only call for salt in the massaging, others only for oil, others for oil, lemon juice and salt and still others for the entire dressing. The point is just to break down the kale a bit so it is still raw but friendly and makes a worthy bed for all kinds of other good stuff.

Ingredients

  • One or two bunches kale, washed, spun dry, stemmed and shredded or torn. *
  • Olive oil, salt, lemon juice

*(You can easily stem kale with a big sharp knife by holding it vertically from the stem end and running the knife down the stem. Or you can go rogue and use your fingers. Grip the stem between thumb and forefinger and zip down the stem.)

Method

Put kale into a big bowl. Drizzle with a Tablespoon or more of olive oil, a splash of lemon juice and a good sprinkling of salt. Massage kale with your hands until it softens a bit and is a shinier, dark green. Store covered in the fridge until  ready to use.

Roasted Beets

These keep a week or more in the fridge, so I generally make enough to fill up a large 9 x13 baking dish.

Ingredients

  • 1-2 bunches beets, or a few large ones.
  • Balsamic vinegar
  • Olive oil

Method

Preheat oven to 400.

Remove stalks from beets and scrub them well. Chop into wedges – either quarters, sixths or eighths. The smaller you chop, the faster they will cook. I like big wedges because I have more slicing and dicing options later

Splash with a few tablespoons of balsamic vinegar and the same of olive oil. Sprinkle with kosher salt.

Cover tightly with foil and roast for 45 minutes to 1 hour or until beets are tender. Season to taste. When cooled you can easily peel them by hand or with a knife, or just eat them with the peels.

Parisian Lentils

I love these any time of day, even for breakfast with an egg on top. Full disclosure: I never measure these. I just boil a bunch of lentils and add equal splashes of the seasonings at the end. And if I don’t have sherry vinegar I cut to the chase with a splash of straight sherry. Saves you the trouble of having a separate glass of wine with dinner (or breakfast in some cases). The recipe calls for topping these with fresh ricotta and parsley, which sounds awesome.

Ingredients

  • 7 oz French style green lentils (aka puy lentils)
  • 2 tablespoons sherry vinegar
  • 2 tablespoons soy sauce

Method

Place lentils in a medium saucepan and cover generously with water. Cover and bring to the boil.

Remove lid and simmer for 10-15 minutes or until the lentils are tender.

Drain lentils and return to the pan. Season with vinegar, soy and 2 tablespoons extra virgin olive oil. Taste and add salt as needed.

Balsamic Onions

I wasn’t going to include these but they are so good on pizza, sandwiches, salads and soups that they need to  be in. If you’re over the taste of balsamic at this point just use a combo of olive oil and butter and sprinkle generously with salt. This clearly makes a ton, but they keep for a long time and are addictive so a ton is a good thing. Feel free to halve of quarter, but don’t complain when you are out of them so soon!

Ingredients

  • 8 onions
  • 1/2 cup olive oil
  • 1/2 cup balsamic vinegar

(No need to use your best olive oil and balsamic)

Method

Heat oil in a large heavy based saucepan over a medium heat.

Halve onions, lengthwise, then remove the skins and slice into half moons. Adding chopped onions to the oil as you go.

Cover and cook on a medium low heat, stirring occasionally for about 1/2 hour or until onions are very soft but not browned.

Remove cover and add balsamic. Bring to a simmer and cook, again stirring from time to time for about 20 minutes or until the sauce has reduced a little and the onions are slightly brown.

Get Saucy With Me


Easy sauces

They say taste is free. It’s darned easy too when you just add some sauce.

If there was ever a time to go long on veggies and salads, it is now, in the dim days of January when we are warding off seasonal affective disorder, flu season, sub zero temperatures and the lingering effects of holiday excess. If none of the above applies to you it’s probably because you’ve been eating your veggies all along. It’s not hard to do that if you plan ahead a bit, and it’s downright easy if you have a repertoire of go-to sauces that give even the humblest of greens and veggies some soul-satisfying mojo.

This is the first of a two-part installment aimed at getting a whole lot of fresh into your fridge and opening up Bring It possibilities like Deconstructed Lunch (coming atcha soon) instead of a boring old sandwich or sad-looking leftovers.

These sauces are all easy to prepare and most are lightening quick as well. They dress up salads, sandwiches, vegetables, grains, and pretty much anything (inanimate) that can be dressed. With any of these kicking around your fridge your meals need never be uninspired. Let’s start with the easiest and work from there.

Mi So Easy, Mi So Good…

I was afraid of miso’s new ageyness until I discovered this dressing. Now I always have miso on hand. This could not be easier, and reminds me of the strangely addictive dressing that comes on that distressingly tiny salad served at Japanese steakhouses. It is great as is, or made with rice vinegar if you don’t have lemons. As an added bonus, this doesn’t even require a food processor or blender.

Miso Tahini Dressing

from The Kitchn

Makes about 6 ounces

1/4 cup tahini
1 Tbsp red miso
1 Tbsp lemon juice
1/4 cup or more warm water
freshly cracked black pepper

Method

In a small bowl or lidded jar, combine the tahini, miso and lemon juice. Mix with a spoon into a smooth paste. Add the warm water gradually, stirring or shaking (if using a jar) until the dressing reaches desired consistency. It may need more than 1/4 cup. Taste for seasoning. Add pepper if desired. Store in the refrigerator for about a week. Dressing thickens up as it sits, so you will need to add more water to thin.

Healthy and Hearty…

I got this in a roundabout way from Jane Esselstyn who lived in the schoolhouse next door way back before her brother Rip became famous with his Engine 2 diet book. This versatile three-ingredient (plus water) sauce is a healthy, Esselstyn family favorite, featured in Rip and Jane’s latest book, My Beef with Meat as well.  Put it on anything from kale and quinoa to pizza and grilled cheese (and probably burgers, but don’t tell Rip and Jane).

 OMG Walnut Sauce

1 cup of walnuts
1-2 cloves of garlic
1 Tbsp low-sodium tamari sauce (soy sauce)
1/4 – 1/2 cup water, for desired consistency

Method

Combine the walnuts, garlic and tamari in a food processor and blend, adding water until the desired texture is reached, (1/4 to 1/2 cup). Use more water for a thinner dressing, less water for a thicker dip.

Shalloticious…

Shallots are just plain magic. Mince them into any dressing, (like this one from Joy The Baker, also pictured above) and they make everything work.  This sauce is part of the more involved Spring Roll Salad  from 101 Cookbooks, which is a taste sensation. It requires roasting shallots, which is super easy and makes them even better if that is possible. As you know from roastarama. I can’t help filling up a high temp oven, so I threw more shallots and an unpeeled head of garlic onto the sheet as well. It’s pretty handy to have both on hand for anything that needs some cha-cha (dressings, hummus, stir fry’s, etc) throughout the week.

Roasted Shallot Peanut Sauce

Makes 2 cups

1 cup unsweetened coconut milk
1/2 cup smooth peanut butter
3 Tbsp natural sugar, preferably maple sugar or evaporated cane sugar
1/2 tsp cayenne pepper
1 Tbsp shoyu
3 medium shallots, unpeeled
2 Tbsp plus 1 teaspoon fresh lime juice

Method

Preheat the oven to 375 F.

Place the shallots on a parchment-covered baking sheet and roast until they are very tender and the juices have started to ooze out, 30 to 35 minutes. Let the shallots cool slightly, and then squeeze the pulp out of the skins. Place the shallot pulp and all the remaining ingredients in a food processor or blender, and blend until smooth. The sauce will keep, covered and refrigerated for up to a week. Heat or serve at room temperature.

And for some spice…

For a spicy girl trapped in a houseful of Yankees this sauce is money. Put it on anything that needs some zap, or just on toast or a piece of sharp cheddar. I love that it relies on jarred stuff from your pantry, and of course that it involves the blender. Oh, and it makes a great DIY gift.

Pantry Raid Spicy Sauce

From Food 52

Makes 2 cups (Where this recipe calls for ounces my guestimates are included. It’s not an exact science.)

4 ounces B&G hot cherry peppers or other pickled hot peppers, stemmed (a generous ¾ cup, or about 8)
2 ounces roasted red peppers (1/3 cup or so)
2 ounces crushed tomato  (same as above, about 1/3 cup)
1/4 cup olive oil
1/4 tsp chile flakes
1/4 tsp dried oregano
1/4 tsp sugar
Salt to taste

Method

Combine all ingredients in a food processor or blender, and mix until slightly smooth.

Mini Cheesecakes

Just a bite!

Just a bite!

I try to be all healthy with my vegetarianism, and eating the right kind of fats, and checking out the latest health trends, and so on and so on. Then I get to dessert and fall off the beam hard.  Yes, it’s true…I have a raging sweet tooth.  My solution to this is to eat tiny desserts.  I cut desserts in half, share desserts, or have “just a bite”.  My husband and son hate this because they think I make a mess.  Well, I do, but so be it.  That’s the way I eat dessert and I’m sticking to it. They can either share with me or let me make a mess all on my own.

With that preface, I bring to you one of my favorite desserts – cheesecake. I made cheesecakes for my mom’s dinner parties as a kid. I tried to have the tops of the cheesecakes not crack, but they always cracked and they still tasted unbelievably good.  I generally topped them with a can of bright red cherries packed in that thick gooey syrup so it didn’t really matter that the top cracked anyway.  Now as an adult, with my fondness for small portion desserts, I use the mini cupcake pan to make bite sized cheesecakes. Once done, the whole eating experience becomes very low commitment. I don’t have to cut the mini cheesecake in half. I don’t have to make a mess. I just pop the whole thing in my mouth and see what other desserts are available!

Make these cheesecakes – big or small and top with whatever makes you happy that day!

Ingredients

1 ½ cups finely ground graham cracker crumbs (about 12 sheets)
3 Tbsp unsalted butter, melted
1 ½ cups plus 3 Tbsp sugar
2 pounds cream cheese, room temperature
Pinch of salt
1 tsp pure vanilla extract
4 large eggs, room temperature

TAKE THE CREAM CHEESE AND EGGS OUT OF THE REFRIGERATOR NOW!
(Just a subtle reminder for people like me who never remember to do this…)

Method

1) Preheat the oven to 325.  Line muffin tins with paper liners.  This recipe will make 48 mini cheesecakes so divide the recipe in half if you want less.  Stir together graham cracker crumbs, butter, and 3 Tbsp of sugar.  Press a small amount of the mixture into bottom of the muffin liners.   What is a small amount you ask? Well enough to fill the bottom of the liner and make a little base for your cheesecakes.  Bake until set and beginning to color at the edges, which is about 10 minutes.  Transfer tins to wire rack and cool.

2) With an electric mixer on medium-high speed, beat cream cheese until fluffy. Reduce speed to low; add remaining 1 ½ cups sugar in a slow stream.  Mix in salt and vanilla until combined.  Add eggs, one at a time, beating until just combined after each (do not overmix). Scrape down sides of bowl as needed.

3) Spoon cream cheese filling over cooled crust in each muffin cup. It is somewhat tricky to get the cream cheese filling into mini muffin liners.  Do your best and don’t stress over it.  Fill them until they are almost full and then tap down on counter to set.

4) Bake 30-35 minutes rotating half way through.  Transfer to wire rack to cool completely.  Refrigerate cheesecakes in tins (uncovered) at least 4 hours.  Remove cheesecakes from muffin pan using a butter knife to lift them out.

I topped my mini cheesecakes in this post with a thick mocha spread but you could top with a raspberry or blueberry or drizzle a little syrup over them too. Look for something in your fridge or cabinet as an add on – that’s part of the fun.  Once topped, pop one or two or a few in your mouth!

Blueberry muffin batter

Overnight Sensations

In our next installment of overnight breakfasts (see Overnight Blender Cardamom Popovers), we present two delish muffin options. I have long been a fan of blueberry overnight muffins (see above, and below) but the most favored muffins of both my sons are the lemon poppy seed ones from their Montessori preschool. That was the last time they got fresh muffins once a week, and because that particular recipe involves creaming butter there is not a chance my kids will get them on any winter morning. My search for an overnight  version of lemon poppy seed Nirvana led me to these from Bouchon Bakery. I liked the recipe immediately because it enlisted the blender, an overnight nap AND melted butter (no need to think ahead and soften butter).

These are from a super high-end baker so of course I had to make some adjustments for the real world. First off, they are jumbo, and I am without jumbo muffin pans. Second, all ingredients are based on weight so the measurements are odd (1 cup plus 3 Tbsp, etc). I know I know…baking is chemistry and only a fool messes with it. With that in mind, I left the real instructions and noted my fool short-cuts in bold. The muffins—very dense and almost pound cake-like—turned out great, and I was assured by children not related to me that they would be much appreciated for breakfast, at home or in the car at 0-dark-30.

 Lemon-Poppy Seed Muffins

From “Bouchon Bakery” by Thomas Keller and Sebastien Rouxel

Makes 6 jumbo-sized muffins or at least 14 regular ones.
*The batter must be refrigerated overnight, so plan accordingly.

Ingredients

161 grams (1 1/4 cups) cake flour (see how to make your own w/flour and cornstarch here)
3.4 grams (1/2 + 1/8 teaspoon) baking powder
1.7 grams (1/2 teaspoon) kosher salt
234 grams (1 cup + 3 tablespoons) granulated sugar
170 grams (1/2 cup + 3 tablespoons) eggs (4 large)
4.5 grams (3/4 teaspoon) vanilla paste (I really do wish I could but…1 tsp vanilla)
194 grams (6.8 ounces) unsalted butter, melted and still warm
60 grams (1/4 cup) fresh lemon juice
6 grams (generous 1 tablespoon) grated lemon zest (takes about 1 ½ lemons)
4 grams (1 1/2 teaspoons) poppy seeds

Method

Sift the cake flour and baking powder into a medium bowl. Add the salt and whisk to combine.   I made my own cake flour, and whisked it all together in the same step, no sifting

Combine the sugar, eggs, and vanilla paste or vanilla in a deep medium bowl and mix with an immersion blender or just chuck it all in the real blender.

Add the dry ingredients in 2 additions, mixing until just combined. 

With the blender running, pour in the butter in a steady stream, and continue to mix until the batter is smooth.  Add the lemon juice and blend again to combine. 

Fold in the lemon zest and poppy seeds. 

Transfer the batter to a covered container keep it right in that blender, baby and refrigerate overnight, or for up to 36 hours.

When ready to bake:

Preheat the oven to 425F. 
Line a 6-cup jumbo muffin pan with muffin papers and spray the papers with non-stick spray.  I used no spray, regular muffin liners and pans, and greased the pans when I ran out. The muffins released easily from both.

Transfer the batter (which has a firm, gelato-like texture) to a pastry bag, fitted with a 3/4 inch plain tip, (or use a spoon), and pipe or spoon (can you guess which I did?) the batter evenly into the papers, stopping 3/8 inch from the top (135 grams each). Rest assured, no measuring here.

Place the pan in the oven, lower the oven temperature to 325F, and bake for 34 to 37 minutes, or until the muffins are golden brown and a skewer inserted in the center comes out clean. I started checking at 28 and took them out at 30 minutes.

Set the pan on a cooling rack and cool completely

lemon poppyseed muffins

Luscious lemony poppyseed muffins


…and here is a much less fussy, straight up and easy blueberry version that we all love.

Overnight Blueberry Muffins

 From The Inn at the Round Barn Farm in Waitsfield, VT.

 Ingredients

6 Tbsp butter
1 ¼ cup sugar
2 eggs
2 cups flour
2 teaspoon baking powder
½ teaspoon salt
½ cup milk
1 pint (2 cups) fresh or frozen blueberries
4 teaspoons sugar, divided
2 teaspoons flour
¼ teaspoon cinnamon

Method

Cream the butter and 1 ¼ cup sugar in a mixer bowl until very light and fluffy. Add the eggs. Beat for 2 minutes. Combine the 2 cups flour, baking powder and salt in a bowl. Add to the butter mixture alternately with the milk. Place the blueberries in a bowl. Sprinkle with 2 teaspoons sugar and 2 teaspoons flour. Toss gently. Fold the blueberries gently into the batter just until blended. Refrigerate, covered, overnight.

Wake up happy. Preheat oven to 375. Spoon the batter into 12 greased muffin cups, filling almost to the top. Combine the remaining 2 teaspoons sugar and cinnamon in a bowl. Sprinkle over the tops of the muffins. Bake for 25 minutes or until golden brown.

Whole Wheat Pasta with Spicy Peanut Sauce

Whole Wheat Pasta with Spicy Peanut Sauce

How often do you make pasta with some variation of red sauce or pesto?  A lot?  Well, try a peanut sauce!  Everyone loves it and it is so easy and forgiving.   I got this recipe from Naturally Ella’s which is a site I go to often.   I want to make and eat every recipe Ella posts.   If it weren’t for my day job, I might give it a try. She says this recipe is tied with her sweet potato tacos as one of her two favorite meals.  I’m making those tomorrow night.   But back to the peanut sauce… I’ve made a lot of peanut sauces in the past and this one is by far the best.  You should really try this recipe.  It will end up in your repertoire of “recipes you must make again and again”.  Ella uses rice noodles in her recipe, but I made mine with whole wheat pasta.  In the end, any kind of noodle will work. Okay, get to it!

Ingredients

Sauce:
1/2 cup peanut butter
1 1/3 cup vegetable broth
1 tsp crushed red pepper
1/4 cup honey
2 cloves garlic, minced
1 Tbsp fresh ginger, minced
1/4 cup tamari (soy sauce)

Other Ingredients:
1 lb. whole wheat pasta
1 Tbsp olive oil
1 large onion
4 cups assorted vegetables ( such as broccoli, cauliflower, carrots)

Toppings:
Bean Sprouts
Cilantro
Peanuts

Method

1) In a bowl, whisk together ingredients for sauce.  Taste sauce and add more of whatever you like.  Set aside.
2) In a large skillet, heat olive oil over medium heat.  Add onion and cook until onion is fragrant and translucent, 6-7 minutes.  Stir in your choice of vegetables and cook for 2 more minutes. Add peanut sauce and reduce temperature to low. Cover and let vegetables cook, 6-8 minutes.
3) While vegetables are cooking, cook pasta according to instructions.
4) Mix pasta with peanut sauce and vegetables and serve with toppings for everyone to pick what they like.
5) Feel free to throw in cooked shrimp or tofu – Yum!

Fast and Slow Lasagna


Snowy day for lasgna making

It’s a great day to be slaving away making lasagna…NOT!

I have a thing about crock-pots. Ok, a few things. First, I love them, so that’s a thing. They allow for  Bringing It on an entirely different level which is another thing. But then, I have a thing that bugs me. I hate it when crock-pot recipes involve multiple steps and pots and pans, that take us from the realm of crock pot cookery to the realm of  crock-pot warmery. So technically this recipe, which involved browning the meat before putting it in the crock, goes against my principles.  However, it gives you lasagna that is ready when you walk in the door vs. lasagna an hour plus later. This can be life changing on a weeknight.

This is really more of a method than a recipe. It turns out a darned good lasagna, not a transcendent meal. We are feeding our families here people. Some days it doesn’t need to be art–it just has to happen.

On another note, everyone says lasagna is “so easy.” Sure, cooking and serving it may be easy, but making it is not. It’s kind of a pain, involving multiple steps and multiple vessels. That’s why I really like this one. You need your crock-pot and one pan to brown the meat and make the sauce. That’s it. And rather than follow an involved process you simply keep layering the same stuff until it’s all gone.

This recipe is adapted from the “Make it Fast, Cook it Slow” cookbook, by crock-pot aficionado Stephanie O’Dea. I made it this morning before we headed out a day on the slopes and it was in my crock, ready to get cooking in 30 minutes. Much of that time was browning the meat, so during that half hour I unloaded the dishwasher and made breakfast and lunch for the family (all of whom are old enough to make their own meals, but I wanted to prove a point on efficiency.)

So here it is. Mix it up with different meats and veggies, totally meatless versions or whatever. Celebrate your awesomeness by serving it with Easiest French Bread Ever.

Ingredients

1 lb ground beef, turkey or sausage browned and drained
1 (25 -ounce) jar pasta sauce
10 dry lasagna noodles (traditional, not the no-cook kind)
1 (15- ounce) container ricotta cheese
Sliced mushrooms, chopped onion, a few handfuls of spinach, sliced carrots and/or and any other veggies you want to sneak in.
2 1/2 cups grated Mozzarella cheese
3/4 cup grated Parmesan or Italian cheese
1/2 cup water

Method

1. Use a 6-quart slow cooker. Brown the ground meat with mushrooms or other veggies in a pan on the stovetop. Drain well. Add the jar of pasta sauce to the meat. Save the jar, you’ll need it later.
2. Spoon some of the meat and sauce mixture into the bottom of your slow cooker. Cover with a layer of uncooked lasagna noodles, breaking them as necessary to fit as a single layer. Smear some ricotta cheese on the noodles. Sprinkle a handful of mozzarella on top, and 1/3 or so of the Parmesan cheese. Add another spoonful of the meat and sauce mixture, and repeat the layers until you run out of ingredients, or the crock is full. Mine makes 3 layers but probably could fit four. Adjust proportions according to how many layers you think can fit.
3. Put the water into the empty pasta jar and shake. Pour the contents over the assembled ingredients. Cover and cook on low for 6 hours or on high for 3 to 4 hours. Crock-pots vary a lot on their cooking times so this is not an exact science. Check about an hour before serving, and push down the top noodles into the liquid, if they are getting too brown and crispy. The lasagna is done with the pasta has reached the desired tenderness and the cheese has melted completely and has begun to brown on the edges.

All great things start with a step...and often cheese.

All great things start with a step…and often cheese.

Halfway there. Not a lot of precise measuring going on here.

Halfway there. Not a lot of precise measuring going on here.


Fast and Slow Lasagna done

Lasagna Finito!


fully popped popover

Overnight Blender Cardamom Popovers

There’s a lot going on in that title, but it needs every word to do this recipe justice. First off, I am all about make-ahead breakfasts, especially in the dead of winter when rallying out of bed and getting psyched to embrace the great outdoors can be a challenge. In fact, the pursuit of easy yet yummy breakfasts is such a priority this time of year that I’m going to make it my January theme. Stay tuned for overnight waffles and French toast, but for now we’ll start with these popovers.

They are a golden example of overnight brilliance, made even more convenient by the fact that you make, blend and store the batter in the same container. (If there isn’t one already, there should be an entire cookbook devoted to blender cuisine. Anyone?) Wake up, turn on the oven, pour the batter into some muffin tins or, better yet,  a shmancy popover pan and you’re good to go. Without the filling, these popovers are a perfect breakfast—barely sweet and subtly spiced. Spread them with a little butter, jam or honey and they are perfect for grab and go, eat-in-the-car-on-the-way-to-the-race scenarios. The options of storing the batter overnight or all day, and turning it into a dessert with a delish filling (the one below or really anything creamy that floats your boat) make this recipe even more versatile.

This originally came from AP Food Editor J.M. HIRSCH.

Start to finish: 45 minutes
Servings: 12

For the popovers:
2 cups all-purpose flour
2 cups milk
4 large eggs
2 tablespoons butter, melted
1 tablespoon sugar
1 teaspoon salt
1/2 teaspoon ground cardamom

For the filling:
Two 8-ounce tubs mascarpone
2 tablespoons honey
Juice and zest of 1 lemon
2 teaspoons cinnamon
Sliced strawberries or other fresh berries, to serve.

Heat the oven to 400 F. Coat a 6-cup popover pan or 8-cup muffin pan with cooking spray (or be kind to the ozone and butter the heck out of said pan).

In a blender, combine the flour, milk, eggs, butter, sugar, salt and cardamom. Blend until the ingredients form a very smooth batter, about 1 minute. At this point you can: proceed as directed, making half now and half later; make them all now if you have enough pan space; or put the entire blender in the refrigerator for up to 24 hours.

popovers ready to bake

Barely conscious? Perhaps. But popovers are on deck.


Fill each of the prepared popover pan cups about halfway with batter. You should use only half of the batter in the blender.

Bake for 30 minutes. Remove the popovers from the pan and use a knife to cut a small hole in the top of each to let the steam escape. Cool slightly.

Meanwhile, to prepare the filling, in a medium bowl gently stir together the mascarpone, honey, lemon juice and zest, and the cinnamon. When the popovers have cooled just enough to handle, carefully tear the opening in each just enough to be able to spoon in about 1/4 cup of the filling. Serve each with berries.

Popovers in oven

Almost there…a few more sips of coffee and these babies will be ready.


Whitewater Veggie Burgers

Backcountry skiing BC

Fredrik Marmsater Photography LLC
[email protected]
303-506-6200
fredrikmarmsater.com

I was backcountry skiing with some friends near Nelson, British Columbia recently. We decided to spend the first day skiing the terrain off the backside of Whitewater Ski area before flying into the Carlyle Hut to backcountry ski for the week. The group was stout to say the least and I spent the entire day “off the back” hyperventilating. After 7-8 hours of trying to hang on at their blistering pace, I headed back to the lodge to lick my wounds and re-fuel my depleted body. I pictured the normal ski lodge food scene were you grab a tray and head to the hot beverage machine, then help yourself to burgers and fries that have been under the warming lamp for hours. Much to my surprise, the charming and welcoming Fresh Tracks Café was open for business and looked like an oasis in the desert. I stumbled into the café, grabbed a seat and ordered the first thing I saw on the menu which happened to be the Whitewater Veggie Burger. I loaded it up with gruyere cheese, sautéed mushrooms, caramelized onions, ketchup, mustard, pickles, tomatoes all on a toasted whole wheat bun (is your mouth watering yet?). It saved me!  Well, truthfully it was the greasy French fries that saved me but I’m trying to think healthy after the holiday blitz I’ve been on for the past 2 weeks!

Your search for the perfect veggie burger has ended. This is it – load it up and enjoy! For more Fresh Tracks Café recipes, click here.

And why is there no photo of the veggie burgers, you ask.  Have you ever tried to take a photo of a veggie burger? Not exactly easy!

Ingredients

1 Tbsp vegetable oil
1 onion, diced
1 clove garlic, minced
1 Tbsp cumin
2 Tbsp chili powder
1 19oz can black beans, drained, rinsed, roughly pureed
1 tsp oregano
¼ cup parsley or cilantro, chopped
2 tsp seasame oil
1 cup sunflower seed, roasted
½ cup almonds, roasted and chopped
3 cups fine bread crumbs
½ cup soy sauce
5 eggs (I use 2 egg whites as a substitute for whole eggs but that’s a lot of eggs!)
2 cups carrots, grated
2 cups oats
Flour for dredging
2 Tbsp vegetable oil

Method

In a large skillet, sauté onions and garlic in oil. Place in large bowl and let cool a little. Add remaining ingredients. Mix well and shape into patties. Dredge lightly in flour. Heat vegetable oil in a large pan to brown burgers on both sides and warm through. You will probably need to cook these in 2 or 3 batches. Add 2 Tbsp vegetable oil for each batch.

Bring It!

For all my vegetarian friends, how many times have you gone to a cookout only to see the grill loaded up with hamburgers, chicken, hot dogs, and steaks? Grills are meat magnets.  Here is what I do to manage these meat laden meals.  I ask the host if I can bring veggie burgers to feed any vegetarians in the crowd. I pre-cook the burgers at home, wrap them individually in foil, and then heat them on the grill (in the foil). Everyone is happy!  Oh, and make sure to freeze some so they are at the ready whenever you need them at home.

Load it up burger toppings

Load it up burger toppings

Maybe don't look great but taste great!

Maybe don’t look great but taste great!