Loosey Brucey’s Strawberry Rhubarb Crisp

From the rhubarb patch to the kitchen, with a little magic and a whole lot of forgiveness.

If you need exact recipes, do not read any further, because this recipe will irk you. If you can tolerate significant looseness with your dessert creations, read on.

Today we have strawberry rhubarb crisp, because if you don’t have a rhubarb patch, somebody you know probably does and it is time to take it down!

This one comes from Pierce’s Inn, more specifically from innkeeper Bruce Lingelbach’s head as he guides pinch-hitter food preppers in the kitchen. His instructions range in specificity based on food type and his degree of recipe ownership. They fall on the spectrum of extremely loose (fruit crisps you can’t possibly screw up), to highly specific yet humorously delivered (7 millimeter thick slices and the spread must completely cover the toast), to intentionally vague as when he is guarding a secret recipe (don’t mess with Bruce’s chili).

I love this recipe because, along with being seasonal and delicious, it is among the loosest, with easy to remember, even proportions that can be grown and shrunk without higher math skills. If there is any wavering on amounts, Bruce will shrug and say, “Who ever complained about too many strawberries? …or maple syrup/crumb topping, etc. The crumb topping would work with whatever berries or softish fruit you have on hand, and the process could not be easier. It’s all about filling a dish with fresh berries, pouring molten rhubarb over it, then topping it all with your crisp mixture and baking it. Best of all, it requires no more than a baking dish and a pot.

This recipe is really more about process than exact amounts or baking time. The amounts here are good for a big 9” x 13” baking dish, and you can adjust according to the size of your dish. (Up it to 2 sticks butter, 2 cups of all else. Downsize it to 1 stick butter, 1 cup of all else. You’ve got this!) The recipe, like Bruce, is mighty forgiving, and also lends itself to special diets. Use gluten free oats and flour mix for the GF’s, and Vegan butter sticks for the Vs. No special diets? Then go for it and toss in some chopped walnuts or almonds.

The only place I freelanced on this was by adding a bit of salt to the crisp and a hefty squeeze of lemon to the cooked rhubarb because, “who ever complained about a dash of salt or fresh squeezed lemon?”

Pierce’s Inn Strawberry Rhubarb Crisp

Ingredients:

For the fruit:

  • 2 pounds strawberries
  • A whole lot of rhubarb (5 stalks or more) cut into 1-inch pieces
  • Big slug of maple syrup
  • ¾ cup sugar
  • Juice from half a lemon (optional)
  • 1 tsp vanilla

For the topping:

  • 1 ½ sticks (12 Tbsp) butter, melted or very soft (Pierce’s uses only Kate’s Sea Salted. See Bruce’s comment below)
  • 1 ½ cups brown sugar
  • 1 ½ cups oats
  • 1 ½ cups flour
  • ½ tsp salt (optional)
  • roughly chopped nuts of choice (optional)

Method:

Preheat oven to 350.

Cut the rhubarb into one-inch pieces, put into a pot with sugar and maple syrup. Give it all a stir and turn it on medium high so it gets bubbling along. Let it cook for 20 minutes or so, until rhubarb falls apart when stirred. Give it a taste for sweetness and add some sugar or syrup if desired.

Meanwhile, quarter the strawberries directly into baking dish. When rhubarb is done, remove from heat and stir in the vanilla and lemon juice. Pour molten rhubarb over the berries and give it all a stir.

In the rhubarb pot you have rinsed or wiped out, melt the butter and combine with the rest of the ingredients. Distribute evenly across the fruit and bake.

Of course there is no exact time, but give it a solid 30 minutes before checking. It should look, well, awesome— golden brown on top with sweet red lava of goodness bubbling up. Let cool a bit before serving. If made ahead, gently rewarm before serving.

Top with vanilla ice cream or whipped cream…because whoever complained about too much of that?

Summer Perfection Watermelon Tomato Feta Salad

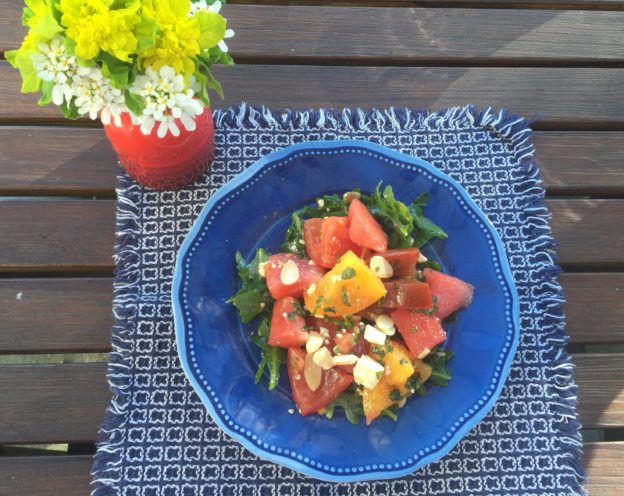
I had a feeling that Memorial Day weekend would deliver. It did in the form of this watermelon salad. Quite simply, you need this in your summer life. I’ve seen watermelon feta salads aplenty but for some reason have never made them. Perhaps too many failed attempts at grilling watermelon “steaks” killed my ambition to bridge the sweet/salty gap with watermelon.

But thanks to Jenny—who not only brought this salad to a party, but also preemptively tracked me down to deliver the recipe because she heard from so many people that I wanted it—here it is! Thank you to Jenny for saving me so much anxiety and sticky kitchen experimentation.

Looking through the notes on the original recipe there are all kinds of variations. While I applaud the will to experiment, for me, if it ain’t broke…After all, it’s only early June. We have all summer to try it with lime juice instead of vinegar, to saute the sliced almonds in a little butter first, or maybe to add some jalapenos or spice. But then again, maybe not. It may be as close to perfection as I can bear.

This recipe does make a ton, so adjust amounts accordingly if that concerns you. A platter of this salad atop arugula looks pretty darned impressive. Made as directed, the watermelon chunks, are big, which seems a little odd. But that also makes it a knife and fork salad, which is somehow more satisfying.

Summer Perfection Watermelon Tomato Feta Salad

From Epicurious

Makes 6 to 8 servings

Ingredients

  • 8 cups 1 1/4-inch chunks seedless watermelon (about 6 pounds)
  • 3 pounds ripe tomatoes (preferably heirloom) in assorted colors, cored, cut into 1 1/4-inch chunks (about 6 cups)
  • 1 teaspoon (or more) fleur de sel or coarse kosher salt
  • 5 tablespoons extra-virgin olive oil, divided
  • 1 1/2 tablespoons red wine vinegar
  • 3 tablespoons chopped assorted fresh herbs (such as dill, basil, and mint)
  • 6 cups fresh arugula leaves or small watercress sprigs
  • 1 cup crumbled feta cheese (about 5 ounces)
  • 1/2 cup sliced almonds, lightly toasted

Method

    1. Combine melon and tomatoes in large bowl. Sprinkle with 1 teaspoon fleur de sel and toss to blend; let stand 15 minutes. Add 4 tablespoons oil, vinegar, and herbs to melon mixture. Season to taste with pepper and more salt, if desired.
    2. Toss arugula in medium bowl with remaining 1 tablespoon oil. Divide arugula among plates. Top with melon salad; sprinkle with feta cheese and toasted almonds and serve.

Bringing It:

Keep the watermelon cold as long as possible before serving, and cut up the watermelon and tomatoes as close to serving time as you can. If you need to cut them up at home, hold off on tossing them with the salt until 15 minutes before serving. This looks beautiful on a platter atop the arugula, or in a big bowl with the arugula tossed right in.


Rubble: A Beautiful Mess of Ice Cream

This is it people. The opening weekend of summer is upon us, and we need to be ready. We’ve got three months of picnics, drive ins, hikes, sleepovers, pool parties, campouts, BBQ’s, road trips, beach trips, lake visits, river running. In short, this is when you need to get your Bring It on!

You don’t just want to bring “something” to all these occasions. You want to bring the thing that keeps people coming back for more. Here are a few faves:

My number one recommendation is, of course, Hero Slaw, but there are other salads that will stand up to travel, and make you popular once you arrive. Panzanella and Shrimp and Bulgur salad are hard to beat for ease and deliciousness. If your numbers are smaller and you can handle a little on-site assembly, let them eat pineapple avocado salad.

Casually plunk People’s Choice Cornbread on the table and watch the kids move right on in. Use the same casual approach with a loaf or two of Easiest French Bread Ever, which you can also slice up for bruschetta or make in a well-buttered loaf pan and use for sandwiches (hellooo road trips!)

If you are on cocktail duty for a crowd, bust out your Tupperware pitchers and freeze up a big batch of frosé or frozen daquiris. Nobody’s going to send you away with a pitcher of watermelon sangria either.

And fergawdsakes don’t forget the cookies! Champion chip cookies and these cinnamon-y oatmeal raisin ones will do the trick.

And speaking of dessert…I recently met a totally Memorial Day worthy recipe. “Rubble,” is a creation straight from Squaw Valley, courtesy of Treas, the Squaw of Granite Chief. She made it for us with chocolate, vanilla, coffee and strawberry ice cream, and with chocolate and caramel sauce. (Overachiever!) Eminently adaptable Rubble can be made with any combo of ice cream and sauce, and it can be expanded to fit the size of the group. Perhaps best of all, it can be sourced at pretty much any market— even a decent mini mart.

Treas aspires to make this in more grown up flavor combos, but I can attest that the straight up chocolate, coffee, vanilla, strawberry is fantastic. As a bonus it can be assembled by kids or adults with no real regard for exact instruction or amounts.

You will need, from the bottom up:

Equipment:

  • Parchment Paper
  • Baking sheet
  • Freezer

Ingredients:

  • Biscotti or any hard cookie (Treas uses Nonnis biscotti)
  • Ice cream, in amounts and flavors you desire
  • Fresh berries of choice
  • Ice cream sauce, again in flavor or flavors of choice.
  • Smoked almonds, roughly chopped (Treas holds the line here. Smoked almonds really make the difference, and yes they probably have them at the mini mart)

Method:

Line the baking sheet with parchment paper.

Smash/break up a few biscotti (do not crumble them too much. You want to be able to identify them), and scatter them across the parchment.

On top of that, start layering up: scoops of ice cream, a good drizzle of sauce, a smattering of berries and a sprinkling of chopped almonds over the whole shebang. Depending on the size of your crowd you may need to make more layers. Use your best artistic dessert instincts on this.

Put your masterpiece in the freezer so it coalesces into one frozen pile.

A few minutes before serving take out the rubble and let it soften just enough to be penetrable.

Have at it!

Bringing it:

Once frozen, rubble can take a short trip in the car with no ill effects. It’s not exactly tailgate fare though.

Happy Memorial Day all, and welcome to summer!

Mochanut Granola

For all those times when you wish you could chew your coffee.

When I first ran across a recipe for mocha granola, it was an a-ha moment. Coffee, chocolate and breakfast all in one bite? Brilliant! It sounded like the perfect offering for a weekend away, a camping trip, a hike, etc. And so, the experimenting and recipe sampling began.

Granola making is neither rocket science nor an exact science. It involves mixing oats with all your favorite tastes and textures, lubing it up some fat and sweetener, and baking it in the oven until it is crisp but not burnt. How much fat and sweetener is where granola can go from pretty healthy to totally decadent. One swishy LA café’s mocha granola recipe involves two sticks of butter. Well, duh. Of course it tastes good. So does a cheesecake, but it doesn’t really get your day off to a healthy start. Some recipes call for only ground coffee, which can get gritty and  others for only brewed coffee which can be kind of wimpy. I needed to slay this beast.

In my excitement I misread the first recipe, and by measuring ground coffee vs brewed coffee ended up using a solid 8 times the intended amount of coffee. That first batch could have been named “True Grit.” Still, I didn’t want to back off that much on the coffee flavor, which happens if you use only brewed coffee. The extra liquid also means your granola takes longer to bake and crisp. I settled on using a combo of finely ground coffee, in the dry ingredients, along with brewed coffee mixed in with the oil and maple syrup.

The flavor profile of this reminded me of my youth, when Jamocha Almond Fudge ice cream turned my world upside down. I am pretty sure that in 6th grade I worked the flu for an extra day to stay home with this particular flavor. This recipe bridges the territory of breakfast and treat. It’s got a double dose of coffee— liquid and ground—which is balanced by

Roasty and toasty, straight from the oven.

a fair yet not indecent amount of sweetener, mostly in the form of maple syrup. I also added unsweetened flaked coconut, because when coconut rolls around and gets toasty with maple syrup it assumes bacon-like decadence.

You can sub butter or another oil for the coconut oil, and mess around with the type and quantity of sweetener you like (or have). Play around with it, and when you walk back inside your house and it smells like coffee, chocolate and roasted nuts…you’re welcome!

Mochanut Granola

Ingredients:

  • 2 ½ cups rolled oats
  • 1 cup almonds (or nut of choice)
  • 1 cup unsweetened flakes coconut (this is the addict dose. Use your judgment)
  • 1 Tbsp cocoa
  • 1 Tbsp finely ground coffee
  • 2 Tbsp brown sugar
  • 3 Tbsp coconut oil
  • 3 Tbsp maple syrup
  • ½ tsp or more vanilla (optional, but why not?)
  • 6 oz strong brewed coffee

Method:

Preheat oven to 325. Line one or two baking sheets with parchment paper. (It will cook up and crisp faster in two.)

In a large bowl combine oats, almonds, coconut, cocoa and ground coffee.

In a small saucepan melt oil and stir it together with syrup and brewed coffee until combined.

Pour liquid mixture over oats and combine well. Spread granola evenly in pan(s).  

Bake, stirring and checking every 10 minutes, for 30-40 minutes, until desired dryness. Don’t skip the stirring, especially if it’s all on one pan. The granola will crisp up more as it cools. Cool completely before storing.

Bringing it:

Curl up that parchment paper and funnel this goodness straight into a mason jar. Bring it anywhere you want to be a morning hero.

Cinco de Derby

With this in your house, how can your weekend go wrong?


What we have here, my friends, is a dream Double Header. Cinco de Mayo and the Kentucky Derby, on successive non-school nights. If there was ever a time to have a cool, refreshing  drink in your hand (and a snazzy hat on your head) this is it.

In honor of creative cocktails and mocktails, below are two infused simple syrups that will give your drinks a fresh twist appropriate for the upcoming occasions. And what the hell—keep scrolling for a few cocktail concoctions as well, though they are only a starting point. Don’t be afraid of using the jalapeno syrup in your mint julep (or even subbing cilantro for the mint) for some south of the border cha-cha.

Have fun and if you’re placing bets, good luck!

Jalapeño Simple Syrup

  • 1 cup sugar
  • 1 cup water
  • 2 jalapeños, seeded and halved lengthwise (or not seeded if you are brave)

In a small saucepan over high heat, combine 1 cup water, sugar, and jalapeños. Bring to a boil, stirring to dissolve sugar. Reduce heat to medium and allow to simmer to three to four minutes, stirring frequently. Remove from heat and let steep 20 minutes.

Strain syrup, discard jalapeños (or chop up the now mild pepper and use as desired), and cool syrup. (Simple syrup can be refrigerated, in an airtight container, for up to 6 months. It keeps even better if you add a capful of vodka.)

Cilantro Simple Syrup

  • 1 cup sugar
  • 1 cup water
  • 1 large handful cilantro leaves

Combine water and sugar in a saucepan, and bring it to a slow boil while stirring continuously until all the sugar has dissolved. Just as the mixture begins to boil, add 1 cup of fresh cilantro. Simmer for 5-10 minutes and let cool (this syrup will keep in your fridge for about a month. More if you add a capful of vodka).

Now how do we use them? Below are two ideas, but this is no time to follow directions. Use these in whatever cocktail or mocktail could use some salsa sass.

Each makes two drinks:

Cilantro coolers: wayyyy better than a kale smoothie on a fine spring night

Cucumber Cilantro Cooler

Cool. Hot. Fresh. This one has it all. slightly adapted from organic authority

To a cocktail shaker add:

  • 1 cup chopped cucumber (seeds removed) and a large handful of cilantro leaves (cilantro haters use mint instead, and maybe extra vodka to get over the cilantro glut)

Muddle well with a muddler or a heftier pestle. Then add:

  • 4 ounces vodka
  • Juice from 2 limes
  • 1 1/2 ounce jalapeno simple syrup
  • ICE! Don’t be shy here.

Shake well for twenty seconds and then strain* into a lowball glass filled with ice. Garnish with a wheel of cucumber and a sprig of cilantro.

*brave multi taskers, fans of zero waste, and those desperate for a meal idea because they spent so much time prepping cocktails will love this: fully drain the remaining cucumber and cilantro shrapnel and mix it in with Chinese noodles, a few more veggies and soy dressing for a summery salad.

 Jalapeno Cilantro Margarita

To a shaker add:

  • Juice of two limes
  • 1 ounce cilantro syrup
  • 1 ounce Blanco tequila
  • 1 ounce Reposado tequila and 6-8 slices of jalapeno (seeds removed).

Shake it like you mean it, then strain into a cocktail glass. Garnish with a slice of lime, a slice of jalapeno and a sprig of cilantro.

And finally, if making margs for a bigger crew…

Spicy Margaritas by the Pitcher

  • 2 cups of tequila
  • 1 1/4 cup lime juice
  • 1/2 cup of orange liqueur
  • 1/2 cup of jalapeno simple syrup

Stir together with ice in a large pitcher and pour into 8 glasses.

Get Your Picnic On: Lemony Shrimp and Bulgur Salad

Driver Ed Lesson of the Day:Taking your shrimp show on the road.

Driver’s Ed is taking me down. This is my second round of Driver’s Ed, the five weeks of captivity that will eventually lead to liberty. This time it is in St Johnsbury—again nowhere near where I live—so it involves lots of scheduling and shuttling of hungry kids. It can also involve a boatload of cash if you’re not careful. Whether it’s Driver’s Ed or spring sports turning your car into a food truck, this is the time to get your picnic on.

One week in and I have already overworked my chicken rotation (oven fried chicken totally goes the distance).There is a tomato hater on board so the Panzanella of the Gods is out. I’m also not yet ready to surrender to the quick fix of pasta and meatballs, so I turned to a super easy, substantial and delish salad.

This salad is a brilliant go-to for potlucks and picnics. It stars bulgur, which is sort of my new best friend. The beauty of bulgur is that it requires no cooking AND it’s cheap cheap cheap. Bulgur just needs to soak for a bit and it’s ready to use, making is a nice alternative to overnight oats…but that’s another meal and another conversation. We’re sticking with the picnic message here.

What else makes this salad so great? It’s quick and easy to prep and pack, requires zero to minimal stove time and few ingredients, can be eaten at any temp and does leftovers like a boss. The spinach holds its own on Day 2, so even if you are an avowed leftover salad hater (helloooo entire rest of my family), this might entice you to change your ways.

The recipe calls for cooked shrimp. I usually start with raw, defrosted shrimp, and cook them in a pan with some olive oil and/or butter, and a squeeze of lemon or a splash of vinegar. Do shrimp how you do shrimp. It’s all good.

Grab that bag of shrimp from the freezer, soak some bulgur and make this salad. Then you’ll have all the time in the world to worry about having another driver in the house.

Lemon Bulgur Salad with Shrimp

This came from Food and Wine, but, as you can see in my notes nimbly veers to many variations. If you forget to get radishes you can go with any crisp, thinly sliced vegetable. No pine nuts? Use what you’ve got. Here, I used pecans.

Ingredients:

  • 1 1/2 cups coarse bulgur
  • 1 teaspoon finely grated lemon zest
  • 1/4 cup fresh lemon juice
  • 3 tablespoons chopped dill
  • 1/2 cup extra-virgin olive oil
  • 1 pound large cooked shrimp, shelled
  • 3 cups baby spinach
  • 4 radishes (or another crisp veggie), thinly sliced
  • 2 tablespoons pine nuts (or nuts/seeds of choice)
  • Kosher salt and freshly ground pepper

Method:

  1. In a bowl, cover the bulgur with warm tap water. Let stand until the grains are tender, about 2 hours. Drain the bulgur well. (If needed, speed up the process with hot water.)
  1. In a large bowl, whisk the lemon zest with the lemon juice and chopped dill. Whisk in the olive oil. Add the bulgur, shrimp, baby spinach, sliced radishes and pine nuts and toss to coat. Season with salt and pepper and serve.

Bringing It

The salad can be refrigerated for up to 1 day. Add the spinach, radishes and pine nuts just before serving. (It can also totally be eaten in the parking lot of a Driver’s Ed class, or wherever you can find free parking and wifi. )


The Unicorn that Jumped the Shark

A sign of the times, direct from the Jet Blue terminal in JFK.

Unless you are living in, say, Narnia, you have likely noticed the Unicorn theme going on in the food world. There are rainbow-colored everythings, from cupcakes and cookies to noodles and sushi. I know of one person who got on a waiting list for $60 rainbow bagels…that reportedly “tasted like dirt.” And now, to punctuate the moment, Starbucks comes out with the Unicorn Frappuccino, an unnaturally bright, pink-to-purple, sweet-to-tart-morphing frozen beverage.

I tracked down the Unicorn Frappuccino at its source at a Starbucks in JFK, amidst a long line of bleary-eyed redeye survivors and dawn patrol flyers. Although nobody was ordering one at that hour, I got a few customer reviews of the mango flavored frozen slurry including: “Disgusting, with gross sweet tarty sugar on top,” or, as Stephen Colbert put it,  “a sugary affront to God.” This, my friends, is where Unicorn Food has, like the Fonz, jumped the shark, effectively creating “the moment when a brand, design, franchise, or creative effort’s evolution declines, or when it changes notably in style into something unwelcome.”

The unicorn food craze started out as a creatively wholesome pursuit, with unicorn toast. This is essentially cream cheese tinted with natural dyes from beet juice, freeze dried strawberry powder, turmeric root, chlorophyll, spirulina powder and freeze dried blueberry powder. Those little pots of fantasia, whimsically swirled on toast and garnished with star-cut vegetables, was innocent enough. Then Pinterest took over and things took a decidedly unnatural turn.

The trend must say something about a need for escapism (I am the Unicorn of Your Confidence, after all), or about the number of people on Pinterest with too much time on their hands. 

http://https://youtu.be/4Xk38CTE1h0

Whatever nefarious marketing ploy may be at the heart of this trend, one must concede that, throughout picnic season at least, rainbow colored food is a legit thing. If you want to bring your A Game to the table, you need to have unicorn food technology in your skill set.

A far safer, healthier, cheaper and more educational starting point—than ponying up $5 for 420 calories and 59 grams of sugar (the equivalent of 6 Krispy Kreme donuts and 22 Weight Watcher Points) for a Uni Frapp—are unicorn noodles. The basic recipe involves little expense and no fancy ingredients or techniques. As a bonus they involve a little bit of science. This is not Mentos in Diet Coke explosion excitement science, but acid (lemon juice) meets anthocyanin (cabbage mojo) color-changing science.

All you need to be trendy is some red cabbage, some lemon juice, and some clear rice noodles. (If you crave another white carb, make rainbow rice as featured in this unicorn sushi.) Once you have made the noodles, the challenge is finding something appealing to put on them. Peanut sauce? Not so pretty. Marinara? No grazie. Considering the lemon juice already at work, I went with olive oil, capers, parsley, salt and grated parmesan cheese (thank you Patti G!). Really any blanched or grated vegetables would work. Indigo Kitchen goes full Yellow Brick Road Technicolor and plates the noodles with every fresh vegetable and fun sauce on the planet, like this and this. I feel healthier and kind of magical just looking at these creations.

So here is the basic recipe, tightened up from Indigo Kitchen. If nothing else, just bring it to a friend’s house as a conversation starter. I mean really…unicorn side at the pot luck—you win!

Unicorn Noodles

Ingredients:

  • Water
  • Chunk Red cabbage
  • lemon or lime juice
  • toppings, mix-ins, fairy dust, etc…

Method:

Boil some water (enough to hold the amount of noodles you want) with the red cabbage. The amount of water used and the time you soak the noodles will affect the shade of blue your noodles will be. Less water/longer steep time= deeper color.

Turn off the heat and add the noodles. You can use basic white or clear noodles, but glass/clear noodles will get you the prettiest shade.

Let the noodles soak for about 5 to 10 minutes, depending on how deep you want the color to be. Remove the noodles and place them in a bowl.

before…

After. Rice noodles on left. Spaghetti on right. No contest really

Here comes the magic, and the chemistry lesson. Take a lime or lemon and squeeze some of the juice wherever you want it to be pink. Watch the noodles change color in front of your eyes. Hint: Bring the kids in here. Be a hero.

Purple cabbage has a pigment called anthocyanin, that changes color when it makes contact with something acidic or alkaline. When you cook a few pieces of purple cabbage for a short time in some water you’ll get a nice blue shade. Cook it for bit longer with a bit more purple cabbage for a nice purple shade. Add something acidic (lemon or lime juice) to the blue colored noodles and the pigment from the purple cabbage will react and take on a bright pink color.  It really happens. Try it! If you are not impressed, there’s always Starbucks.

Passing the Nina test. She is too nice to squawk.

Unicorn noodles: stars, mane and carrot horn for extra credit


turmeric-unicorn-noodles

Turmeric joins the party, lending yellow flair in unicorn land.

Snow Day Lemon Mousse

Light and fresh, like the snow we dream about!

This comes straight outta Steamboat, from Rocky Mountain Tania, who describes this lemon mousse as, “Amazing. Easy, light and such a counter balance to heavy winter food.”  Tania says she’s  embarrassed how much she makes this, but who in the world would be embarrassed by this thing of beauty?

The coolest thing about it is that it involves fresh snow. I just got back a trip west, where there is plenty of that, and I have high hopes that the return of cold temps to the east this week will bring some of the white stuff here as well. To all of you who are wishing for the opposite…C’mon man! Just give us one more month. Then we can all feel good about the meltdown.

Chilled Lemon Mousse

Adapted from Cook’s Magazine, with full photo, recipe and commentary credit to food and photo sensei Tania Coffey.

You will need:
A one quart soufflé dish (or any 1-1½ qt serving bowl)
A Kitchenaid with whipping attachment (or this recipe could be a real pain)
snow (or a good ice-maker) to put in a big bowl for chilling custard quickly

Ingredients:

  • Juice from 3 lemons (1/2 cup)
  • Zest from one lemon (3 tsps)
  • 1 packet (1/4 oz) gelatin
  • 1 cup whole milk
  • 3/4 cup sugar divided*
  • 2 large egg yolks (3 small) plus 5 large egg whites at room temperature
  • 1/4 tsp cornstarch
  • pinch cream of tarter
  • 3/4 cup heavy cream chilled
  • mint, raspberries or finely chopped pistachios for garnish

Method:

Leave eggs out for a couple of hours to bring to room temperature.
Zest one lemon
Add zest to the 1/2 cup of lemon juice and sprinkle pack of gelatin over juice.  Stir and set aside to soften.

Heat milk and 1/2 cup of sugar in a medium saucepan over medium-low heat.
stir occasionally until the sugar dissolves (5 min)
Meanwhile, whisk together the yolks, 2 Tablespoons sugar and the cornstarch in a medium-large bowl until pale yellow and thickened.
Whisking constantly slowly add the hot milk to the yolks (a rubber bottomed bowl is so great here so it doesn’t move while you are whisking and pouring).
Return the egg yolk-milk mixture to the pan and cook over medium low heat, stirring constantly until the foam dissipates to a thin layer and the mixture thickens to the consistency of heavy cream (185 on an instant read thermometer).  About 4 minutes. Do not over cook here or it will get lumpy or worse.

Pour the mixture into a medium-large bowl (I use the already dirty one) and add the lemon/gelatin mixture and stir.

Chilling’ in the snow. Sooooo cool!

Set the bowl in a larger bowl of snow (sorry, if you don’t have fresh snow ice water works well).  Stir occasionally to cool.

While the custard is chilling crank up the Kitchenaid with the whipping attachment.
Beat the egg whites and cream of tarter at medium speed until foamy (1 minute)
Increase speed to medium high.
*Add 2 Tablespoons of sugar (I usually skip this addition because I like the mousse super tangy not sweet) and beat until glossy and the whites hold soft peaks.
Don’t over beat.

Remove custard from snow/ice bath.
Gently whisk in one third of the egg whites.
Then fold in the remaining whites with a rubber spatula.

In the same mixer bowl (don’t bother cleaning it) beat the cream on medium high speed until soft peaks form when whisk is lifted (2-3 minutes).
Fold the cream into the custard/egg white mixture until no white streaks remain.

Pour into a 1 quart soufflé dish (or any 1 1/2 quart serving bowl).  Refrigerate.

For best texture chill for 1-2 hours

Garnish as desired. PS. This recipe makes you look like a pro—try it quickly!

Squaw Valley USA, a looooong way from meltdown.

Morning Paper Oatmeal Raisin Cookies

The oatmeal cookie lid: one of many ways to keep warm this winter.


One of the greatest sources for food and drink recipes is the Wall St Journal. Who knew? Really, cocktails are their sweet spot, but they have a sophisticated spin on pretty much everything. Consequently, you don’t find a lot of cookies there, but when you do, you know they’re going to be good.

These cookies delivered, and turn out to be somewhat addictive, even for someone who is not a huge oatmeal raisin fan. It may have been the overdose of cinnamon, or the salt, or the plumped up raisins. It probably had little to do with the oats, but you never know. They even passed the suspicious kid test. 

I waited a long time to post these because the recipe, when strictly followed, asks you to leave the dough in the fridge for four days. Four DAYS. This is really handy for those tough Monday afternoons when you say to yourself, “Boy I feel like a warm oatmeal cookie…on Friday.” Needless to say, I have made many batches of these, and it took until today to achieve the recommended four day incubation.

Was it worth the wait? I did indeed notice the flavor was even better than the young, unseasoned cookies. BUT they are also really good with a one day rest, and even a zero day rest. I will leave the waiting up to you.

A few notes here: The mixer with the paddle attachment is real, as is the extra large egg. This dough is pretty crumbly, so pro mixing and the extra bit of egg both help. If you only have large eggs, just beat up another one and add a bit of it in. Then have yourself a hearty ¾ egg omelet or cook it up and add it to your salad. Or, if you are not pathologically averse food waste (as I am), just put it down the drain.

On cookie size: The original calls for a ¼ cup scoop. Those are massive cookies. I prefer to make mine golf ball sized and smoosh them as suggested, with a bit of parchment paper.

On refrigerating: It says to scoop them first. If you don’t happen to have that kind of real estate in your fridge, refrigerate the batter in a bowl and scoop just before baking.

Finally, on cooking time: 14 minutes was about right for my normal sized cookies, but start checking them at 12. Err on the side of underdone and they will firm up a bit as they cool.

Oatmeal Raisin Cookies

From Adapted by the Wall St. Journal from Sadelle’s, New York City.
Active Time: 10-15 minutes
Total Time: 1 hour, plus 4 days for chilling dough
Makes: 14 massive cookies. Or wayyyy more normal sized ones.

Ingredients:

  • 1 cup raisins
  • 1¼ cups all-purpose flour
  • 1 tablespoon plus 1 teaspoon ground cinnamon (yes this is a lot, and it is key!)
  • 2 teaspoons baking soda
  • 1½ teaspoons fine sea salt
  • 1½ sticks slightly softened butter
  • 1 cup light brown sugar, firmly packed
  • 6 tablespoons granulated sugar
  • 2 cups old-fashioned or rolled oats
  • 1 extra-large egg
  • 1½ teaspoons vanilla extract

 Method:

  1. Soak raisins in hot water for 30 minutes, then drain.
  2. Meanwhile, in a small bowl, sift together flour, cinnamon, baking soda and salt.
  3. Using an electric mixer fitted with paddle attachment, cream together butter and sugars on medium speed until light and fluffy, scraping down frequently. Take care not to overbeat.
  4. Add flour mixture to creamed butter and sugar and mix on low speed until combined. Mix in oats, followed by drained raisins, egg and vanilla.
  5. Use a ¼-cup measure to scoop dough onto a parchment-paper lined baking sheet. (See note above. Golf ball sized makes a regular-sized cookie.) Flatten each blob with base of measuring cup or your hand and a square of parchment paper. Cover baking sheet with plastic wrap and refrigerate 4 days (optional).
  6. To bake cookies: Preheat oven to 350 degrees. Bake until cookies are golden-brown on the outside but still soft in the middle, about 17 minutes (12-14 for smaller cookies). Remove from oven and let rest on baking sheet a few minutes, then transfer to a rack to cool.

A whole plate of yum, looking a little funky with a filter.


Inner Beauty Oven Fried Chicken

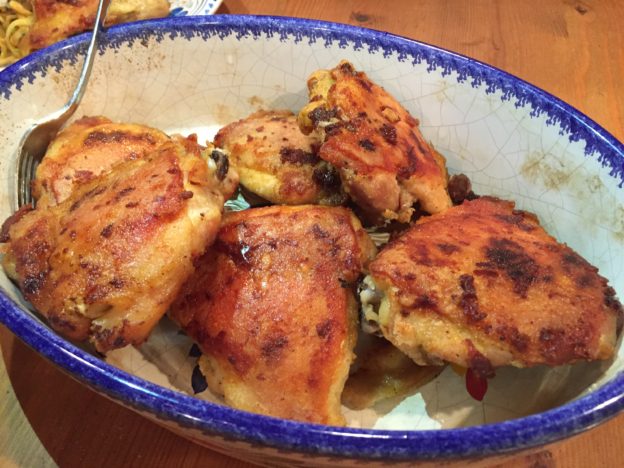
Confession: I’ve been wanting to share this recipe for a long time, but it wasn’t pretty enough. Just try to make fried chicken look appealing without a food stylist and studio lighting. If you succeed, let me know!

Let’s not let looks get in the way of substance because this, my friends, is a recipe you need to know…especially with Super Bowl, ski lodge lunch and après ski snack season upon us. (It will be equally useful for summer picnics, but we’re staying on message. And PS, see some Super Bowl recipe ideas way below.)

This recipe, by way of Food52, takes totally simple ingredients, and only asks that you adhere to an equally simple but all-important method:

 You brine it, you pat it, you coat it, you shake it hard and you bake it…in a hot oven on a hot roasting pan glistening with just enough melted butter. Oh, and you flip it. Because, you know, “chestnut golden brown” on only one side is just mean.

 My chicken took longer than 40 minutes for the first side to brown up, so use your good judgment on that. AND for max browning and crispiness be sure to use a metal roasting pan or rimmed baking sheet that gives each piece of chicken its space. I did some test pieces in a ceramic baking dish and they were not A-Team material.

 This totally passed the man test, the boy test, the boy-man test, the leftover test, the hot from the oven and cold from the fridge test, and the straight outta Tupperware in the lodge test. Be beautiful inside and out: Make this chicken!

Serves 4, or 3 big eaters

Provenance: From Food52 and Judy Hesser, whose daughter Amanda included it in her book Cooking for Mr Latte .

Ingredients:

  • 3 tablespoons sea salt (divided, plus more for serving)
  • 8 bone-in, skin-on chicken thighs (as good as you can get)
  • 2 tablespoons unsalted butter
  • 1/2 cup all-purpose flour
  • 1 teaspoon coarsely ground black pepper (plus more for serving)
  • Optional: grated Parmesan cheese and grated fresh lemon zest (I have not yet tried this variation but it looks awesome)

Method:

  1. In the morning, combine 2 tablespoons salt and about a cup of warm water in a large bowl or container. Stir to dissolve the salt. Trim the chicken of excess skin and fat. Add the chicken to the bowl. Cover with very cold water and add a tray of ice cubes. Swish around with your hand to disperse them. Chill in the refrigerator until dinner time.
  2. Preheat your oven to 400°F (200°C). Remove the chicken from the fridge and pat dry completely with paper towels (you can lay them on a clean dish towel to get off a lot of the moisture). Put the butter in a roasting pan large enough to fit the chicken in one layer (if you crowd them, they will stew vs. crisp). Place the pan in the oven. In a 1-gallon freezer bag, pour in the flour, remaining 1 tablespoon salt and pepper (along with the parm and lemon zest if you are using.) Give it a good shake. Add the chicken pieces two at a time and shake them until thoroughly coated. As you lift them out of the bag, shake them off vigorously. This is vital. You do not want a gummy coating. Line them up on a plate, and repeat with the rest.
  3. Lay the chicken pieces in the roasting pan, skin side down, and oven-fry until a chestnut brown and crisp on the bottom, about 40 minutes (sometimes it takes as long as an hour). Don’t flip them until this happens. Use a thin spatula to scrape them up off the pan and turn them; cook the other side until the bottom is browned, which will take less time, around 20 minutes. Remove the pieces from the oven as they finish cooking, and place on a plate lined with paper towels. Just before serving, grind fresh pepper over top and sprinkle lightly with sea salt.

SUPER BOWL BONUS

And speaking of the Super Bowl…If you need some ideas for how to prep for your couch or wherever you are headed, you might want to consider Crock Pot Chicken Taco Chili (so easy and feeds a crowd), Peoples Choice Corn Bread (not so easy but so worth it. You WILL be the halftime star). Game Day Wings, because, WINGS, Buffalo Chicken Meatballs because HOT SAUCE and potato bites because TATERZZZ! For some healthy snacking get your Hail Mary Coconut, your Nootch Popcorn and your Party Time Hummus on. Have a great weekend all!