Category Archives: Uncategorized

Drunken Fig Jam: Where fresh figs go to party

Fig Jamming New England style, with cheddar of course

How did I make it through life this far without ever canning? Why did I start now? Two fine questions. My two fine answers are fresh figs and fresh corn. They’re only around for a bit and they are so darned good.

Let’s start with figs. This recipe come from Treas, out in Cali, head chef at Granite Chief Command Central. Her recipe, which she shared with me after two years of my passive yet unremitting coersion, says that fig season is only in August. This handy guide to all things fig, gives us a larger window. According to google, there is a short season in early summer and then a longer season in late summer/fall. Either way, fresh figs are not around forever, and once you buy them you’ve got to use them fast. We should have a few more weeks at least, and cognac is always in season, so we’re good there. 

A little heads up to you non-canners out there. You need a big pot, you need to know that when you fill it too full with water and then put your jars in, your stove may have a hazardous overflow situation. You can only use canning lids once, which is why that whole mysterious section of parts in the grocery store exists. I guess that’s about it. I was going to get into racks for the bottom of your pot, but this recipe doesn’t call for one, so let’s run with the “ignorance is bliss” theory.

Another small cautionary note: When you are heading out to book group for three hours it’s best to turn the burner under your boiling fig jam OFF.  Next up? Corn relish to give Stonewall Kitchen a run for their money…and a new stockpot.

Fancying up a fall salad

Drunken Fig Jam

Recipe and action shots from Treas Manning
Makes 6 1/2 pint jars

Ingredients

• 2 lemons
• 4 pounds ripe fresh figs (preferably black), stemmed,
cut into 1/2-inch pieces (use food scale for accuracy)
• 4 cups sugar
• 3/4 cup brandy or Cognac
• 1/2 teaspoon coarse kosher salt

Method:

Using a vegetable peeler, slice peel from lemons (try to avoid as much as the white part as possible) in long strips. Cut peel into matchstick-size strips. Combine lemon peel, figs, sugar, brandy, and 1/2 teaspoon coarse salt in heavy large deep saucepan; let stand at room temperature 1 hour, stirring occasionally.

Bring fig mixture to a boil over medium-high heat, stirring until sugar dissolves. Reduce heat to medium; continue to boil until jam thickens (30 to 35 minutes), and is reduced to 6 cups, stirring frequently and occasionally use a hand blender to puree the mixture. It’s fine if there are small bits of lemon peel and fig, but I do like the bits to be minimal. Remove from heat.

Ladle mixture into 6 hot clean 1/2-pint glass canning jars, leaving 1/4-inch space at top of jars. Remove any air bubbles. Wipe jar threads and rims with clean damp cloth. Cover with hot lids; apply screw bands. Process jars in pot of boiling water 10 minutes. Cool jars completely. Store in cool dark place up to 1 year.

Notes: At high altitude over 5500 feet, process the jars for 15 minutes.

Drunken Fig Jam is yummy:

  • on a toasted baguette with a slice of melted Irish Cheddar, and a walnut on top.
  • on crusty bread with fresh burratta or mozzarella
  • on a grilled bone in pork chop, or on slices of pork tenderloin
  • on whole wheat toast topped with a strip of bacon for breakfast.
  • with cheese, sliced pears and walnuts on a groovy pizza

Bringing It and Giving It:

Makes a darned nice Christmas gift, especially canned in a Ball and Mason squatty wide mouth jar


ZUKES! Zucchini Bruschetta and More Green Ideas

Summer’s Surplus, all fancied up and ready for company.

It’s that time of year when it’s perfectly ok to eat fresh corn every day, tomatoes appear at every meal, and zucchini magically appear on your doorstep. I’m NOT complaining about the zucchini bounty, especially now that I have my “as seen on TV” spiralizer (a brilliant gizmo everyone should own), but using it up does present a challenge.

You could go the zucchini bread route, but if you’re not in the baking mood or you’re not in to cranking up that oven on a hot summer day, here are some alternatives. First, is a brilliant zucchini bruschetta. I have long suspected that Martha Stewart cuts her recipes to fit the page, leaving out a step or an ingredient here and there. On the positive side, it cuts out the micromanaging of how to make your toasts. If you need a bruschetta clinic, I’ve got you covered. And if you need other ideas on what to put on them, try Funitella Bruschetta, Sicilian Caponata , this creamy crunchy pickled fig extravaganza or sooooo many more things. As for missing ingredients, the only thing Martha missed in this case was a squeeze of fresh lemon. The fact that she left off the fancy fresh herb chiffonades is just a pure gift to humanity.

Zucchini Bruschetta

Ever so gently adapted from Martha Stewart Living, July/August 2015. It’s a good thing, Martha. I promise. 

Pro move of the day: salting the zucchini before cooking it draws out water, eliminating sogginess.

Ingredients

  • 2 medium zucchini
  • Coarse salt and freshly ground pepper
  • 3 tablespoons unsalted butter 
  • 1/4 cup minced shallot
  • 1/4 teaspoon red-pepper flakes
  • a healthy squeeze of fresh lemon juice (not sure how Martha missed this!)
  • Toasted baguette slices
  • Extra-virgin olive oil, for serving (optional)
  • thinly sliced or grated cheddar cheese (optional)

Method

  1. Shred zucchini on the large holes of a box grater. (You should have about 4 cups.) Toss with 1/2 teaspoon salt in a colander set over a bowl. Let stand 10 minutes. Squeeze out excess moisture with your hands.
  2. Melt butter in a large skillet over medium-high. Add shallot; cook 1 minute. Add zucchini; cook until tender and golden, 5 minutes. Stir in red-pepper flakes; Squeeze fresh lemon over the whole shebang and season with salt and pepper. Serve atop baguette slices, drizzled with olive oil, if you must.

Double Zuke Roll-Ups

For the adventuresome (and truly zucchini laden) among you…Out of desperation for a suitable appetizer, I fell upon a brilliant way to put zucchini inside of zucchini. It seems a little cannibalistic, or like a vegetarian version of a turducken. But it all works and it’s tasty. It also uses pesto—preferably with fresh mint thrown in—to address other surpluses in your fridge or garden. Garnish with tomatoes because, well, August tomatoes. I am quite sure this would taste fabulous with some fresh corn stirred in. Yes go ahead try that! Blueberries? Easy now, let’s draw the line right there.

There are no amounts here because we’re using what we’ve got, right? Any leftovers are going into the spiralizer for a zoodle future.

Ingredients:

  • Whole zucchini, preferably on the larger side
  • Your favorite pesto. This Vegan one was darned good, but pick your fave and sub or add some mint for bonus points
  • Zucchini from zucchini bruschetta (see above)
  • Balsamic glaze (if you’re fancy, and I know you are)

Method:

Chop off the end of the zucchini and thinly slice into strips. Use either a mandoline (easiest), or bear down hard with a vegetable peeler. Spread some pesto on each strip, and then layer on some of the shredded zucchini mixture. Leave a little space at the end of each strip for a tidy closure. Roll up that bad boy and secure it with a toothpick. When you have all your roll ups on the plate, drizzle with balsamic glaze, if using, just before serving. You can also drizzle some oil on these and bake them to serve with the main meal. 

Do you have a favorite zucchini recipe? Or ten? Please let me know!

This picture right here is why you use balsamic GLAZE vs straight balsamic. Live and learn…


Best of Summer Simmer Chicken

Let’s be honest here about grilling and entertaining. Food that is hot off the grill is fantastic for everyone but the host, who is typically tied to said grill. If you really want to relax, it’s all about food that can be cooked long and slow with minimal effort and is very, very hard to mess up. Bonus points if it is good as leftovers. Some dishes that come to mind are crock pot pulled pork or carnitas and the king daddy of all picnic food: Chicken Marbella.

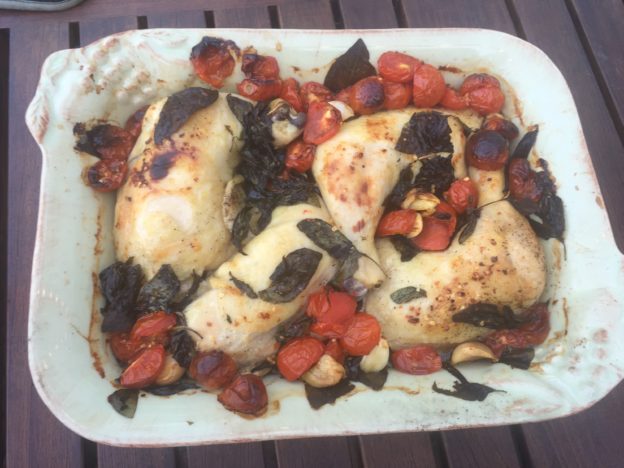
Ok, so maybe not pretty. But pretty tasty, which counts.

In case you have never met Chicken Marbella trust me when I say it is magical. It’s a Mediterranean classic, that even the most Mediterranean-averse eaters still love. That’s the magic. The only downside of Chicken Marbella is the long marinating time, and the longish list of ingredients.

With that in mind, this recipe is darned near perfect. It involves chicken that falls off the bone, and as much fresh basil tomatoes as you can handle. Even better, it takes easy to an impressively idiot-proof level. Any recipe that includes “throw” and “chuck” in the instructions has a place in my heart. With this recipe, and the supply of fresh corn coming your way, you’ve got summer dinners for any size crowd handled. While you’re figuring out what to do with your spare time, whir up a batch of ABC Summer Sauce to have on hand for the leftover chicken, veggies, pizzas, sandwiches, etc. I can’t count the number of times I’ve made it this summer, and it always gets raves.

Special slacker note: In three tries I have been foiled by bad pictures with this dish, but that hasn’t stopped me before. Honestly, though, a dish that makes even raw chicken looks somewhat pretty deserves some respect. Here’s hoping you get to step away from the grill and enjoy your summer evenings while they last!

Summer Simmer Chicken

AKA Jamie Oliver’s Tender and Sweet Chicken Legs with Sweet Basil and Tomatoes

From  Food52

Serves 4

Ingredients

  • 4 higher-welfare chicken leg quarters
  • Sea salt & freshly ground black pepper
  • 1 big bunch fresh basil, leaves picked, stalks finely chopped
  • 2 big handfuls red and yellow cherry or grape tomatoes and ripe plum or beefsteak tomatoes, cherry tomatoes halved, plum tomatoes quartered
  • 1 whole bulb garlic, broken into cloves (less works too)
  • 1 fresh red chile, finely chopped, or a big pinch of dried chile flakes
  • Olive oil
  • One 14.5-ounce/410 g can cannelini beans, drained and rinsed (optional)*
  • 2 handfuls new potatoes, scrubbed (optional)*

* I’m all for keeping it simple without the beans and potatoes, but if you need to extend the feeding power this is a great way to do it.

Method:

  1. Heat your oven to 350°F (180°C). Season your chicken pieces all over with salt and pepper and put them into a snug-fitting pan in one layer, skin side up. Throw in all the basil leaves and stalks, then chuck in your tomatoes. Scatter the garlic cloves into the pan with the chopped chile and drizzle over some olive oil. Mix around a bit, pushing the tomatoes underneath. Place in the oven, uncovered, for 1 1/2 hours, turning any of the exposed tomatoes halfway through, until the chicken skin is crisp and the meat is falling off the bone. If after an hour or so the skin isn’t crisping to your liking, you can turn up the heat and switch to convection, or just blast it under the broiler for a bit at the end, rotating the pan occasionally and watching closely, until you get the skin as brown as you like. Just don’t let the sauce simmer too vigorously or the meat might toughen up.
  2. If you fancy, you can add some drained cannelini beans or some sliced new potatoes to the pan along with the chicken. Or you can serve the chicken with some simple mashed potato. Squeeze the garlic out of the skins before serving. You could even make it part of a pasta dish—remove the chicken meat from the bone and shred it, then toss into a bowl of linguini or spaghetti and serve at once.


Okey Poke: Watermelon Poke Bowls

All the Fixin’s for a Poke Feast

At about this time, in the height of summer, we might as well throw up our hands and say, “It’s all about watermelon!” Seriously, between watermelon rosemary lemonade, watermelon salad, watermelon gazpacho and the soon-to-be shared watermelon jalapeño margaritas, I am hard pressed to get really excited about any other ingredient. But, like mama said, you must eat your veggies. And your protein. And your condiments (summer is condiment season after all).

This brings me to the poke bowl (say po-kay unless you want to horrify foodies and make Californians smirk). Poke originated as a thing in Hawaii, where fisherman needed a tasty way to use the trimmed scraps of freshly caught tuna. Bonus points for being able to serve it all out of a cooler. They did this by marinating it, putting it over sticky rice and then dressing it up with whatever condiments felt right. Intrigued by the sheer magnitude of food combining possibilities in one dish, I set out in search of my perfect poke match. I’m a huge fan of fresh raw tuna, as long as it is procured, prepared and paid for by someone else. When I saw watermelon poke taking over the Internet, I knew I’d met my destiny.

Watermelon poke, where watermelon stands in for tuna, is often made with raw watermelon which is quickly marinated. It is fine but bears little resemblance in taste or texture to tuna, and the perkiness drains right out of the watermelon after serving time. This version, adapted from Bon Appetit—in which the watermelon is marinated, cooked, then chilled until ready to be used—produces watermelon that is strangely similar in taste, texture and appearance to tuna. This not only gives you an easy, storable for days, cheap alternative to tuna, but it also makes the Vegans (not to mention the tuna) happy. Ba-da-bing! We have a winner!

As with any new type of food, the process can seem daunting at first. I promise, however, that it is low skill and effort/ high return. Here is what you’re doing:

  • Dicing the watermelon, and putting it in a simple marinade, ideally overnight.
  • Cooking that entire mixture down for 30 minutes then chilling it. At this point, or after the next step, it can chill in the fridge for up to a few days.
  • Tossing the cooked, cooled watermelon with sliced sweet and green onions, sesame seeds and soy sauce. Chill until needed (see above)
  • Cooking up a batch of sushi rice with some honey and vinegar. This can be served hot or made ahead and served cold.
  • Assembling your universe of your favorite fresh toppings, sauces and condiments.

Poke bowls are built around the upside of prep. Set up your basic elements and you can throw them together anytime, anywhere. They use what you have, what you love and what is fresh and available. They are the perfect cultural marriage of all your favorite things and a fully customizable feast.

With so many topping choices it is hard to decide what actual recipes to include here in your watermelon poke primer. For me, and for my very satisfied (and patient) extended family, the key components are the watermelon, the sushi rice and a few key condiments. The toppings are where you make this your own, and change it up based on mood, dietary constraints, availability, etc. My must haves among these are: pickled ginger for zing, avocado for creaminess, toasted peanuts or sesame seeds for crunch; scallions, chives or some such representative from the onion family to keep your taste buds honest.  

Sauces? Homemade are awesome, but sometimes enough is enough. Store bought faves can be as good or better.

And now, for the main event. Make a batch of the watermelon poke and store it in the fridge for poke bowls as needed. Bring it chilled, along with your cooked rice and an array of condiments to make a poke bowl bar for a party or picnic. This right here, my friends, will rocket you straight to the Bring It All Star Zone.

Watermelon Poke Bowl with a creamy sesame sriracha sauce.

Watermelon Poke Bowls

Mostly from justthefood.com 

  • Watermelon Poke (recipe below)
  • Sweet sushi rice (recipe below)
  • Diced cubed fresh vegetables
  • Savory sauces, crunchy toppings and condiments

The Watermelon Poke

Don’t fear cooking the watermelon. It will not disintegrate, but will assume the look and texture of raw tuna. Trust the process that will transform your watermelon from sweet to savory and into a weirdly awesome, Vegan-friendly science project.

For the marinated watermelon

Ingredients:

  • ¼ cup rice vinegar
  • 2 tablespoons sesame oil
  • 2 tablespoons Tamari or soy sauce
  • 1 tablespoon balsamic vinegar
  • 2 pounds cubed red seedless watermelon (about 6 cups), cut it into small cubes no larger than ½-inch. The consistent, smallish dice is key.

Method:

Mix together marinade in a shallow dish with a lid, or a re-sealable plastic bag.
Add watermelon and refrigerate for at least one hour, but it’s even better if you can do it overnight. Transfer marinated watermelon to a pan with a lid.
Cook covered on medium high heat for about 20 minutes, stirring occasionally.
Remove the lid and continue cooking for about 10 minutes more, or until deep red and translucent and most of the liquid has been absorbed. If you have a really juicy watermelon, you can drain off any excess liquid.
 Chill until ready to serve.

For the Poke

  • 1 recipe marinated watermelon
  • 1 cup julienne cut Maui Onions
  • 1 cup chopped green onion
  • 1 tablespoon sesame seeds
  • 2 teaspoons soy sauce

Add all ingredients to a bowl and toss to coat. Keep chilled until ready to serve.

The Sweet Sticky Rice

This sweet rice makes a perfect base to serve under your Poke. Use an Ice Cream Scoop for perfectly shaped balls of rice.

Ingredients:

  • 2 cups short grain arborio or sushi rice, rinsed
  • 3 1/2 cups water
  • 2 tablespoons honey or agave
  • 1 tablespoon rice wine vinegar
  • 1/2 teaspoon salt

Method:

Mix all ingredients together in the bowl of your rice cooker and follow the directions on your rice cooker. If you do not have a rice cooker, bring salt and water to a boil in a pot with a tight fitting lid. Stir in remaining ingredients. Return to a low simmer, cover and simmer for about 20 minutes, or until water has been absorbed. 

The Condiments

Here’s a list of options to get you started:

  • Pickled ginger
  • Cubed avocado
  • Cubed mango
  • Cubed cucumber
  • Thinly sliced radishes
  • Thinly sliced scallions
  • Chopped chives
  • Fried shallots
  • Dry roasted peanuts, roughly chopped
  • Toasted sesame seeds
  • sprouts and/or seeds
  • Cilantro or mint
  • Ponzu or shoyu sauce
  • Furikake (now that you’ve got it from your popcorn adventure)

Assembling the Poke Bowls

Mound a scoop of rice in a bowl (not on an plate—that’s just the way it’s got to be).

Top with a scoop of watermelon poke. Top it off with your favorite condiments, then add a drizzle of your favorite sauce(s). You know what to do!


Furikake Fireworks Popcorn

Weird as hell? Yes. Delicious? Yes, yes and more yes!!!

Weird food on the weekend. It’s a thing. Ok, maybe it’s not a thing, but it’s a thing this weekend if you make this. Spoiler alert: you won’t be sorry! You will, however, have to get a few things you might not have in your pantry. And you will have to suspend your disbelief that this bizarre mix of ingredients can combine to make a snack that is not only edible but also addictive.

Now for a little background. I’ve been meaning to make this ever since I saw it on Joy the Baker nearly three years ago, but I got stuck at Furikake—both the pronunciation and the procurement. As for pronunciation, say Foo-ree-kah-kay, and you are close enough. Say furry cocky and you are either a teenage boy or an adult who can’t help yourself. You know who you are.   

As for procurement, Furikake must be having its moment because the day I finally broke down and got it on Amazon, I found it at our awesome Coop. Only later did I discover that there are several flavors of furikake. Mine from the Coop was yasai fumi— “vegetable” flavor.” The yet-to-be used one from Amazon—Nori Komi—is seaweed flavor. Scary? A little.

Honestly, even harder to find than Furikake were the Corn Pops. Props to the Coop for taking the high road and not carrying Corn Pops, but in this case it sure would have helped. I considered buying two packs of mini cereals at the mini mart just to cobble together the cup of Corn Pops but dang—that’s a lot of surplus Fruit Loops and Apple Jacks.

On to the recipe. You’re going to cook up some bacon—good and crispy like you mean it. You’re going to chop it up fine. You’re going to make your own kettle corn—in your Whirly Pop, your big covered pot or your cracked Mickey Mouse popcorn maker. You’re going to brown some butter. Then you’re going to marry it all together with some additional weirdness including chopped up dried pineapple, corn pops and the precious furikake. And you’re not going to substitute anything for anything, because Joy said not to. After seeing this popcorn disappear with both kids and adults, I trust her on this.

So here you go. I hope this brings you and your people joy and weirdness this weekend.  

Roy Choi’s Furikake Kettle Corn

Ingredients

For the Kettle Corn

  • 3 tablespoon canola oil
  • 1/4 cup corn kernels
  • 1 tablespoon granulated sugar
  • salt to taste

For the Mix

  • 4 heaping cups kettle corn
  • 1 cup Corn Pops (the cold cereal)
  • 2 tablespoons furikake, plus more for topping if desired
  • 1 teaspoon red pepper flakes
  • pinch of cayenne pepper
  • 3 tablespoons finely chopped dried pineapple
  • 3 tablespoons finely chopped crisp bacon
  • 4 tablespoons unsalted butter, melted and browned
  • 2 tablespoons minced chives

Instructions

  1. To make the kettle corn, in a medium saucepan with a tight-fitting lid (or your weapon of choice), heat the canola oil over medium heat. Add the corn kernels and sprinkle with granulated sugar. Place the lid over the pan, keeping the lid slightly ajar. 
  2. Allow popcorn to begin popping. Once or twice, cover the pan completely, and use pot holders to lift the pan and shake it. When popping slows, remove from heat and sprinkle lightly with salt. Shake into a large bowl. 
  3. Add Corn Pops, furikake, red pepper flakes, pinch of cayenne, diced pineapple, and diced bacon. Drizzle the melted butter over the mixture and toss to combine. Place in a serving bowl and sprinkle with more furikake and minced chives. 
  4. Serve and enjoy! 

Bringing it: 

Shovel that good stuff right into a ziplock bag and take it where you will. I’m talking to you hikers, road trippers, party hoppers, fireworks watchers, Drive In goers…


Mochanut Granola

For all those times when you wish you could chew your coffee.

When I first ran across a recipe for mocha granola, it was an a-ha moment. Coffee, chocolate and breakfast all in one bite? Brilliant! It sounded like the perfect offering for a weekend away, a camping trip, a hike, etc. And so, the experimenting and recipe sampling began.

Granola making is neither rocket science nor an exact science. It involves mixing oats with all your favorite tastes and textures, lubing it up some fat and sweetener, and baking it in the oven until it is crisp but not burnt. How much fat and sweetener is where granola can go from pretty healthy to totally decadent. One swishy LA café’s mocha granola recipe involves two sticks of butter. Well, duh. Of course it tastes good. So does a cheesecake, but it doesn’t really get your day off to a healthy start. Some recipes call for only ground coffee, which can get gritty and  others for only brewed coffee which can be kind of wimpy. I needed to slay this beast.

In my excitement I misread the first recipe, and by measuring ground coffee vs brewed coffee ended up using a solid 8 times the intended amount of coffee. That first batch could have been named “True Grit.” Still, I didn’t want to back off that much on the coffee flavor, which happens if you use only brewed coffee. The extra liquid also means your granola takes longer to bake and crisp. I settled on using a combo of finely ground coffee, in the dry ingredients, along with brewed coffee mixed in with the oil and maple syrup.

The flavor profile of this reminded me of my youth, when Jamocha Almond Fudge ice cream turned my world upside down. I am pretty sure that in 6th grade I worked the flu for an extra day to stay home with this particular flavor. This recipe bridges the territory of breakfast and treat. It’s got a double dose of coffee— liquid and ground—which is balanced by

Roasty and toasty, straight from the oven.

a fair yet not indecent amount of sweetener, mostly in the form of maple syrup. I also added unsweetened flaked coconut, because when coconut rolls around and gets toasty with maple syrup it assumes bacon-like decadence.

You can sub butter or another oil for the coconut oil, and mess around with the type and quantity of sweetener you like (or have). Play around with it, and when you walk back inside your house and it smells like coffee, chocolate and roasted nuts…you’re welcome!

Mochanut Granola

Ingredients:

  • 2 ½ cups rolled oats
  • 1 cup almonds (or nut of choice)
  • 1 cup unsweetened flakes coconut (this is the addict dose. Use your judgment)
  • 1 Tbsp cocoa
  • 1 Tbsp finely ground coffee
  • 2 Tbsp brown sugar
  • 3 Tbsp coconut oil
  • 3 Tbsp maple syrup
  • ½ tsp or more vanilla (optional, but why not?)
  • 6 oz strong brewed coffee

Method:

Preheat oven to 325. Line one or two baking sheets with parchment paper. (It will cook up and crisp faster in two.)

In a large bowl combine oats, almonds, coconut, cocoa and ground coffee.

In a small saucepan melt oil and stir it together with syrup and brewed coffee until combined.

Pour liquid mixture over oats and combine well. Spread granola evenly in pan(s).  

Bake, stirring and checking every 10 minutes, for 30-40 minutes, until desired dryness. Don’t skip the stirring, especially if it’s all on one pan. The granola will crisp up more as it cools. Cool completely before storing.

Bringing it:

Curl up that parchment paper and funnel this goodness straight into a mason jar. Bring it anywhere you want to be a morning hero.

Cinco de Derby

With this in your house, how can your weekend go wrong?


What we have here, my friends, is a dream Double Header. Cinco de Mayo and the Kentucky Derby, on successive non-school nights. If there was ever a time to have a cool, refreshing  drink in your hand (and a snazzy hat on your head) this is it.

In honor of creative cocktails and mocktails, below are two infused simple syrups that will give your drinks a fresh twist appropriate for the upcoming occasions. And what the hell—keep scrolling for a few cocktail concoctions as well, though they are only a starting point. Don’t be afraid of using the jalapeno syrup in your mint julep (or even subbing cilantro for the mint) for some south of the border cha-cha.

Have fun and if you’re placing bets, good luck!

Jalapeño Simple Syrup

  • 1 cup sugar
  • 1 cup water
  • 2 jalapeños, seeded and halved lengthwise (or not seeded if you are brave)

In a small saucepan over high heat, combine 1 cup water, sugar, and jalapeños. Bring to a boil, stirring to dissolve sugar. Reduce heat to medium and allow to simmer to three to four minutes, stirring frequently. Remove from heat and let steep 20 minutes.

Strain syrup, discard jalapeños (or chop up the now mild pepper and use as desired), and cool syrup. (Simple syrup can be refrigerated, in an airtight container, for up to 6 months. It keeps even better if you add a capful of vodka.)

Cilantro Simple Syrup

  • 1 cup sugar
  • 1 cup water
  • 1 large handful cilantro leaves

Combine water and sugar in a saucepan, and bring it to a slow boil while stirring continuously until all the sugar has dissolved. Just as the mixture begins to boil, add 1 cup of fresh cilantro. Simmer for 5-10 minutes and let cool (this syrup will keep in your fridge for about a month. More if you add a capful of vodka).

Now how do we use them? Below are two ideas, but this is no time to follow directions. Use these in whatever cocktail or mocktail could use some salsa sass.

Each makes two drinks:

Cilantro coolers: wayyyy better than a kale smoothie on a fine spring night

Cucumber Cilantro Cooler

Cool. Hot. Fresh. This one has it all. slightly adapted from organic authority

To a cocktail shaker add:

  • 1 cup chopped cucumber (seeds removed) and a large handful of cilantro leaves (cilantro haters use mint instead, and maybe extra vodka to get over the cilantro glut)

Muddle well with a muddler or a heftier pestle. Then add:

  • 4 ounces vodka
  • Juice from 2 limes
  • 1 1/2 ounce jalapeno simple syrup
  • ICE! Don’t be shy here.

Shake well for twenty seconds and then strain* into a lowball glass filled with ice. Garnish with a wheel of cucumber and a sprig of cilantro.

*brave multi taskers, fans of zero waste, and those desperate for a meal idea because they spent so much time prepping cocktails will love this: fully drain the remaining cucumber and cilantro shrapnel and mix it in with Chinese noodles, a few more veggies and soy dressing for a summery salad.

 Jalapeno Cilantro Margarita

To a shaker add:

  • Juice of two limes
  • 1 ounce cilantro syrup
  • 1 ounce Blanco tequila
  • 1 ounce Reposado tequila and 6-8 slices of jalapeno (seeds removed).

Shake it like you mean it, then strain into a cocktail glass. Garnish with a slice of lime, a slice of jalapeno and a sprig of cilantro.

And finally, if making margs for a bigger crew…

Spicy Margaritas by the Pitcher

  • 2 cups of tequila
  • 1 1/4 cup lime juice
  • 1/2 cup of orange liqueur
  • 1/2 cup of jalapeno simple syrup

Stir together with ice in a large pitcher and pour into 8 glasses.

The Unicorn that Jumped the Shark

A sign of the times, direct from the Jet Blue terminal in JFK.

Unless you are living in, say, Narnia, you have likely noticed the Unicorn theme going on in the food world. There are rainbow-colored everythings, from cupcakes and cookies to noodles and sushi. I know of one person who got on a waiting list for $60 rainbow bagels…that reportedly “tasted like dirt.” And now, to punctuate the moment, Starbucks comes out with the Unicorn Frappuccino, an unnaturally bright, pink-to-purple, sweet-to-tart-morphing frozen beverage.

I tracked down the Unicorn Frappuccino at its source at a Starbucks in JFK, amidst a long line of bleary-eyed redeye survivors and dawn patrol flyers. Although nobody was ordering one at that hour, I got a few customer reviews of the mango flavored frozen slurry including: “Disgusting, with gross sweet tarty sugar on top,” or, as Stephen Colbert put it,  “a sugary affront to God.” This, my friends, is where Unicorn Food has, like the Fonz, jumped the shark, effectively creating “the moment when a brand, design, franchise, or creative effort’s evolution declines, or when it changes notably in style into something unwelcome.”

The unicorn food craze started out as a creatively wholesome pursuit, with unicorn toast. This is essentially cream cheese tinted with natural dyes from beet juice, freeze dried strawberry powder, turmeric root, chlorophyll, spirulina powder and freeze dried blueberry powder. Those little pots of fantasia, whimsically swirled on toast and garnished with star-cut vegetables, was innocent enough. Then Pinterest took over and things took a decidedly unnatural turn.

The trend must say something about a need for escapism (I am the Unicorn of Your Confidence, after all), or about the number of people on Pinterest with too much time on their hands. 

http://https://youtu.be/4Xk38CTE1h0

Whatever nefarious marketing ploy may be at the heart of this trend, one must concede that, throughout picnic season at least, rainbow colored food is a legit thing. If you want to bring your A Game to the table, you need to have unicorn food technology in your skill set.

A far safer, healthier, cheaper and more educational starting point—than ponying up $5 for 420 calories and 59 grams of sugar (the equivalent of 6 Krispy Kreme donuts and 22 Weight Watcher Points) for a Uni Frapp—are unicorn noodles. The basic recipe involves little expense and no fancy ingredients or techniques. As a bonus they involve a little bit of science. This is not Mentos in Diet Coke explosion excitement science, but acid (lemon juice) meets anthocyanin (cabbage mojo) color-changing science.

All you need to be trendy is some red cabbage, some lemon juice, and some clear rice noodles. (If you crave another white carb, make rainbow rice as featured in this unicorn sushi.) Once you have made the noodles, the challenge is finding something appealing to put on them. Peanut sauce? Not so pretty. Marinara? No grazie. Considering the lemon juice already at work, I went with olive oil, capers, parsley, salt and grated parmesan cheese (thank you Patti G!). Really any blanched or grated vegetables would work. Indigo Kitchen goes full Yellow Brick Road Technicolor and plates the noodles with every fresh vegetable and fun sauce on the planet, like this and this. I feel healthier and kind of magical just looking at these creations.

So here is the basic recipe, tightened up from Indigo Kitchen. If nothing else, just bring it to a friend’s house as a conversation starter. I mean really…unicorn side at the pot luck—you win!

Unicorn Noodles

Ingredients:

  • Water
  • Chunk Red cabbage
  • lemon or lime juice
  • toppings, mix-ins, fairy dust, etc…

Method:

Boil some water (enough to hold the amount of noodles you want) with the red cabbage. The amount of water used and the time you soak the noodles will affect the shade of blue your noodles will be. Less water/longer steep time= deeper color.

Turn off the heat and add the noodles. You can use basic white or clear noodles, but glass/clear noodles will get you the prettiest shade.

Let the noodles soak for about 5 to 10 minutes, depending on how deep you want the color to be. Remove the noodles and place them in a bowl.

before…

After. Rice noodles on left. Spaghetti on right. No contest really

Here comes the magic, and the chemistry lesson. Take a lime or lemon and squeeze some of the juice wherever you want it to be pink. Watch the noodles change color in front of your eyes. Hint: Bring the kids in here. Be a hero.

Purple cabbage has a pigment called anthocyanin, that changes color when it makes contact with something acidic or alkaline. When you cook a few pieces of purple cabbage for a short time in some water you’ll get a nice blue shade. Cook it for bit longer with a bit more purple cabbage for a nice purple shade. Add something acidic (lemon or lime juice) to the blue colored noodles and the pigment from the purple cabbage will react and take on a bright pink color.  It really happens. Try it! If you are not impressed, there’s always Starbucks.

Passing the Nina test. She is too nice to squawk.

Unicorn noodles: stars, mane and carrot horn for extra credit


turmeric-unicorn-noodles

Turmeric joins the party, lending yellow flair in unicorn land.

Snow Day Lemon Mousse

Light and fresh, like the snow we dream about!

This comes straight outta Steamboat, from Rocky Mountain Tania, who describes this lemon mousse as, “Amazing. Easy, light and such a counter balance to heavy winter food.”  Tania says she’s  embarrassed how much she makes this, but who in the world would be embarrassed by this thing of beauty?

The coolest thing about it is that it involves fresh snow. I just got back a trip west, where there is plenty of that, and I have high hopes that the return of cold temps to the east this week will bring some of the white stuff here as well. To all of you who are wishing for the opposite…C’mon man! Just give us one more month. Then we can all feel good about the meltdown.

Chilled Lemon Mousse

Adapted from Cook’s Magazine, with full photo, recipe and commentary credit to food and photo sensei Tania Coffey.

You will need:
A one quart soufflé dish (or any 1-1½ qt serving bowl)
A Kitchenaid with whipping attachment (or this recipe could be a real pain)
snow (or a good ice-maker) to put in a big bowl for chilling custard quickly

Ingredients:

  • Juice from 3 lemons (1/2 cup)
  • Zest from one lemon (3 tsps)
  • 1 packet (1/4 oz) gelatin
  • 1 cup whole milk
  • 3/4 cup sugar divided*
  • 2 large egg yolks (3 small) plus 5 large egg whites at room temperature
  • 1/4 tsp cornstarch
  • pinch cream of tarter
  • 3/4 cup heavy cream chilled
  • mint, raspberries or finely chopped pistachios for garnish

Method:

Leave eggs out for a couple of hours to bring to room temperature.
Zest one lemon
Add zest to the 1/2 cup of lemon juice and sprinkle pack of gelatin over juice.  Stir and set aside to soften.

Heat milk and 1/2 cup of sugar in a medium saucepan over medium-low heat.
stir occasionally until the sugar dissolves (5 min)
Meanwhile, whisk together the yolks, 2 Tablespoons sugar and the cornstarch in a medium-large bowl until pale yellow and thickened.
Whisking constantly slowly add the hot milk to the yolks (a rubber bottomed bowl is so great here so it doesn’t move while you are whisking and pouring).
Return the egg yolk-milk mixture to the pan and cook over medium low heat, stirring constantly until the foam dissipates to a thin layer and the mixture thickens to the consistency of heavy cream (185 on an instant read thermometer).  About 4 minutes. Do not over cook here or it will get lumpy or worse.

Pour the mixture into a medium-large bowl (I use the already dirty one) and add the lemon/gelatin mixture and stir.

Chilling’ in the snow. Sooooo cool!

Set the bowl in a larger bowl of snow (sorry, if you don’t have fresh snow ice water works well).  Stir occasionally to cool.

While the custard is chilling crank up the Kitchenaid with the whipping attachment.
Beat the egg whites and cream of tarter at medium speed until foamy (1 minute)
Increase speed to medium high.
*Add 2 Tablespoons of sugar (I usually skip this addition because I like the mousse super tangy not sweet) and beat until glossy and the whites hold soft peaks.
Don’t over beat.

Remove custard from snow/ice bath.
Gently whisk in one third of the egg whites.
Then fold in the remaining whites with a rubber spatula.

In the same mixer bowl (don’t bother cleaning it) beat the cream on medium high speed until soft peaks form when whisk is lifted (2-3 minutes).
Fold the cream into the custard/egg white mixture until no white streaks remain.

Pour into a 1 quart soufflé dish (or any 1 1/2 quart serving bowl).  Refrigerate.

For best texture chill for 1-2 hours

Garnish as desired. PS. This recipe makes you look like a pro—try it quickly!

Squaw Valley USA, a looooong way from meltdown.

Cauliflower and Pear Soup


My Dad’s favorite soup was vichyssoise, which is French for a cream, leek and mashed potatoes milkshake. While vichyssoise is delicious, I always feel a little guilty having a day’s worth of calories in a cup. It’s also traditionally served cold, which makes it a tough sell in winter. This soup, from Food52, reminds me of Vichyssoise in its creamy texture and in its potato/leek provenance. It is, however, downright healthy and served hot—key features for all food in January.

The addition of pears here is all upside, especially if you need a way to use up any Christmas pears. By the way, if you happen to have that problem, I’ll be right over! It also cooks in one pot. And that’s not all…it can easily be Veganized by replacing the butter with your fat of choice, and using vegetable broth instead of chicken broth. Swirl in some cream if you need a hug.

Cauliflower and Pear Soup
Serves 4 to 6

Ingredients

  • 1 T olive oil
  • 2 T butter
  • 1 large leek, white and light green parts, chopped
  • 1 small shallot, chopped
  • 1 head cauliflower, green leaves and trunk removed, florets chopped
  • 2 small yukon gold potatoes, peeled and chopped
  • 1 large or 2 small pears, peeled, cored, and chopped
  • 5 leaves fresh sage (or about 2 tsp chopped), plus more for garnish, if desired
  • 1 T chopped fresh thyme leaves
  • 5 to 6 cups chicken stock
  • kosher salt + freshly ground black pepper
  • 2 to 3 tsp sherry vinegar, or to taste (champagne vinegar also works well)
  • 2-3 Tbsp maple syrup (optional)

For Serving:

Method:

  1. Heat the oil and butter in a soup pot over medium heat. Add the leek and shallot, and cook until they are soft, stirring occasionally, about 5 minutes.
  2. Add the cauliflower, potato, pear, sage, and thyme, stirring to thoroughly coat them with the oil and butter. Season with salt and pepper. Cook until lightly browned, stirring frequently, another 8 to 10 minutes. (if your pot is pretty full it may take quite a bit longer. Be loose and go with your instincts here). You’re aiming for a little caramelization around the edges for depth of flavor.
  3. Add 5 cups chicken stock. Season to taste with salt and pepper. Bring to a simmer, lower heat to just maintain the simmer, and cook until all of the ingredients are very tender, about 30 minutes.
  4. With an immersion blender or regular blender, puree the soup until it’s smooth. If using a blender, you may need to do this step in batches, then return to pot. You’re looking for a smooth, velvety texture, so take your time to blend thoroughly. Thin with more chicken stock, if needed, until you reach desired consistency.
  5. Season to taste with vinegar, maple syrup if desired (when would it not be?) and salt and pepper. Serve in heated bowls, with garnish of choice

The experts say you should serve this with a gooey grilled cheese sandwich. Who am I to argue? And in case you wondered, it’s darned good cold as well. Buck would approve!

Winter’s back. Stay warm out there!