Category Archives: Start it up

Watermelon 911

 watermelon1

We’ve all been there. It’s the height of summer and you get a watermelon every time you go by the big bin of them in the store because it just seems like the right thing to do. You can get ambitious and whirl it into watermelon gazpacho or mix up some watermelon sangria or just cut it in cubes for snacks. Inevitably you reach the point where a watermelon hangs around a tad too long so you give it precious fridge space. And then by some crazy plot twist you end up with another watermelon. You’ve got yourself a watermelon emergency. What do you do?

Well you start drinking of course. And you drink watermelon juice. In the name of research I watched nearly all of a six minute video on making watermelon juice until I realized it was just an excuse for people to watch a hot yoga instructor with expressive hands talk breathily about her “watermelon secret.” I felt so violated. There is no secret here—just throw watermelon chunks in a blender and press the button. I should have used my time to watch this video, inspired by a facebook find from Sister B:


In honor of Sister A, I wanted to put my watermelon juice to good use by making a big batch of cocktails, but the week was young. Soooo, with inspiration from Sandy’s freezer dacquiris I froze the whole batch in my brilliant rectangular Tupperware pitcher. Now, my fridge has been freed, I’m still stone sober, and I’m ready for a weekend expedition without needing to find ice packs for the cooler. Boom!

A few details, as ever. This drink, inspired by Food52’s  Boozy Watermelon Lemonade, relies on rosemary simple syrup for sweetness. It’s well worth your time to make up batches of simple syrup, with various flavorings (mint, rosemary, citrus, peppercorns, etc, etc) and have them on hand to fancy up everything from iced tea and plain old seltzer to your firewater of choice. Inspired by my favorite Aveda shampoo, I added some mint to my rosemary syrup as it steeped because, why not?

This is an excellent non-alcoholic drink as well, but don’t freeze it without the booze or you’ll have one huge ice cube. I made this drink with gin because it has that little edge to it. But feel free to use vodka or whatever feels right to you. And finally, this recipe is easily scaled up or down, so if you’re on a date just change cups to ounces.

Now let’s get mixing. The weekend’s a comin’ and you need to free up that fridge for bacon and burrata!

Watermelon Rosemary Lemonade

Serves lots

Ingredients:

  • 5 cups watermelon juice *
  • I ½ cups rosemary simple syrup **
  • 1 ½ cup lemon juice, lime juice or any combo of the two, fresh squeezed (or use that frozen minute maid juice I won’t tell!)
  • 1 ½ cups seltzer
  • 3 cups gin

 Method:

Combine first four ingredients and stir well. Pour the mixture into a large pitcher. Add gin if using. Stir to combine. Serve over ice in jars garnished with a rosemary sprig or fresh mint or both. If freezing this for later, do not add seltzer and allow to freeze at least 8 hours and up to a day. Remove from freezer and stir/scrape it into Slurpee form. As it thaws it will get easier to pour. If there are leftovers just refreeze them. 

*To make Watermelon Juice (no thanks to Yoga woman)

Chunk up a watermelon and puree it in a blender in batches. Pour juice through strainer (if desired, and definitely if freezing) and into a wide bowl. Save yourself sticky anguish and do this over the sink. Transfer to a pourable container if not using it right away.

** To make Rosemary Simple Syrup (thanks to the Kitch’n)

Ingredients:

  • 1 cup sugar
  • 1 cup water
  • 4 fresh rosemary sprigs

Method:

Stir together first 3 ingredients in a medium saucepan over medium-high heat. Bring to a boil, stirring occasionally, and boil 1 minute or until sugar is dissolved. Remove from heat, and let stand 30 minutes. Pour liquid through a wire-mesh strainer into a cruet or airtight container, discarding rosemary sprigs. Cover and chill 4 hours. Garnish, if desired. Syrup may be stored in refrigerator up to 1 month.

Makes about 1 1/2 cups.

Beet Caviar—for the No Roe Gourmet


beet-caviar

Meaty, beety, sorta sweety. Keep some of this in your fridge to fancy up any toast or cracker.

Yes, summer should be about melons and berries and fruity deliciousness. But let’s have a moment with beets, shall we? They are hearty but also virtuous, sneakily sweet without being considered dessert. Put them with a few other secret ingredients (like dates, walnuts, and a dollop of creme fraiche) and they are downright decadent. Speaking of secret ingredients, a note here on the booze: When using bourbon I went a little overboard once and it was overpowering. Stick with the 2 Tbsp. And if you’re not into booze, try using some good apple cider instead.

Roast a load of beets, however you like to do them, and keep them in the fridge for this, or easy deconstructed salads, or beet hummus or pretty smoothies. And hang in there—fruity summer goodness is coming at you soon…I promise!

Beet Caviar

Lifted from 101 Cookbooks and adapted from The Eastern and Central European Kitchen: Contemporary and Classic recipes by Silvena Rowe (2007).

Prep time: 5 min – Cook time: 60 min

If you have bourbon or vodka on hand, you can use one of those in place of the cognac.

Ingredients:

  • 4 medium beets, washed and trimmed
  • 5 plump dates, pitted and chopped
  • 2 tablespoons cognac (bourbon, or vodka)
  • 4 garlic cloves, peeled and smashed
  • 2 tablespoons lemon juice, plus more to taste
  • 1/2 cup chopped toasted walnuts
  • 3/4 teaspoon fine grain sea salt
  • 3 tablespoons creme fraiche, plain yogurt, or sour cream
  • lots of freshly chopped chives

Method:

Preheat the oven to 400F with a rack in the center. Puncture the beets with a fork a few times, and roast for an hour, or until the beets are completely tender when you test by cutting into the center with a knife.

In the meantime, gently heat the cognac in a small saucepan. Place the dates in a glass bowl, and, when just hot, pour the alcohol over the dates. Jostle around a bit, and soak for at least 10 minutes.

When the beets are cooked and cool enough to peel, remove the skins and chop into cubes. Place in a food processor with the dates, cognac, and garlic. Puree until the texture is to your liking – I left a bit of texture here, but you can go smoother if you prefer.

Transfer to a serving bowl before adding the lemon juice, walnuts, and salt. Taste, and adjust the seasoning if needed. Serve swirled with the creme fraiche* (or on a creamy little mattress of it), and finished with chives.

Serves 6.

*buy creme fraiche, or make your own by one of these two methods, depending on what you have on hand:

Whisk together equal parts heavy cream and sour cream. Cover loosely with plastic wrap and let stand in the kitchen or other reasonably warm spot overnight, or until thickened. Cover and refrigerate for at least 4 hours. The tart flavor will continue to develop as the creme fraiche sits in the refrigerator.

or…Mix one cup of room temperature heavy or whipping cream with two tablespoons of butter milk in a glass jar and cover. Let it stand at room temperature for 8 to 24 hours, or until it thickens. Stir well and refrigerate for up to two weeks.

Love the One You’re With Pineapple Salsa

salsa

A picture of restraint. Pineapple salsa with Taco Works chips, imported from San Luis Obispo, CA. At left, all the ingredients that did not go into it.

What? Don’t tell me you forgot it was Cinco de Mayo. True, having it fall on a Tuesday is just plain sad (see Marcharitas and weep). Sadder yet is that this is the very first time I realized my birthday day of the week syncs up with Cinco de Mayo. I’m not sure what that means, but it must have something to do with a cicada-like cyclical intensity of birthday season. Regardless, it’s tough to rally for a Tuesday.

BUT, we can get a little tropical and sassy with pineapple salsa. This came about because I had some leftover fresh pineapple from a pineapple avocado salad that I will share with you as soon as I sort out the spice thing. (Suffice to say, habañero and jalapeno are different animals.)

Making salsa is neither complicated nor precise, but it can be messy, especially when you are working with juicy fresh pineapple. The prospect of a sticky cutting board and floor made me turn to the food processor. While that made the pineapple more pulpy than chunky, it makes the finished product easier to eat. Bottom line: you can wrangle even more of it onto a chip, which is the entire goal when a good dip is involved. (See also Ollie’s Trip Salsa, mango jicama guacamole, balsamic black beans.)

Even thought the pineapple gets pulverized, the other key elements stay appropriately chunky so you feel like it’s salsa and not just sauce. I am pretty happy with this salsa for what went in to it, but also for what didn’t. I’m looking at you, mango, avocado, garlic and jicama. Just because I had every Mexican fruit and vegetable didn’t mean I wanted to make you all go get them. Finally, here is the very loose recipe for…

Love the One You’re with Pineapple Salsa

As the name suggests, this salsa is a consequence of what I had in the house. Don’t be shy—go with what you’ve got. LTOYW

 Ingredients:

  • ½ fresh pineapple (or less), cut into whatever slices you know how to make
  • ¼ red onion (or more if that’s your thing)
  • 1 small or part of a large jalapeno, seeded and chopped
  • 1 chunk fresh ginger, chopped (about 1 Tbsp)
  • A responsible amount of fresh cilantro (a healthy handful), chopped. Go with your gut on this. And if you hate cilantro (Beatie) grab some mint instead.
  • ½ lime, juiced
  • 1 tsp maple syrup (totally optional but it was there)

 Method:

Put the pineapple in the food processor and pulse until all the big chunks are gone and it is the consistency you can imagine eating.

Pour the pineapple into a bowl.

Put the onion, jalapeno, ginger and cilantro in the processor and pulse until desired, edible consistency.

Scrape those veggies into the pineapple. Stir in syrup (if desired) and lime juice. Add salt to taste.

Enjoy with chips, on fish or chicken, on a sandwich, on a spoon…whatever. And while you’re staring at the jicama you didn’t use, cut that baby up and squeeze the other half of the lime over it so you have another thing to dip in the salsa. Happy Cinco de Mayo. May it make your Friday come all the faster!

Spring Chickens, and Lots of Eggs

Spring is trying to poke through. At least the chickens are feeling it.

Spring is trying to poke through. At least the chickens are feeling it.

If you have neighbors with chickens you might be getting a lot of eggs right now. And really, it makes sense. If I were a northeastern chicken I would not be giving up the goods until just about now. We had quite a winter. And now that it’s relaxing its grip, we’ve got eggs.

This is a good thing, because as it turns out, the aforementioned salad week is actually going to have to be salad month. The past week has reminded me of all the great salads out there, like edamame avocado citrus, shaved asparagus, massaged kale, as well as all the delicious ways to create a deconstructed lunch. It leads me to think, why wasn’t I doing this all along? But that would take away the springtime angst I depend on for balance.

Today, we’re talking about salad toppers. One staple in our house is coconut “bacon.” I did a little blind taste test with my peeps (who are admittedly a bit gun-shy of my experiments after discovering black beans in their brownies and shredded cauliflower in their mac and cheese. Poor dears.) Anyway, like real New Englanders they again gave two thumbs most enthusiastically up to the maple syrup versions that I tried, so I’m sticking to those.

I tend to go a bit overboard on food combining, especially when it comes to toppers. But nothing gives mealtime heft to a salad like the ordinary and incredible egg. Furthermore, fully self contained eggs are the ultimate portable food so they are a natural for Bring It!

Hard boiling eggs ought to be easy, but still every time I do it I have to refer to a grimy index card tucked behind my stove that tells me exactly how many minutes to boil them, let them sit covered and then rinse in cold water. Here are two awesome methods—baking and steaming—both of which will set you free from the grimy index card. The first lets you cook a heap load of eggs—as many as you can fit on your over rack. The second takes slightly less time and the resulting eggs are slightly easier to peel. At any rate, if egg peeling challenges you watch this video (spoiler alert: run them under cold water while peeling.)

So here you go, you future queens and kings of deviled egg overabundance. Chickens, get on your marks!

Method 1, from Alton Brown.

Position an oven rack in the middle of your oven. Thoroughly dampen a kitchen towel and lay it over the rack. Load that rack up with as many eggs as you like, as long as they don’t touch. Turn your oven on to 320° F and let your eggs bake for 30 minutes. Then, pull the rack out and grab the four corners of the towel to create a little cradle for the eggs. Carry the towel with the eggs out of the oven and transfer the eggs to an ice bath. Let them chill out until you can handle them. Dry them off if you’re making Easter eggs, or peel them if you plan to eat them.

  • Pros: Volume volume volume! Yes of course you need two dozen!
  • Cons: Takes more total time (but it’s brainless time)
High and dry--the perfectly easy way to cook your eggs.

High and dry–the perfectly easy way to cook your eggs.

And Method 2, from Ali Slagle

In a big pot with a metal steamer inside, bring 1 inch of water to a boil. Add your eggs directly from the fridge to the steamer—6 fit without overcrowding. Cover the pot and let the eggs cook for 12 minutes (6 minutes for soft boiled). If you plan to eat them cold, transfer the eggs to an ice bath and let them chill out until you can handle them, then peel them.

  • Pros: Quick—you’re boiling an inch of water, not an entire pot; you can easily make them soft boiled too.
  • Cons: You can’t go for mass production as with the oven method.


Love, and a Side of Buffalo Chicken Meatballs

 a few of the best friends in the world. Way better looking than meatballs in the sun.

A few of the best friends in the world. Way better looking than meatballs.

This is about meatballs, but it’s not really about meatballs. It’s about friends and family and communities and about the times that remind you how much you love all of the above. Those times are called parties.

I’m on spring break, which is why we’ve sort of lost touch (It’s not you, it’s me.) The anchor of the trip was the party (see happy purple people above) to honor my awesome mama. The whole process of throwing a party in your hometown—especially when you have no definitive vision or time or really any business thinking you can pull it off—is confirmation that Dorothy and her sparkly red shoes really had it right. There’s no place like home.

Friends appeared at just the right time to help me shop, delivered fondue pots, brought drinks and favorite dishes, ship-shaped the house, helped prep, cook, clean and tend each other throughout, took pictures and showed up with their rally caps on. They asked “how can I help?” and when I hesitated they just jumped in and did. The timeliness of the help was downright freaky, as when I was lamenting that I’d failed to order a cake and the phone rang: “Could I prepare a signature dessert to honor your mom?” I’m talking crazy good.

Like I said, this isn’t much about meatballs. BUT for this occasion I needed something easy I could make ahead and then pop in the oven, something that would not require any utensil beyond a toothpick, and something that was worthy of the best friends and family a girl could ever have. These mighty meatballs (poached from Epicurious) delivered in all areas. As a bonus, the leftovers were good the next day, cold and reheated.

Make these and have a party to remind yourself of all the good stuff and good people in your life.

Ingredients:

  • 2 tablespoons vegetable oil
  • 4 tablespoons (1/2 stick) unsalted butter
  • 1/3 cup Frank’s Red Hot Sauce or any other favorite hot sauce
  • 1 pound ground chicken, preferably thigh meat (turkey works too)
  • 1 large egg
  • 1/2 celery stalk, minced
  • 3/4 cup bread crumbs
  • 1 teaspoon salt
  • Some kind of Blue cheese dip or dressing

Method:

Preheat the oven to 450°F. Drizzle the vegetable oil into a 9×13-inch baking dish and use your hand to evenly coat the entire surface. Set aside.

Combine the butter and hot sauce in a small saucepan, and cook over low heat, whisking until the butter is melted and fully incorporated. Remove from the heat and allow the mixture to cool for 10 minutes.

Combine the hot sauce mixture, ground chicken, egg, celery, bread crumbs, and salt in a large mixing bowl and mix by hand until thoroughly incorporated.

Roll the mixture into round, 3/4 -inch balls, making sure to pack the meat firmly. Place the balls in the prepared baking dish, being careful to line them up snugly and in even rows vertically and horizontally to form a grid. The meatballs should be touching one another.

Roast for 15 to 20 minutes, or until the meatballs are firm and cooked through. A meat thermometer inserted into the center of a meatball should read 165°F.

Allow the meatballs to cool for 5 minutes in the baking dish before serving.

Serve with blue cheese dip for the real buffalo experience

 See? I told you. But don’t judge. Just make them. Trust me on this.

See? I told you meatballs aren’t as pretty as friends. But as with friends, don’t judge. Just make them, love them  and be happy.

Date Night

CROPDATE

Just another bad, desperate date picture. Imagine the real deal with greek yogurt (not Yoplait), big flaky sea salt (not Mortons) and a real photographer (not me). By the way, even as stand ins these were still darned good.

There are certain things I can’t make when I am going to be home alone for a long stretch. One is bread. I learned this the day after I received a bread machine for my birthday—something I had in fact pleaded for. I was single at the time, recently out of a career and not entirely hopeful about my future. A bread machine was the worst thing to add to this mix. I made a loaf, I ate the loaf, I wiped out the machine repackaged it and brought it back to the store. If you happened to buy a bread machine around the spring of ‘95 at the Reno Macy’s it may have been test driven. Sorry.

That’s the long way of saying that I’ve discovered yet another thing I cannot make when I am alone. Sauteed, salted dates. Really, they are ridiculous. Salty, sweet, creamy and even crunchy (if you cook them too long the way I like to). Also they are easy to make, to serve and to eat. They are very quick, pretty healthy, and totally delicious.

The only beef I have with the recipe featured on Food52 is that they call for unpitted dates and then suggest luscious variations, all using pitted dates. Now really, who wants to deal with date pits, especially at a party? Let’s just leave them out. So here you go. Happy date night!

Sauteed Salted Dates

Serves as many as you care to serve

Ingredients:

  • sharp extra-virgin olive oil.
  • pitted medjool dates (Deglet will do, but medjool are A team material. (count on 4 to 5 per person as an appetizer)
  • flaky sea salt. The good stuff here–you need those big flakes.

Method:

Heat 1/4 inch olive oil in a small sauté pan over medium heat. Fill the pan with dates and cook, turning them a few times, just until they’ve warmed through. (They burn easily, so don’t overdo it if you want soft dates, but do overdo it if you want some crunch) Serve them on a plate with flaky sea salt.

Notes:

These can be served as is or… with warm bread to sop up the oil, on a shallow plate spread with good plain greek yogurt and drizzled with the leftover oil in the pan, with a wedge of blue cheese and a sprinkling of nuts. Get totally pro and add pistachios to the pan as you heat the dates. Or just saute and salt those babies and be done with it. Be as plain or as fancy as you like.

There are no amounts here, which is key. If you are alone and feeling vulnerable to sweet salty overindulgence, make just a few. If you are having a party, make a whole bunch. Leftover dates, if you manage to resist, are good any time of day. I know. I’ve tried. A-ny-time.


Party Time Hummus


Don't bring that hummus. Bring THIS hummus.

Don’t bring that hummus. Bring THIS hummus.

It’s getting to be party season. And what’s a party without that token tub of hummus with the perfect swirl on top? Yes, it’s healthy, it’s appreciated, it gives you something to do with those mini carrots. But it’s, yawn, hummus. Wake up and smell the chickpeas! You can bring something healthy and easy that also has seasonal flair and cha-cha. Bust out the roasted beet or pumpkin hummus for a totally different vibe—hot pink, vibrant orange and totally delish.

The beauty of making these together is that you roast the garlic in olive oil and then use both in both recipes. No need to measure. Just roast a whole load of garlic because when is it ever a bad thing to have roasted garlic and garlic flavored oil on hand in the fridge? Yeah. Rhymes with never. You’ve got your base for awesome salad dressings, crazy good roasted vegetables, a drizzle for soup, dipping oil for bread, etc etc etc.

Now, I happened to have roasted squash and roasted beets begging to be used up so I was going to make up a batch of each of these. But somehow my pantry only coughed up one can of chickpeas. Stranger still is that I had six cans of sliced beets. How does that happen? Rest assured a recipe for canned beets is on the horizon. Given the situation I made a half batch of each hummus which is not a bad tactic. Note (with joy) that the pumpkin/squash hummus does not involve tahini, which is handy if you ran out of your stash or if having another expensive tub of nut butter is going to put you over the edge. You can use canned pumpkin if that’s what you’ve got, and as soon as I get more chickpeas I’m going to try using canned beets as well. Stay tuned!

The final thing you need to know before embarking on this food processor adventure is that hummus is not an exact science. Get the basic ingredients and then tweak as desired. I always put in extra lemon and (when nobody’s looking) salt. We’re making this stuff from scratch fergawdssake, so just think about how much crap we are NOT putting in there. A scootch more kosher salt isn’t going to hurt.

Pumpkin Rosemary Hummus

Adapted from Pinch of Yum

If you use kabocha squash it will be a little sweeter and a little thicker so you may need to add some warm water at the end to achieve your ideal texture.

Ingredients

1-2 cloves roasted garlic (see #1)
2 Tbsp olive oil
2 Tbsp water
1 can chickpeas, drained and rinsed
2/3 cup pumpkin puree (or hint hint, kabocha/butternut squash puree)
1 Tbsp maple syrup or honey
squeeze or more of fresh lemon (optional)
1/2 tsp finely minced fresh rosemary (more to taste)
salt to taste

Method

  1. To roast the garlic, simmer the peeled cloves in a small saucepan with olive oil for 15-20 minutes over low/medium heat. See note above and make more if you can.
  2. Puree all ingredients except rosemary in a blender or food processor until smooth. Add more oil or water as needed. Stir in the rosemary at the very end.
  3. Serve with warm naan, apple slices, crackers, carrots, wheat toast, roasted vegetables, pita bread, and/or anything.

Roasted Beet Hummus

From Minimalist Baker

Ingredients

1 small roasted beet
1 15 oz. can (1 3/4 cup) cooked chickpeas, mostly drained
zest of one large lemon
juice of half a large lemon
healthy pinch salt and black pepper
2 large cloves roasted garlic, minced or mashed (see garlic step in previous recipe)
2 heaping Tbsp tahini
1/4 cup extra virgin olive oil

Method

  1. Roast Beets (see below)
  2. Once your beet is cooled and peeled, quarter it and place it in your food processor. Blend until only small bits remain.
  3. Add remaining ingredients except for olive oil and blend until smooth.
  4. Drizzle in olive oil as the hummus is mixing.
  5. Taste and adjust seasonings as needed, adding more salt, lemon juice or olive oil if needed. If it’s too thick, add a bit of warm water.
  6. Will keep in the fridge for up to a week.

Roasting beets: Preheat oven to 375°F, remove the stem and most of the root from your beets, and scrub and wash them underwater until clean. Drizzle on a bit of canola oil, wrap tightly, and roast for one hour or until a knife inserted falls out without resistance. They should be tender. Cool to room temperature.

Tomato Jam, co-starring sugar and spice

spicy tomato jam

Tomato jam and all the fixin’s for an alfresco summer feast. As ever, bacon helps.

Oh yeah. We’re jamming on tomatoes because it’s the ingredient of the month. It’s a little early for many of you New England gardeners, but pretty soon we’ll be in full tomato overload, so I’m getting you prepped. Tomato cheddar pie, featuring big honkin’ full-sized red bombers will be coming at you soon. But let’s ease into tomato season, and give it some sass while we’re at it, with this sweet and spicy number.

 Let me first say that there’s nothing quite as perfect as a fresh tomato from the garden, so it feels a little sacrilegious to futz with fresh tomatoes in high summer. BUT, sometimes we go overboard, and just have too much of a good thing. When that happens, make this jam.

It adds some zing to a BLT (along with crunchy iceberg or romaine, not shmancy wispy greens) or any caprese type appetizer with basil and fresh mozzarella or my new best friend, burrata (thank you Jeanie!). Use it with a creamy base in bruschetta deconstructed, as an element of lunch deconstructed, put it in quesadillas, on pizza, over a poached egg or my favorite way, on a lusty piece of That’s Life Bread spread with avocado. It’s sort of like grown up ketchup, and you can dial the sweet and spice up or down as you see fit.

Ok, here we go.

 Ingredients

3 Tbsp olive oil
1 1/2 pounds cherry or grape tomatoes, halved
3 Tbsp packed dark brown sugar
3 medium cloves garlic, minced (about 1 tablespoon)
1 small shallot, minced (about 2 tablespoons)
2 Tbsp red wine vinegar
2 Tbsp Worcestershire sauce
1 tsp red pepper flakes (or some finely diced jalapeno for extra cha-cha)
Kosher salt and freshly ground black pepper

Method

Heat oil in large skillet over medium-high heat until shimmering. Add tomatoes, brown sugar, garlic, shallot, vinegar, Worcestershire, red pepper flakes or jalapenos, 1/2 teaspoon salt, and 1/2 teaspoon pepper, and cook, stirring until tomatoes are softened and lightly browned, about 15 minutes. Transfer to bowl and let cool to room temperature.

Bring It!

Bring this in your mason jar of choice, is a brilliant addition to any picnic, and an excellent contribution to any summer gathering, peace offering or gift basket.

Strawberry Mania

Summer's strawberry bounty

Summer’s strawberry bounty in its many forms.

Strawberry season is getting off to a slow start in our corner of the world, but now the big grocery stores are full of them and with a little sunshine the farmers markets will soon be exploding with the good stuff. Of course, you’re not going to go wrong by simply washing them and letting everyone inhale them by the pint, but let’s go over just a few easy, yummy ways to use them.

Ready? Here we go…

First, a word on hulling strawberries. The frugal among us get torqued at wasting half a strawberry because SOME PEOPLE grab the stem, take one big bite and leave the rest for the compost bin. So we the frugal rush to hull all the strawberries and thereby enable maximum use of the fruit. The best way to do this of course is with a strawberry huller, and if you have one you are my culinary niche tool hero. If you don’t, here are two solutions to maximize each berry:

First, the most basic and humble vegetable peeler has a built in “potato-eye remover” at the end, which can just as well take on strawberry stems. You will quickly discover that you can’t manhandle a strawberry like a potato, but get as close as you can to the stem, plunge the tip of the peeler right in and dig out the stem. It takes about three strawberries to master this.

If that still sounds too much labor go ahead and chop off the tops, then use them to make your own shmancy strawberry water that will make you the envy of any yoga class:

Strawberry Water

After rinsing your strawberries, slice off their tops and dump them into a large jar. Fill it with water, let it sit for an hour or so and… Voila! Strawberry infused water. Drink deeply. Feel beautiful. Namaste

Worlds Easiest Strawberry Dessert

Ingredients:

  • Strawberries
  • Sour cream
  • Brown sugar

Method:

Grab a strawberry. Dip it first in sour cream, then in brown sugar. Eat. Repeat.

Strawberry-Rhubarb Compote:

This comes from the Bitten Word with inspiration from farmer Carrie at their CSA It is certified easy, very quick, kid pleasing, totally portable AND a great way to use up the rhubarb that might be taking over your garden. The guys at BW advise us not to get hung up on the amounts listed in this recipe. Depending on the amount of rhubarb and strawberries you have, the method is easily adapted. 

Ingredients:

  • 1 1/2 cups rhubarb, sliced into half-inch pieces
  • 1 cup strawberries, capped and halved (if using larger strawberries, you can quarter them)
  • 1/4 cup sugar

Method:

Place rhubarb in a saucepan. Sprinkle with sugar. Cook over medium heat until rhubarb begins to soften and fall apart (20 minutes). In the last 5 minutes of cooking, toss in the strawberries. Add a little lemon zest at this point for extra credit.

Remove from heat and let cool. Store in an airtight container in the refrigerator. Serve over good vanilla ice cream or yogurt, top with whipped cream or just put it on a spoon.

 Some Savory and Sweet Goodness

Balsamic vinegar and strawberries are a classic Italian-inspired combination. They can be served as a dessert, like in Ina Garten’s recipe below, in a salad with goat cheese and peppery greens (pepper is key to the strawberry/balsamic alchemy) like arugula or as an appetizer like on the bruschetta further down. I’ve even seen them on a pizza with bacon, but we’re not going there today.

 Balsamic Strawberries à la Ina Garten

 As with the compote, no need to be too particular on quantities. Just aim to get the proportions close:

Ingredients:

  • 4 pints (8 cups) fresh strawberries, sliced thick
  • 5 tablespoons balsamic vinegar
  • 2 tablespoon sugar
  • 1/4 teaspoon freshly ground black pepper
  • 2 pints vanilla ice cream, for serving
  • Freshly grated lemon zest, for serving

Method:

Thirty minutes to an hour before serving, combine the strawberries, balsamic vinegar, sugar, and pepper in a bowl. Set aside at room temperature.

Place a serving of the strawberries in a bowl with a scoop of ice cream or dollop of whipped cream on top and dust lightly with lemon zest.

Strawberry Goat Cheese Bruschetta

These are gooooood, kid approved and somewhat impressive to guests. Substitute whipped cream cheese if you’re not a goat cheese fan, but do try the goat cheese on your picky eaters. You might be surprised. This recipe makes 12 big slices which can easily be cut in half for easier eating. Remember the napkins!

Ingredients:

  • 1/2 cup balsamic vinegar
  • 12 slices Italian bread
  • 1 tablespoon olive oil
  • 1 pound strawberries, washed and diced
  • 2 teaspoons fresh thyme leaves, plus more for serving
  • 1 cup goat cheese, room temperature
  • salt and freshly ground pepper to taste

 Method:

  1. Heat vinegar in a small skillet over medium-low heat. Simmer until reduced by about half, 8 to 10 minutes. Remove from heat and allow to cool to room temperature.
  2. Prepare a grill for high heat. Place bread slices on a foil-lined baking sheet and drizzle with olive oil. (alternatively, assemble bread in a baking sheet, brush slices with olive oil, sprinkle with salt and bake at 350 until toasted to your liking.)
  3. Combine strawberries and thyme in a small bowl and set aside. (If your strawberries aren’t farm fresh and super sweet sprinkle them with a little sugar when nobody is looking.)
  4. Grill bread on the preheated grill until browned, about 3 minutes per side.
  5. Spread goat cheese on toasted bread. Add black pepper, salt, and reduced vinegar to the strawberry mixture. Spoon over the goat cheese topped bruschetta. Garnish with additional thyme.

These are easy to bring if you pre-bake/toast the bread. Simply bring goat cheese, strawberry/balsamic mixture and bread in separate containers and assemble on site.

Now let’s hope the sun shines on those strawberry fields so the berry fest can begin!


Mango Jicama Guacamole

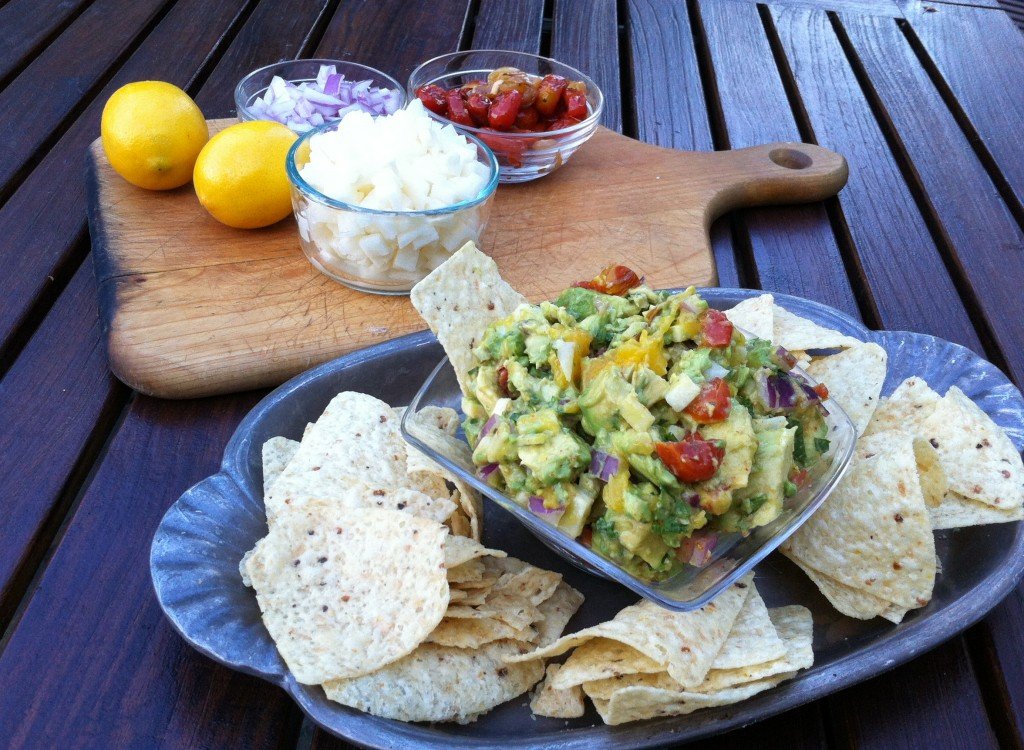
Mango jicama guacamole

Let the Sunset fantasy begin.

We’re past Memorial Day, so you can all bust out the linen togs and start working on your guacamole recipes. You know how it rolls from here on out: Casual parties start to happen. You want to bring something that you know will be appreciated and eaten, that is homemade but not terribly taxing and that can probably be pulled off without a recipe. As long as you can lay your hands on ripe avocados you simply can’t go wrong with a good guacamole.

And you can go really right with this guacamole, because it has jicama AND mangoes, both of which (along with avocados) make me fantasize that I am actually in a Sunset magazine photo shoot. You’ve got crisp, sweet and creamy mixed in with spicy, tangy and juicy. And then you add cilantro, which makes everyone but my sister happy. And since it’s almost her birthday we can all just go ahead and substitute fresh mint for the cilantro if we want. Because it’s guacamole…and the first rule of guacamole is to improvise at will! No adobo? No problemo! Just sprinkle in some chile powder. It’ll all work out, even without a drop of tequila.

To show bicoastal reverence of a good guacamole, this recipe comes from Meracadito Cantina in Manhattan via Food and Wine, and with many thanks to our friendly local Hannaford’s where jicama is a totally reasonable $1.99/lb and where they double your refund if it turns out to be no bueno (see note below).

Ingredients

3 Hass avocados, cut into 1/2-inch dice
1 medium plum tomato, seeded and cut into 1/4-inch dice
1/2 small onion, cut into 1/4-inch dice
3/4 cup finely diced ripe mango
1/2 cup finely diced peeled jicama
3 Tbsp finely chopped cilantro
1 medium chipotle in adobo, minced (1 tablespoon)
1 small jalapeño, seeded and minced
2 Tbsp fresh lemon juice
Kosher salt
Tortilla chips, for serving

Method

In a large bowl, gently stir the avocados with the tomato, onion, mango, jicama, cilantro, chipotle, jalapeño and lemon juice until well mixed but still slightly chunky. Season with salt and serve with tortilla chips. Olé!

Note: Whereas in California the jicama roots make a quick jaunt from Mexico, they travel much further to get to our stores in New England. You most often find them heavily waxed…Brazilian super model before the SI swimsuit shoot waxed. We’re talking a thick coat that can prevent you from seeing the jicama’s true self.  Look for jicama with no soft spots and no oozing juices (never an excellent sign of health on anything). It should be firm, crisp and mild tasting when peeled. You won’t need it all for this recipe so slice up the rest, add some lime juice and store it in the fridge for snacks… or the next party.