Category Archives: Dessertalicious

Morning Paper Oatmeal Raisin Cookies

The oatmeal cookie lid: one of many ways to keep warm this winter.


One of the greatest sources for food and drink recipes is the Wall St Journal. Who knew? Really, cocktails are their sweet spot, but they have a sophisticated spin on pretty much everything. Consequently, you don’t find a lot of cookies there, but when you do, you know they’re going to be good.

These cookies delivered, and turn out to be somewhat addictive, even for someone who is not a huge oatmeal raisin fan. It may have been the overdose of cinnamon, or the salt, or the plumped up raisins. It probably had little to do with the oats, but you never know. They even passed the suspicious kid test. 

I waited a long time to post these because the recipe, when strictly followed, asks you to leave the dough in the fridge for four days. Four DAYS. This is really handy for those tough Monday afternoons when you say to yourself, “Boy I feel like a warm oatmeal cookie…on Friday.” Needless to say, I have made many batches of these, and it took until today to achieve the recommended four day incubation.

Was it worth the wait? I did indeed notice the flavor was even better than the young, unseasoned cookies. BUT they are also really good with a one day rest, and even a zero day rest. I will leave the waiting up to you.

A few notes here: The mixer with the paddle attachment is real, as is the extra large egg. This dough is pretty crumbly, so pro mixing and the extra bit of egg both help. If you only have large eggs, just beat up another one and add a bit of it in. Then have yourself a hearty ¾ egg omelet or cook it up and add it to your salad. Or, if you are not pathologically averse food waste (as I am), just put it down the drain.

On cookie size: The original calls for a ¼ cup scoop. Those are massive cookies. I prefer to make mine golf ball sized and smoosh them as suggested, with a bit of parchment paper.

On refrigerating: It says to scoop them first. If you don’t happen to have that kind of real estate in your fridge, refrigerate the batter in a bowl and scoop just before baking.

Finally, on cooking time: 14 minutes was about right for my normal sized cookies, but start checking them at 12. Err on the side of underdone and they will firm up a bit as they cool.

Oatmeal Raisin Cookies

From Adapted by the Wall St. Journal from Sadelle’s, New York City.
Active Time: 10-15 minutes
Total Time: 1 hour, plus 4 days for chilling dough
Makes: 14 massive cookies. Or wayyyy more normal sized ones.

Ingredients:

  • 1 cup raisins
  • 1¼ cups all-purpose flour
  • 1 tablespoon plus 1 teaspoon ground cinnamon (yes this is a lot, and it is key!)
  • 2 teaspoons baking soda
  • 1½ teaspoons fine sea salt
  • 1½ sticks slightly softened butter
  • 1 cup light brown sugar, firmly packed
  • 6 tablespoons granulated sugar
  • 2 cups old-fashioned or rolled oats
  • 1 extra-large egg
  • 1½ teaspoons vanilla extract

 Method:

  1. Soak raisins in hot water for 30 minutes, then drain.
  2. Meanwhile, in a small bowl, sift together flour, cinnamon, baking soda and salt.
  3. Using an electric mixer fitted with paddle attachment, cream together butter and sugars on medium speed until light and fluffy, scraping down frequently. Take care not to overbeat.
  4. Add flour mixture to creamed butter and sugar and mix on low speed until combined. Mix in oats, followed by drained raisins, egg and vanilla.
  5. Use a ¼-cup measure to scoop dough onto a parchment-paper lined baking sheet. (See note above. Golf ball sized makes a regular-sized cookie.) Flatten each blob with base of measuring cup or your hand and a square of parchment paper. Cover baking sheet with plastic wrap and refrigerate 4 days (optional).
  6. To bake cookies: Preheat oven to 350 degrees. Bake until cookies are golden-brown on the outside but still soft in the middle, about 17 minutes (12-14 for smaller cookies). Remove from oven and let rest on baking sheet a few minutes, then transfer to a rack to cool.

A whole plate of yum, looking a little funky with a filter.


Salted Peanut Butter Cookies: Gluten-Free and Mini-Mart Sourced

Gluten-free, marmot approved.

Gluten-free, marmot approved

Here’s a hypothetical situation. It’s Christmas Eve, you gave away all your homemade cookies (if you happen to have made them in the first place), and you just found out Santa (or a guest) is gluten-free. There’s no way you’re going to the grocery store for special ingredients but you may be able to pull off a mini mart run. What if all that happened? What would you do?

You would make these cookies.  These are barely adapted from Smitten Kitchen who got them from the Ovenly cookbook. It’s the gift that keeps on giving. Here’s hoping you don’t need these tonight, and you stay clear of mini marts, but in case of emergency, you’re covered. Have a good one all, enjoy your people, and see you on the other side!

Salted Peanut Butter Cookies

Yield 26 to 28 cookies with a 1 2/3 tablespoon or #40 scoop.

  • 1 3/4 cups (335 grams) packed light brown sugar
  • 2 large eggs, at room temperature
  • 1/2 teaspoon vanilla extract
  • 1 3/4 cups (450 grams) smooth peanut butter (see note at end)
  • 1 cup (or so) of your favorite chocolate chips (optional)
  • Coarse-grained sea salt, to finish

Preheat the oven to 350°F. Line a rimmed baking sheet with parchment paper.

In a medium bowl, whisk together the light brown sugar and eggs until smooth. Whisk in the vanilla extract, then the peanut butter until smooth and completely incorporated; you shouldn’t be able to see any ribbons of peanut butter. Stir in chocolate chips, if desired.

Scoop or spoon the dough into balls — from a heaping Tablespoon to monster 1/4 cup sized. Place on prepared pan. For the tallest final shape, place the tray in the freezer for 15 minutes before baking.

Sprinkle the dough balls lightly with coarse-grained sea salt just before baking. Bake smaller cookies for 14 to 15 minutes and larger for 18 to 20. When finished, cookies should be golden at edges. They’ll need to set on the sheet for a minute or two before they can be lifted intact to a cooling sheet. With any luck Santa hits your house late enough to let them cool completely so the crispy outside/soft inside thing can really happen. 

Do ahead: You can make the dough in advance and either refrigerate it for a couple days or scoop out the cookies, freeze them, then bake them right from the freezer.

About chilling the dough: You can scoop and bake the cookies right away, but they keep their shape better if you chill them in the freezer for 15 minutes first.

Blueberry Dutch Bunny

Blueberry Durch Bunny

Fresh from the field and hot from the oven.

Sometimes you just get lucky. Friday was my day. I took a flyer and called Super Acres in Lyme to see if they were open for blueberry picking and learned it was opening day. Hallelujah! If you’ve never been to this PYO paradise it’s an Upper Valley rite of summer, and well worth a trip up River Rd.

Blueberry pints

The fruits of your labors

I coerced a friend— Super Acres newbie— to make the trek and he was suitably impressed.  This is not tedious, back-breaking work in a scorching field (I’m looking at you, strawberries). These are grassy rows of high bushes laden with so much ripe fruit that you can pick them like grapes. Somehow you can always seem to find a shady spot. Sheer brilliance! In about a half hour we easily picked four lbs each, without even taking a rest in the Adirondack chairs. Berry picking is about digging deep.

Super Acres provides picking buckets and pint baskets, though the pros bring their own giant Tupperware to make their pies and fill their freezers at home. Despite my aspirations, the allure of fresh berries is too much to resist in our house, and I have yet to freeze a single blueberry.

As for what to make, I had been angling for an excuse to make a blueberry version of Dutch Bunny, inspired by a recipe in Yankee magazine. Dutch Bunny (known outside my household as Dutch Baby, Sunday Pancake and Swedish Pancake) is my go-to weekend breakfast when I’m aiming to win friends. (Lifelong friends have been made over the magical emergence of Dutch Bunny on a vacation morning. True story) It’s hard to imagine a dish that is easier, more impressive or more appreciated by a houseful of guests.  Baking fresh blueberries into the whole shebang takes it over the top.

This is simply my standard Dutch Bunny recipe with fresh blueberries added to the mix. I linked you up but this saves you the trouble of hunting. You need your strength for blueberry picking.

Yield: Serves 4, or one hungry teenager.

 Ingredients

  • 3  Tbsp butter
  • 3  large eggs
  • 3/4  cup  milk
  • 1/2  tsp vanilla
  • 1/2  cup  all-purpose flour
  • 2  Tbsp sugar
  • 1/8  tsp salt
  • 1/2-3/4 cup fresh blueberries
  • Powdered sugar and fresh lemon wedge for topping
  • Whipped cream for topping, optional

 Method

  1. Melt butter in a 10-inch ovenproof frying pan over low heat. Remove from heat.
  2. In a large bowl or blender, beat or whirl eggs until light and pale. Beat or blend in milk, vanilla, flour, sugar, and salt.
  3. Pour batter into prepared pan and sprinkle blueberries on top (they will plop and sink—it’s all good).
  4. Bake in a 425° oven until pancake is puffed and lightly browned, 15 to 20 minutes.
  5. Dust with powdered sugar and squeeze fresh lemon on top. Slice into wedges and serve immediately.

Top with more berries, and whipped cream is you’re feeling it.

If you’re in the Upper Valley and want to visit Super Acres, it is located at 722 River Rd, north of Lyme. For more info call the hotline at (603) 353-9807. Unsprayed and awesome blueberries are $3/lb at the self-serve slot. Do the right thing and round up if you’re belly hurts from all the sampling. Oh, and it wouldn’t be a crime to save some room for a little detour to Whippi Dip in Fairlee on your way home.

Thanks to Olivia the great for her awesome pictures!

Super acres-kisk

Weighin’ and payin’ on the honor system.


Watermelon: Summer’s Cheap Sweet Thrill

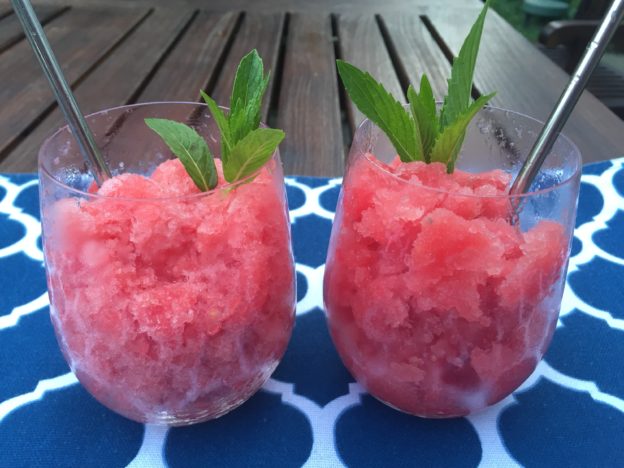
watermelon-sorbet-glass

Call it sorbet, or granita, or just pure refreshment.

The big blockbuster summer weekend is creeping up on you like a kid with a loaded super soaker. Be ready! When agonizing over what to bring to any summer occasion you just can’t go wrong with watermelon. Whoever had too many of these, especially when they can be eaten at any meal, stored at room temperature and, when really unnecessary for nutrition, greased up and used for water games?

So here’s what you do. Get a watermelon every time you go by the bin at the grocery store and then figure out what to do with them. I suggest saddling up to a big cutting board for some watermelon prep, because one melon can really go a long way and satisfy many cravings. Here are some options:

Instant gratification: Cube it and eat it. If you have a crowd or just a couple of teenage boys it will disappear and everyone will have a dose of fruit and fiber.

Instant gratification, fiesta style: Sprinkle your cubes or wedges with chili powder. It’ll take you right back to that first trip to Tijuana. Or maybe this will spare you that trip to Tijuana.

Gourmet Move 1: Cut it into rounds then quarter rounds and make a shmancy arugula/feta/pepitas (or whatev) salad on top, using the watermelon as a plate. Here’s one from Simply Scratch for inspiration.

Gourmet Move 2: Make this watermelon and goat cheese salad that won the watermelon contest at Food52. If you don’t happen to have a crop of lemon verbena out your window use some lemon zest instead.

Drink Your Dinner: Watermelon Gazpacho involves some chopping, but otherwise this refreshing soup is about as easy as it gets. Plus it travels well and enjoys paper cups. Hello picnic!

Just Drink: Scoop watermelon into your food processor or blender, then strain it for watermelon juice. The juice can be used in things like watermelonade (basically watermelon juice and lemonade) or in the ever wonderful watermelon sangria.

As you can see this is not our first watermelon rodeo. For the 2016 edition though my focus is on the simple straight watermelon, cubed, pureed and frozen into a sorbet. It is known across the internet as “one-ingredient watermelon sorbet.” The thing with one-ingredient miracle recipes is that they are all a little better with, say, two or even three ingredients. This is the case here. Frozen pureed watermelon is pretty dang good, but it’s even better when you stir in some mint simple syrup and a splash of lime juice. A fourth ingredient, should you be inspired, could most certainly involve your liquor cabinet. You be the judge there.

1 ish Ingredient Watermelon Sorbet

Notes: Texturally this is more granita than sorbet. Save yourself the anxiety of expecting it to make pretty scoops, and just serve it in a cup with a spoon.

Ingredients:

  • 1/2 large seedless watermelon, peeled and cubed
  • 1-2 Tbsp fresh lemon or lime juice (optional)
  • 1/4 cup mint simple syrup* (optional)
  • Hootch of choice (optional)

Directions:

1. Arrange the watermelon cubes in an even layer on a baking sheet. Transfer the baking sheet to the freezer and freeze until the watermelon is solid, about 2 hours.

2. Working in batches, transfer the watermelon cubes to a blender or food processor and puree until smooth. (My processor fits about half the cubes at a time)

3. Divide the puree among two loaf pans (or put it all in one deep baking dish), packing it down as you add more on top.

watermelon sorbets

Straight up watermelon on left; with lime syrup and mint on right

4. Transfer the pans to the freezer. Freeze until the sorbet is scoopable, 1 to 2 hours more. You can also scrape it with a fork. If it freezes too firm let it sit out for a few minutes.

5. To serve, scoop (or scrape) the sorbet into dishes or cups and eat immediately. Or top with hootch and drink immediately.

*Simple syrup 101:  Combine equal parts sugar and water in a saucepan. For a minted version, add a bunch of chopped or torn fresh mint. Heat to a boil, stirring to dissolve sugar. Remove from heat and let steep for 30 minutes or so. Strain into container and chill.


Sneak Preview of late summer watermelon edition:

As a half Yankee by blood (thanks Mom) I am cursed with the urge to use every scrap of any ingredient. This leads me to watermelon rind pickles, a thing in the south, and watermelon rind jam. I’ve made one version of the pickles and do like them, though my tastes admittedly tweak towards science experiments—guests be warned. I am just now making the jam, which I suspect will have wider appeal. Either way, this is making something edible out of something that was going straight into the compost pile. If it all ends up in the compost pile, at least you tried.

The many forms of watermelon, including pickled science experiments.

The many forms of watermelon, including pickled science experiments.


Lemonpalooza

On-pillows-light

California Dreamin’ on Such a Winter’s Day

Lemonpalooza: n. a celebration of all that is warm, bright and tangy; hope in the home stretch of winter; antidote to a common addiction amongst native Californians and Floridians; yum.

As I was packing a shoe box of Meyer lemons in to my checked baggage, my sister suggested: “You need lemon rehab.” A day earlier I had packed a flat rate priority mail box with lemons and had just returned from the home tree with another batch. Earlier she had bottled a batch of lemon syrup for me, and the lemon possets for dessert were cooling in the fridge. Gnawing on the peel of a juiced half lemon (dentists everywhere are recoiling) I nodded. “You might be right.”

But there is no kicking this addiction. As I boarded my plane back to NH I could not help but have a pang for every Meyer lemon left unpicked in the family tree and in the entire Bay Area megalopolis. I take solace in knowing I did my best.

Here’s a small sampling of how those lemons will be worshiped this week:

The first recipe comes from “The Lemon Cookbook” (of lemon cauliflower couscous fame) which I gave to my sister. The book’s chicken and toasted bread salad has been among their family’s Bring-It staples ever since. It’s sturdy, hearty, delicately and boldly flavored (can that be? Yes, oh yes!) with co-roasted lemons and shallots. And here’s the real kicker—it’s even better the next day.

The ease of rotisserie chicken notwithstanding, reading and re reading all the steps makes the entire recipe a pain in the butt to make the first time. That said, virtually all the labor (and flavor) is in the dressing. So we’re going to take just that element on now, and it will make for many happy salads with or without chicken and toasted bread. 

The other recipes are ridiculously easy: Meyer lemon simple syrup is a juice-intensive staple to brighten tea, seltzer, pancakes, vodka, etc; and lemon posset is a sweet, tart, creamy, perfectly textured pudding/custard with no eggs or special techniques involved.

As good as these recipes are, they are merely a gateway to all the transformational possibilities of Meyer lemons in winter. Roast them, juice them, preserve them (Pickled lemon chutney? I’m looking at you next!), and let them bring a little sunshine in to your life.

Roasted Lemon-Shallot VinaigretteLemon-salad

Ingredients:

  • 1 lemon, halved and seeded with the tip of a sharp knife
  • 8 oz shallots peeled and halved if large
  • 3 large cloves garlic unpeeled
  • ¾ cup extra virgin olive oil, divided
  • 4 sprigs fresh thyme, divided
  • 2 ½ tsp kosher salt, divided
  • juice of one lemon

Method:

Preheat oven to 400. Toss lemon, shallots, garlic and 2 sprigs thyme in 1/4 cup oil and 1 tsp salt. Spread in baking dish in one layer, with cut sides of lemon down. Cover with foil and bake 45-55 minutes or so, until shallots are caramelized and lemons are totally soft. Remove from oven and let cool.

When cool, remove lemon pulp from peel and put it (minus peel and any remaining seeds) into the blender. Add shallots, garlic insides (squeezed from skin), lemon juice, and any accumulated liquid to the blender. Process until smooth. Add remaining oil in a stream. Stir in thyme leaves from remaining sprigs and salt to taste.

Say tuned for a pro version of the chicken and toasted bread salad, pictured above, which is leftover roasted chicken tossed with arugula, plumped currants, rustic bread—torn, tossed with oil and oven-toasted— and this dressing.

This next recipe comes from Cooks Illustrated, so even though it is super simple of course it has some crazy essential step. In this case it is measuring the hot liquid until it is the proper volume. They have a workaround which is even more complicated, so let’s just stick to Plan A. It’s no big.

Lemon Possetposset

  • 2 cups heavy cream
  • 2/3 cup sugar
  • 1 Tbsp lemon zest
  • 6 Tbsp Meyer lemon juice
  • Fresh blueberries or raspberries

Combine cream, sugar and zest in a medium saucepan over medium heat and stir to combine. Heat, stirring as mixture boils. Boil, stirring frequently, for 8-12 minutes, until reduced to 2 cups (pour it off into pyrex measuring cup to check when it’s there). Remove from heat, stir in juice and let cool 20 minutes. Strain into bowl or directly into six individual ramekins/posset containers (see at right. who knew?). Discard strained zest, or eat it when nobody is looking. Chill possets uncovered until set, at least 3 hours. Wrap and store in refrigerator for up to two days. To serve, unwrap and let sit at room temperature 10 minutes. Garnish with berries.


Meyer Lemon Simple SyrupSyrup-tree

2 cups strained fresh Meyer lemon juice
2 cups granulated sugar
zest of 3 Meyer lemons

Wash and gently scrub lemons. Using a zester or vegetable peeler, remove strips of zest from fruit, being careful to remove only the yellow zest, none of the bitter white pith.

Combine sugar, zest and lemon juice in medium saucepan. Heat until simmering over medium heat, stirring to completely dissolve sugar. Increase heat and bring to a gentle boil. Remove saucepan from heat. Cover and set aside to steep 10 minutes. Strain into glass containers. Discard zest, or, you know what I’d do.

Makes 3 cups. The syrup will keep 1 week in the refrigerator, 6 months in the freezer.

granite-lemons

Southern Comfort in the Granite State


Apple Cider Caramels

Salt, caramel, no brainer....

Salt, caramel, no brainer….

My great friend Maggie turned me on to these amazing little candies. It was 9am on a workday, and we were meeting to talk about budgets when she pulled these out of her bag. I was a bit reticent to take a piece of candy at this early hour, but acquiesced when she said “apple cider” and “caramel” in the same sentence. I’m a candy fanatic so I try to wait until later in the day to crack the seal on the candy consumption, but this particular offer was too good. I had to have one now. These candies were homemade, they looked delicious, and we were about to start working on budgets so why not do so on a sugar high. I figured a bit of candy would kick the meeting off to the right start. And so I took a little nibble and, oh my god, they were good! I savored the flavor for what seemed like minutes. I had to have this recipe. Ten minutes later we were still talking about candy and sweets and baking and food when we realized, eek, better get to the budgets. And so, on a sugar high, we dove in deep into variances, profits, losses, expenses and fiscal years. About 2 hours later, the budget work was done, the sugar high wore off, and a little bag of caramels was tucked in my bag for later consumption. They didn’t last long, but I did manage to save a few for my boys when I got home. They loved them too.

I asked for the recipe, which Maggie got from Smitten Kitchen, and whipped up a batch immediately. The only modification I made was to sprinkle some coarse grain salt on top at the end. Here is the recipe. Enjoy and share with your friends. They will quickly become addicts like the rest of us.

Ingredients

4 cups apple cider (not apple juice)
1/2 tsp ground cinnamon
2 tsps flaky sea salt
8 Tbsp unsalted butter, cut into chunks
1 cup granulated sugar
1/2 cup packed light brown sugar
1/3 cup heavy cream
Neutral oil for the knife

Method

Boil the apple cider over high heat until it is reduced to a dark, thick syrup. You should have 1/3 to 1/2 cup in volume when you are done reducing cider. This will take approximately 45 minutes (it took me longer – maybe 50-55). Stir occasionally.

In the meantime, get the other ingredients organized because things move quickly once the cider is reduced. Line the bottom and sides of and 8×8 inch metal baking pan (crisscross parchment paper). Set aside. Stir cinnamon and salt together in a small bowl.

Once you are finished reducing the apple cider, remove it from the heat and stir in butter, sugars and heavy cream. Return the pot to the medium high heat. Let candy boil until a candy thermometer reads 252 degrees. Watch carefully. This takes about 5 minutes. Don’t have a candy thermometer, that’s okay. Deb from Smitten Kitchen explains how to check for doneness without a candy thermometer. Have a bowl of very cold water nearby. When you think it’s done or after about 5 minutes, give or take, drop a tiny spoonful of the caramal into the water. If it becomes firm, chewy and ready to be plied into a ball, it’s done.

Immediately remove caramel from heat. Add cinnamon/salt mixture. Stir to mix thoroughly. Pour caramel into prepared pan. Let it sit and cool for about 2 hours. It should firm up so that you can cut it. You can put it in the fridge to speed up the process or try to firm it up if needed.

Once the caramel is firm, use the parchment paper to lift the caramel out of the pan. Flip it upside down and carefully remove the paper. Mine was a bit sticky but it came off by pulling gently and slowly. Use a well-oiled knife to cut into squares or rectangles. You could oil a cookie cutter and make interesting shapes I suppose. That might be fun and then you could eat all the scraps around the sides of the cookie cutter. Wrap in waxed paper and store in the fridge. You can also freeze if you’d like to save some for another time.

Bring It!

Tuck a little zip lock bag of these in your purse and bring them everywhere. It might also be wise to bring a copy of the recipe because they will surely ask.


Holiday Hybread: Pumpkin Gingerbread with Cream Cheese Filling

Banana-gingerbread

Two breads in one, with a tasty filling. C’mon, who’s better than you at this party?

Ok my pretties (and I know you are bringing your A-game tonight), this is going to be a quick one. Quick because I left posting this until New Year’s Eve on an airplane and quick because you have places to go, things to do and fun people to see! So, go ahead and read this recipe tomorrow when you are reclined on the couch. But before you go, please do three things for me:

  1. Review this party trick just in case. Your A Game, remember?
  2. If you happen to find yourself with leftover champagne (imagine?), SAVE IT! Here are 16 uses for leftover champagne and one of them surely will sound good tomorrow, even if it’s the ice cubes for your oj. If you can only manage to pour it into a mason jar, then do that and you’ll have awesome vinegar by Valentines Day.
  3. Get fancy and celebrate New Years however the heck you want, whether that means ditching champagne entirely or crawling into your new flannel jammies at 9.

Now, go have fun and be safe out there! When you come back…

Slacker bakers unite for Round 2. We’re in the home stretch. You’ve got one more weekend of planned and spontaneous get-togethers, of late nights and chocolate for breakfast, of “how-long-does-that-stuff-in-the-foil-keep?”  What you need here is something edible that is easy to throw together, widely appreciated, mostly homemade and somewhat more impressive than a regifted box of chocolates (not that there is one single thing wrong with that!)

You can get on your pomegranate game, and it never hurts to have fondue fixin’s at the ready, but if you’re still up for baking, here is a little slice of brilliance which involves boxed bread mixes. Now you’re with me, right? This comes from Sister B, who has made it more times than she can count in the past few weeks. The original version combines gingerbread with pumpkin bread, but she prefers it with banana bread (and includes a recipe for that below, so keep your scrolling skills up).banan-gingerbread-ingredients

This Holiday Hybread is nothing gourmet, but it’s yummy, and it can say a lot about you. Like… “I’ve still got some holiday swagger in me,” or, “I know exactly what to get at Trader Joe’s,” or “See what I can do with all that cream cheese I never used for the shrimp dip?” My only note is that this recipe calls for half boxes of both breads. My suggestion is to double it, make two loaves and do away your need for higher math.

And now, I turn it entirely over to sister B, AKA Beatie the Artiste, who took the edible peppermint plate to an entirely new level. More on that later.

Holiday Hybread: Pumpkin Gingerbread with Cream Cheese Filling

Easy, yummy, and  holiday-ish!  A crowd pleaser.

Note: If you don’t have a Trader Joe’s Betty Crocker mixes work too, but TJ’s (or an upscale boxed version) is way better.

Makes one loaf

Ingredients:

  • ½  package Trader Joe’s pumpkin bread mix plus what the box asks for (egg, water, oil)
  • ½ package Trader Joe’s gingerbread mix (plus, egg, water oil)   
  • 12-oz  cream cheese (1 ½  8 oz. packages)
  • 3/8 cup sugar
  • a few drops vanilla

Method:

Preheat oven to 350.

Grease the bottom of a 9” x 5” ish bread pan or spray with cooking spray.

Make your gingerbread and pumpkin bread batters, according to package directions.

Make cream cheese filling:  place cream cheese in microwave safe bowl and zap for
40 seconds.  Stir in sugar and few drops of vanilla until smooth.  Set aside.

SCRAPE pumpkin bread mixture into loaf pan.  Level it as best you can.

PLOP the cream cheese mixture all over the top of the pumpkin bread batter, covering it.  It may be lumpy and uneven…that’s ok, so are some of the best of us. If you care, level it carefully with a knife…but try to let it go.

Now TOP that with your gingerbread batter.  

Bake for about an hour…maybe a little more.  Check it with a toothpick to know for sure.  Cool on a wire rack and then remove from pan. Slice, impress and enjoy!

And now for Sister B’s sister recipe to the above. This was discovered by happy accident, some overripe bananas in the freezer and a WHAT IF inspiration. As in, WHAT IF I tried the same thing but with a layer or banana bread instead of pumpkin this time? Insane, right?  And yet, banana/gingerbread bumped pumpkin/gingerbread off the top of the podium and into the silver medal position.

This recipe uses a proper (and awesome) banana bread recipe from Cooks Illustrated. It’s not out of a box, but it’s already halved for your convenience.

Banana Gingerbread with Cream Cheese Filling

Proceed exactly as above, but for the pumpkin bread part substitute this:

Banana Bread (this is the half recipe. Double it for two loaves of Holiday Hybread or one loaf of straight banana bread)

Ingredients:

  • 1 cup flour
  • 3/8 cup sugar
  • 3/8 tsp baking soda
  • ¼ tsp salt
  • 2  very ripe bananas, mashed well (3/4 cup)
  • 1/8 cup plain yogurt
  • 1 egg, lightly beaten
  • 3 tablespoons unsalted butter, melted and cooled
  • ½ tsp vanilla

Method:

Whisk flour, sugar, baking soda, salt together in a large bowl and set aside.
Mix the mashed bananas, yogurt, eggs, butter, vanilla in a medium bowl.
Lightly fold banana mixture into the dry ingredients until just combined.

Crackle 2.0—Toffee meets dark chocolate pretzels and beer


crackle2

Just when you thought you had covered everyone on your list…surprise! That’s why it makes darned good sense to cook up obscene quantities food gifts, put them in jars and cute boxes and have them at the ready.

My faves are salted caramel Cholliesauce, roasted and glazed nuts and of course, a constantly replenished stash of crackle. We’ve learned to love Crackle over the years, but it’s time to shake it up a little. It’s time to go to the Dark Side. Behold Crackle 2.0, a more grown up version of decadence from a favorite site: thebeeroness.com.

I love the idea of cooking with beer, and the whole consequence of recipes only calling for half a can (at most) of some shmancy beer, making it perfectly ok—even responsible—to finish the rest. There are lots of things I love about this, including of course the taste, which really isn’t beer-like or even alcoholic after all that boiling.

This recipe lets you decide on the thickness of both the toffee and the chocolate layers. Also, it does not require oven time, leaving your oven free for baking things like these and these and these. No baking means also no urgency between steps, which is nice. You can make the toffee part and then come back to slay the rest.

crackle3

Extra points if you make the edible peppermint plate.

Finally, the dark chocolate is a more sophisticated touch (even if you hedge and add some milk chocolate chips when you run out of the good stuff).

I have made this with Guinness and most recently with Lagunitas Little Sumpin ale, subscribing once again to the “love the one you’re with” method of ingredient selection. Do keep it to craft beer or something more complex than Bud. If you want to really experiment, read up on the Beeroness wisdom. Alternatively, just wing it, and try a new beer with each batch. Oh, and for presentation points, make this edible plate out of peppermint candies. You’re soooo Martha!

Chocolate Pretzel Beer Toffee

Adapted from The Beeroness

Ingredients:

Toffee:

1 Cup Sugar
1 Cup Butter (2 sticks)
1/2 Cup Amber Ale

Topping:

2 Cups Pretzels, Smashed
2 Cups Dark Chocolate Chips (60% cacao content)
1/4 Cup Amber Ale or Chocolate Stout
1 Tbsp or so coconut oil (optional but it gives the chocolate a nice gloss)

Method:

In a large pot over high heat add the sugar, butter and 1/2 cup amber ale, it will triple in volume during the cooking process so make sure to use a large pot. Stir until the mixture starts to boil. Allow to boil untouched until the mixture starts to darken and thicken at about 230 degrees. Stir continuously until it turns a very dark amber and hits 290 degrees. (Use the color as your guide. Too light means less caramel flavor. Be patient but vigilant!) This process will take between 15 and 20 minutes from start to finish. Pour onto a baking sheet covered with parchment paper or a Silpat. Immediately spread to desired thickness before it starts to harden. Allow to cool.

Add the chocolate to a large bowl. Heat the beer until hot but not boiling. You can heat it on a pot on the stove or microwave it in a microwave safe bowl. If you use the microwave, know that the beer will foam up once it reaches it’s boiling point. Pour the hot beer over the chocolate chips and stir until well combined and melted. (Alternatively, and preferably to SOME, do the whole shebang in a double boiler. See Edie notes below.)

Pour the chocolate over the toffee and smooth out in an even layer. Sprinkle the crushed pretzels over the chocolate and chill until the chocolate has set. Cut into pieces.

Beeroness Notes: If you use a chocolate with less than 60% cocoa content, it will have higher levels of milk solids, because of this it will have a more difficult time hardening once the beer is added. Try to find 60% and chill it to set.

Edie Notes: In my microwave-deprived house I made this as directed a few times but could not get the chocolate to be as glossy as I wanted. I had better results melting the chocolate and beer over water in a double boiler, and adding a bit of coconut oil. For chocolate I used a combo of 2 Ghirardelli Intense Dark 72 % Cacao bars, and enough milk chocolate chips to get to the right amount.

Crackle1

Why are you looking at this? Aren’t you at the store yet?


Kiss My Crust Christmas Cookies

kiss-cookies

Kiss meets crust. Angels sing.

Welcome to Part 1 of Slacker’s Delight Holiday Baking.

These cookies are brilliant: they’re like Mexican wedding cookies without the work and with a big fat Hershey’s kiss in the middle. They come from Averie Cooks, and though I don’t know Averie I think she needs to be worshipped. Why? Because holiday baking is WAY OVERRATED. I mean, like we need one more thing to do? But the thing is, baking just seems like the right instinct at this crazy time of year.  And so we bake. And it makes our people happy which makes us happy. When we can all be happy with next to no effort, well, that’s the real  miracle of Christmas.

So enough talk. I give you three-ingredient cookies that require no mixing or creaming and, best of all, no thank-you note. Happy Baking and you slackers—stay tuned for Part 2!

Kiss My Crust Cookies

Very slightly amended from Averie Cooks

Makes about 16 cookies
Prep Time: 10 minutes
Cook Time: about 15 to 17 minutes
Total Time: about 45 minutes, for cooling

Ingredients:

  • 1 roll out refrigerated or frozen pie crust for a 9-inch pie, thawed.
  • 16 or so chocolate kisses (or Mini Peanut Butter Cups or Rolos or Andes Mints)
  • confectioners’ sugar (about 3/4 cup), for dredging

Method:

  1. Preheat oven to 350F. Line a baking sheet with a Silpat or spray with cooking spray; set aside.
  2. Place pie crust on a piece of parchment paper or lightly floured surface and roll it it out just a bit with a rolling pin or hefty bottle. Using a sharp knife or pizza wheel, slice into approximately 16 sections, about 2-inch squares. If you cut your circle into 4 rows of 4, a couple sections may be a bit skimpy. Do some cutting and smooshing to make those sections big enough to contain a Kiss. It won’t be perfect. Stay calm. Channel John Tesh.
  3. Place one chocolate kiss in the center of each section.
  4. Using your fingertips, seal the dough at the top to fully contain the kiss. Pat smooth with your palms and flatten slightly into a mound; repeat with remaining crust sections and kisses until gone. Transfer mounds to prepared baking sheet or, if working on parchment, scootch the whole piece onto the baking sheet and rearrange the cookies so they look happy.
  5. Bake for about 15 to 17 minutes, or until crust is just set and done; cookies firm up as they cool. The tops will appear fairly pale while the undersides will be more golden; don’t overbake or the undersides could burn. Watch cookies closely starting at about 13 minutes and use your good judgement.
  6. Allow cookies to cool on baking tray for about 15 minutes, or until cool enough to handle before dredging each one liberally in confectioners’ sugar. Serve immediately. Cookies will keep airtight for up to 1 week at room temp or in the freezer for up to 4 months.

Knock-Out Vegan Pumpkin Pie

V stands for Very Tasty

V stands for Very Tasty

This pie was a revelation. The pie itself is fantastic, and is a stand-alone favorite, V or no V. It comes from the November issue of Self, the one with UFC star Ronda Rousey on the cover. That’s where the revelation comes in. I’ve been staring at that cover for a solid two weeks, flipping to the pie occasionally to remind myself of what ingredients not to forget this time I go to the store. Each time I flipped past the story on Ronda, looking at the pictures but not tempted to read a word of it (or to even google UFC. It’s Ultimate Fight Championship. Pretend you knew that—I won’t tell.

Then she got knocked out. Suddenly I heard her name pop up a lot. Even my husband commented on the great Ronda Rousey losing a match. Now, give me a loser and you have my interest. It’s not schadenfreude, but a strong aversion to packaged success stories…especially when they double as fashion spreads.

Anyway, I finally read the article (in which she is interviewed by a comedian) and it was hugely compelling: revealing, honest, unusual. She did talk about leaving a legacy as an undefeated champ. So much for that, but by losing she got at least one person who was only interested in pie to read her story and now care about her.  I am still not sure I could actually watch a UFC match—way too much blood, guaranteed—but go Ronda.

Now, on to pie. This is awesome. I made it with kabocha squash that I had baked. You could also use fresh pumpkin or butternut squash or the canned stuff. I can’t use the canned stuff, having recently been burned by a legacy can in the pantry. Oops.

With pumpkin pie the Vegan situation means no eggs, milk or cream in the pie and no butter in the crust. Coconut milk subs for the liquid and somehow enough squash just makes the egg factor go away. The crust—where you can really do some dietary damage with pies—is pretty darned healthy, and even easier to put together than a graham cracker crust. It’s a total win. Top it with whipped coconut cream for the full V experience, or with regular whipped cream from happy cows. It’s time to get your pomegranate game on, so you can get fancy and sprinkle some of those on top too. Either way, you’re going to wish you had room for seconds.

Vegan Pumpkin Pie

Ingredients:

  • 1  Pecan-Coconut Crust, frozen
  • 1 cup packed brown sugar
  • 3 tablespoons cornstarch
  • 3/4 teaspoons ground cinnamon
  • 1/2 teaspoon grated nutmeg
  • 3/4 teaspoon grated ginger
  • 1/2 teaspoon kosher salt
  • 1/2 teaspoon vanilla extract
  • 1 can (15 oz) pumpkin puree
  • 1 can (13 oz) coconut milk

Method:

Heat oven to 375°. In a bowl, whisk together sugar, cornstarch, cinnamon, nutmeg, ginger and salt. Add vanilla, pumpkin puree and coconut milk and mix until well combined. Place frozen shell on a baking sheet and slowly pour in filling. Bake on center rack of oven 25 minutes. Rotate 180 degrees and continue baking until filling is set and no longer looks wet at center, 20 to 30 minutes more. (Mine took longer. No eggs means it won’t set as firmly but it will set more as it cools.) Cool 2 to 3 hours. Serve lightly chilled.

Pecan Coconut Crust

Ingredients:

  • 1 cup pecan pieces
  • 1/2 cup shredded unsweetened coconut
  • 2 tablespoons sugar
  • 1/2 teaspoon kosher salt

Preparation:

In a medium skillet over medium heat, toast pecans until fragrant; set aside and cool. Reduce heat to medium-low and toast coconut, stirring, until golden, 2 to 3 minutes; cool. In a food processor, process pecans, coconut, sugar and salt until mixture is fine and sticks together slightly. Pour into an ungreased 9″ pie pan. Press into bottom and sides of pan. Freeze until solid. Makes 1 crust.

pumpkin-pie-rock