Category Archives: Appetizers

Spring Chickens, and Lots of Eggs

Spring is trying to poke through. At least the chickens are feeling it.

Spring is trying to poke through. At least the chickens are feeling it.

If you have neighbors with chickens you might be getting a lot of eggs right now. And really, it makes sense. If I were a northeastern chicken I would not be giving up the goods until just about now. We had quite a winter. And now that it’s relaxing its grip, we’ve got eggs.

This is a good thing, because as it turns out, the aforementioned salad week is actually going to have to be salad month. The past week has reminded me of all the great salads out there, like edamame avocado citrus, shaved asparagus, massaged kale, as well as all the delicious ways to create a deconstructed lunch. It leads me to think, why wasn’t I doing this all along? But that would take away the springtime angst I depend on for balance.

Today, we’re talking about salad toppers. One staple in our house is coconut “bacon.” I did a little blind taste test with my peeps (who are admittedly a bit gun-shy of my experiments after discovering black beans in their brownies and shredded cauliflower in their mac and cheese. Poor dears.) Anyway, like real New Englanders they again gave two thumbs most enthusiastically up to the maple syrup versions that I tried, so I’m sticking to those.

I tend to go a bit overboard on food combining, especially when it comes to toppers. But nothing gives mealtime heft to a salad like the ordinary and incredible egg. Furthermore, fully self contained eggs are the ultimate portable food so they are a natural for Bring It!

Hard boiling eggs ought to be easy, but still every time I do it I have to refer to a grimy index card tucked behind my stove that tells me exactly how many minutes to boil them, let them sit covered and then rinse in cold water. Here are two awesome methods—baking and steaming—both of which will set you free from the grimy index card. The first lets you cook a heap load of eggs—as many as you can fit on your over rack. The second takes slightly less time and the resulting eggs are slightly easier to peel. At any rate, if egg peeling challenges you watch this video (spoiler alert: run them under cold water while peeling.)

So here you go, you future queens and kings of deviled egg overabundance. Chickens, get on your marks!

Method 1, from Alton Brown.

Position an oven rack in the middle of your oven. Thoroughly dampen a kitchen towel and lay it over the rack. Load that rack up with as many eggs as you like, as long as they don’t touch. Turn your oven on to 320° F and let your eggs bake for 30 minutes. Then, pull the rack out and grab the four corners of the towel to create a little cradle for the eggs. Carry the towel with the eggs out of the oven and transfer the eggs to an ice bath. Let them chill out until you can handle them. Dry them off if you’re making Easter eggs, or peel them if you plan to eat them.

  • Pros: Volume volume volume! Yes of course you need two dozen!
  • Cons: Takes more total time (but it’s brainless time)
High and dry--the perfectly easy way to cook your eggs.

High and dry–the perfectly easy way to cook your eggs.

And Method 2, from Ali Slagle

In a big pot with a metal steamer inside, bring 1 inch of water to a boil. Add your eggs directly from the fridge to the steamer—6 fit without overcrowding. Cover the pot and let the eggs cook for 12 minutes (6 minutes for soft boiled). If you plan to eat them cold, transfer the eggs to an ice bath and let them chill out until you can handle them, then peel them.

  • Pros: Quick—you’re boiling an inch of water, not an entire pot; you can easily make them soft boiled too.
  • Cons: You can’t go for mass production as with the oven method.


Love, and a Side of Buffalo Chicken Meatballs

 a few of the best friends in the world. Way better looking than meatballs in the sun.

A few of the best friends in the world. Way better looking than meatballs.

This is about meatballs, but it’s not really about meatballs. It’s about friends and family and communities and about the times that remind you how much you love all of the above. Those times are called parties.

I’m on spring break, which is why we’ve sort of lost touch (It’s not you, it’s me.) The anchor of the trip was the party (see happy purple people above) to honor my awesome mama. The whole process of throwing a party in your hometown—especially when you have no definitive vision or time or really any business thinking you can pull it off—is confirmation that Dorothy and her sparkly red shoes really had it right. There’s no place like home.

Friends appeared at just the right time to help me shop, delivered fondue pots, brought drinks and favorite dishes, ship-shaped the house, helped prep, cook, clean and tend each other throughout, took pictures and showed up with their rally caps on. They asked “how can I help?” and when I hesitated they just jumped in and did. The timeliness of the help was downright freaky, as when I was lamenting that I’d failed to order a cake and the phone rang: “Could I prepare a signature dessert to honor your mom?” I’m talking crazy good.

Like I said, this isn’t much about meatballs. BUT for this occasion I needed something easy I could make ahead and then pop in the oven, something that would not require any utensil beyond a toothpick, and something that was worthy of the best friends and family a girl could ever have. These mighty meatballs (poached from Epicurious) delivered in all areas. As a bonus, the leftovers were good the next day, cold and reheated.

Make these and have a party to remind yourself of all the good stuff and good people in your life.

Ingredients:

  • 2 tablespoons vegetable oil
  • 4 tablespoons (1/2 stick) unsalted butter
  • 1/3 cup Frank’s Red Hot Sauce or any other favorite hot sauce
  • 1 pound ground chicken, preferably thigh meat (turkey works too)
  • 1 large egg
  • 1/2 celery stalk, minced
  • 3/4 cup bread crumbs
  • 1 teaspoon salt
  • Some kind of Blue cheese dip or dressing

Method:

Preheat the oven to 450°F. Drizzle the vegetable oil into a 9×13-inch baking dish and use your hand to evenly coat the entire surface. Set aside.

Combine the butter and hot sauce in a small saucepan, and cook over low heat, whisking until the butter is melted and fully incorporated. Remove from the heat and allow the mixture to cool for 10 minutes.

Combine the hot sauce mixture, ground chicken, egg, celery, bread crumbs, and salt in a large mixing bowl and mix by hand until thoroughly incorporated.

Roll the mixture into round, 3/4 -inch balls, making sure to pack the meat firmly. Place the balls in the prepared baking dish, being careful to line them up snugly and in even rows vertically and horizontally to form a grid. The meatballs should be touching one another.

Roast for 15 to 20 minutes, or until the meatballs are firm and cooked through. A meat thermometer inserted into the center of a meatball should read 165°F.

Allow the meatballs to cool for 5 minutes in the baking dish before serving.

Serve with blue cheese dip for the real buffalo experience

 See? I told you. But don’t judge. Just make them. Trust me on this.

See? I told you meatballs aren’t as pretty as friends. But as with friends, don’t judge. Just make them, love them  and be happy.

Date Night

CROPDATE

Just another bad, desperate date picture. Imagine the real deal with greek yogurt (not Yoplait), big flaky sea salt (not Mortons) and a real photographer (not me). By the way, even as stand ins these were still darned good.

There are certain things I can’t make when I am going to be home alone for a long stretch. One is bread. I learned this the day after I received a bread machine for my birthday—something I had in fact pleaded for. I was single at the time, recently out of a career and not entirely hopeful about my future. A bread machine was the worst thing to add to this mix. I made a loaf, I ate the loaf, I wiped out the machine repackaged it and brought it back to the store. If you happened to buy a bread machine around the spring of ‘95 at the Reno Macy’s it may have been test driven. Sorry.

That’s the long way of saying that I’ve discovered yet another thing I cannot make when I am alone. Sauteed, salted dates. Really, they are ridiculous. Salty, sweet, creamy and even crunchy (if you cook them too long the way I like to). Also they are easy to make, to serve and to eat. They are very quick, pretty healthy, and totally delicious.

The only beef I have with the recipe featured on Food52 is that they call for unpitted dates and then suggest luscious variations, all using pitted dates. Now really, who wants to deal with date pits, especially at a party? Let’s just leave them out. So here you go. Happy date night!

Sauteed Salted Dates

Serves as many as you care to serve

Ingredients:

  • sharp extra-virgin olive oil.
  • pitted medjool dates (Deglet will do, but medjool are A team material. (count on 4 to 5 per person as an appetizer)
  • flaky sea salt. The good stuff here–you need those big flakes.

Method:

Heat 1/4 inch olive oil in a small sauté pan over medium heat. Fill the pan with dates and cook, turning them a few times, just until they’ve warmed through. (They burn easily, so don’t overdo it if you want soft dates, but do overdo it if you want some crunch) Serve them on a plate with flaky sea salt.

Notes:

These can be served as is or… with warm bread to sop up the oil, on a shallow plate spread with good plain greek yogurt and drizzled with the leftover oil in the pan, with a wedge of blue cheese and a sprinkling of nuts. Get totally pro and add pistachios to the pan as you heat the dates. Or just saute and salt those babies and be done with it. Be as plain or as fancy as you like.

There are no amounts here, which is key. If you are alone and feeling vulnerable to sweet salty overindulgence, make just a few. If you are having a party, make a whole bunch. Leftover dates, if you manage to resist, are good any time of day. I know. I’ve tried. A-ny-time.


Super Snacking and Hail Mary Coconut

Crispy, crunchy, sweet and salty...and oh so much better than fried pork rinds.

Crispy, crunchy, sweet and salty…and oh so much better than fried pork rinds.

In honor of Super Bowl Sunday I’ve been searching for a mind-blowing, Super Bowl worthy, totally healthy snack for you to bring and enjoy in front of your TV of choice. Much of my energy and time (while procrastinating on the work I was supposed to be doing of course) was focused on creating the perfect version of Buffalo cauliflower “wings,” the faux meat snack of the moment. I tried making my cauliflower with Sriracha and with maple sweetened hot sauce. I tossed it in coconut oil before roasting, in butter-spiked sauce after roasting, tried it in batters of rice flour, corn flour and wheat flour and in no batter at all.

In the end I came up with some decent versions that I would happily eat. But I get that I have weird tastes. Just because I like something does not mean it’s good enough for prime time. For most people, any of my aforementioned creations would have ended up as a sad extra on a table of Super Bowl snack stars.

So what’s a girl with no Buffalo cauliflower to do? Why, break out the coconut of course. In a Hail Mary play of snack creation, I turned to toasted coconut flakes, the bacon of the Vegan world. Toasted coconut flakes are ridiculously good as is, and even better with a sprinkle of sugar and salt as they bake. This version, however—extracted from an overly fussy recipe for stuffed sweet potatoes, and made on a happy whim—elevates them to Super Bowl worthy heights.

But don’t trust me on that. Trust the teenage boys who ate these flakes of sweet, savory deliciousness by the handful even before they figured out how good they’d be on ice cream. (Ahem, they’re awesome on salads, stir fries, soups, rice, etc as well.)

Of course, man and woman cannot live on coconut alone, so scroll down and check out our list of favorite Super Bowl worthy Bring It! fare. And may the best team win, especially if they’re the Patriots.

Hail Mary Coconut

Ingredients

1 3/4 cups large, unsweetened coconut flakes
1 Tbsp maple syrup
1 Tbsp soy sauce
1/2 tsp freshly cracked black pepper
2 tsp Worcestershire sauce
2 tsp toasted sesame oil

Method

Preheat the oven to 350 degrees. Line a large, rimmed baking sheet with parchment paper. (you can go without parchment, but the coconut may brown faster on a dark pan and you’ll have a little cleanup.)

Toss the coconut in a large mixing bowl with the maple syrup, soy sauce, black pepper, Worcestershire and sesame oil until evenly coated.

Spread in a single layer (make sure you use the coating) on the baking sheet. *Bake for 10 minutes; stir it around and spread it back out on the baking sheet; bake for 5 minutes, until the coconut has browned.

*Set a timer and check on it. Burnt coconut is so sad!

Let it cool, during which time the coconut will crisp up and get all bacon-y. If you’re not going to use it right away, transfer the cooled coconut to an airtight container.

SPRING UPDATE

Here’s another version, a riff on the recipe on the back of Bob’s Red Mill coconut. Ironically, Bob’s coconut isn’t that great for this. Let’s Do Organic is way bigger and better.  The takeaway here is letting the seasoning soak into coconut for 10 minutes. That and the use of apple cider vinegar which makes it even Vermonty-er.

 Ingredients:

  • 3 cups unsweetened coconut flakes (the bigger the better.)
  • 2 Tbsp Olive oil
  • 2 Tsp Maple Syrup
  • 1 Tbsp soy sauce
  • 1 Tbsp cider vinegar
  • 1 tsp liquid smoke (optional, but a nice touch)
  • ½ tsp cayenne pepper

Method:

Preheat oven to 325°F. Line a rimmed baking sheet with parchment paper, a silicon pad or spray with pan spray.

Whisk together soy sauce, molasses, liquid smoke, olive oil and vinegar. Add Bob’s Red Mill Coconut Flakes and mix well. Let sit for 10 minutes so the coconut absorbs all the liquid.

Spread coconut in an even layer on the prepared baking sheet.

Bake at 325°F until deeply toasted, about 15 – 20 minutes. Stir often! (About every 3 – 5 minutes.)

Let “bacon” bits cool completely then store in an airtight container. They can easily be re-crisped in a low oven for 5 minutes.


Bring It! Super Bowl Can’t Go Wrong Picks

Game Day Chicken Wings

Game Day Pulled Pork

Chicken Taco Chili

People’s Choice Cornbread

Nootch Popcorn

Bacon Wrapped Dates

Funitella Bruscetta

Guinness Fondue

Nuts!

Game Day Chicken Wings

Chicken WingsThis is the time of year when many people are looking for game day food. I have to admit, I don’t follow professional sports, but regardless, I still like thinking about game day food and I know chicken wings are a tradition. I found this great recipe for Asian BBQ Chicken Wings made in a crockpot. The description had me at “Asian and BBQ”. Here’s why….

….my family loves both. When I met my husband, he asked me to come to his house for dinner. On our first date, when we were both trying to make good first impressions, he made me BBQ chicken pizza. It was great! The next dinner he made me BBQ grilled shrimp and then BBQ chicken. You don’t have to be a mental giant to see the common thread here. BBQ sauce went on everything!  I quickly took over in the kitchen so as to expand our dinner repertoire, but good for him for trying.  And his love of BBQ sauce has not abated over the past 20 years.  As for the Asian part of the sauce, well, no more need be said, Asian flavoring is always a winner.

Now that you have a little background on why I picked this recipe, I have one more note before we get started…. When I saw this listed as a crockpot recipe, I thought, easy peasy. Then I read the details and realized that you have to brown the wings after cooking them in the crockpot and make the sauce. Now, don’t get me wrong, this recipe is not complicated, but there are a couple steps after the crockpot. I just wanted to provide fair warning, and the extra steps are well worth it.  Have plenty of napkins on hand!

Ingredients

4 lbs chicken wings
8 medium scallions, thinly sliced
1 cup hoisin sauce
3 Tbsp Asian sesame oil
1 1/2 Tbsp minced fresh ginger
1 1/2 Tbsp sambal oelek
2 1/2 Tbsp cider vinegar
Asian chile oil (optional)

Method

In a 5-6 quart slow cooker, stir the chicken wings, all but 2 Tbsp of the scallions, hoisin sauce, sesame oil, ginger, and sambal oelek until the wings are evenly coated. Cover and cook until the wings are cooked through but not falling off the bone, 2 1/2 hours on high or 4 hours on low (the wings can stay in the crock pot on warm for up to 1 hour).

Use tongs to transfer the chicken wings to a large foil-lined rimmed baking sheet. Strain the sauce inot a fat separator and set aside for a few minutes. Pour the defatted sauce into a 2-quart saucepan, add the vinegar and boil over high heat, stirring occasionally, until reduced by half, about 15 minutes.

Position a rack 4 inches from broiler element and heat the broiler on high. Brush the wings with the sauce and broil until browned, about 3 minutes. Turn the wings over, brush them again, and broil until brown and crisp, about 3 minutes more. Brush with the sauce once more before serving and top with remaining scallions. Drizzle with chile oil if using. Serve any remaining sauce on the side for dipping.

Bring It

Place back in crock pot to bring or leave on rimmed baking sheet and cover with foil. It really depends where you are going and timing on when they will be devoured.

Pomegranates Unplugged

pomegranate

“Tis the season to overdo everything. So let’s overdo pomegranates!

It’s almost Christmas, and whether you celebrate it or not, I’ m giving you a gift. Pomegranates. Well, I’m not actually buying them for you, but I am unlocking their potential. For a long time we have heard about the amazing health benefits of pomegranates. They are rich in vitamins and antioxidants, low in calories, high in fiber, high in heart healthy phytochemicals (say that three times quickly then google it). They strengthen the immune system, regulate blood pressure, improve oral hygiene, reduce wrinkles and even give PMS the boot. 

All this, and yet I have ignored pomegranates entirely, for the simple reason that they are a pain in the butt. They are messy, labor intensive, not roastable in any way and obscenely expensive in their juiced or seeded form. Until recently nothing moved me to entertain an interest in the pomegranate or its derivatives other than as a splash in a martini.

But then I found myself living with a young friend who has a pomegranate-a-day habit. Fortuitously this coincided with running across a pomegranate hack that made seeding a pomegranate so easy that I had to try it. Bells rang, stars aligned, produce departments rejoiced. Now, my record for getting all the seeds out of a pomegranate is 1 minute 11 seconds, and it is a rare day in my household that does not involve this “super fruit.”

Incidentally, my young friend rejected the hack, even after we staged timed contests to prove hack efficiency. A traditionalist, he adheres to his old ways, enjoying his ritual of settling down on the couch, focusing on his pomegranate, a bowl and the mission. I respect. But I also have yet to find a primary food provider who is in search of labor intensive food prep rituals. So for the rest of you, here is your key to pomegranate freedom.

Though I adore the Russian Food hacker, his version (by his own admission) is a bit too bare bones: “Ve really need a bowl, not zeez cheap plastic plates from single guy apartment.” This guy  is a bit dry (and he could crack you in half like a pomegranate), but he is a pro.

And now, what to do with the bonanza of pomegranate seeds you have just unlocked? I’ve got you covered, with four festive ideas to let those seed brighten up your holiday.

#1 Pomegranate Bubbly

Pour anything bubbly—Prosecco, champagne, sparkling cider, birch beer, ginger ale etc—over pomegranate seeds and they will float up, be festive and give you something to chew on. Yum!

#2 Pomegranate Cheese Log

Ingredients

8 oz cream cheese (or 4 oz goat cheese and 4 oz cream cheese mixed)
1 cup pomegranate seeds
1/2 cup chopped chives
2 Tbsp finely minced fresh basil
Crackers, toasts or dipping vehicles of choice.

Method

Place cream cheese (or goat/cream cheese mix) on waxed paper and form into a log. Mix pomegranate seeds, chives and basil on another sheet of waxed paper. Roll cream cheese in seed/herb mixture, pressing lightly to stick. Serve with crackers.

# 3 Pomegranate Guacamole

Oh my! This brings me back to my very first pomegranate cocktail ever, the pomegranate margarita at Rosa Mexicano. This use for pomegranate seeds pretty much assures the pomegranate market in New Hampshire. Lest we forget, guacamole is not an exact science by any means. Shallots or green onion instead of red onion? Awesome. No fresh cilantro? No problemo. Roll with it– its Happy Hour fergawdssakes. If all you can muster is avocado, a shake of Adobo seasoning, a squirt of lemon and pomegranate seeds you are good to go.

Ingredients

2 medium ripe avocados
1/3 cup diced red onion
1/4 cup chopped cilantro
2 Tbsp freshly squeezed lime juice
1/2 tsp salt
1/4 tsp pepper
1/2 cup pomegranate seeds
Chips or assorted veggies for serving

Method

Halve and pit the avocados then scoop out the flesh into a large bowl.

Add the red onion, cilantro, lime juice, salt and pepper to the bowl, mashing the mixture together with two forks until it reaches your desired consistency.

Stir in the pomegranate seeds then serve the guacamole with chips or assorted dippers.

#4 Pomegranate Desserts

Fly, be free. Let’s not overthink this. Sprinkle them on vanilla ice cream or yogurt. Put them in a trifle or slip them in fruit pies. Mix them with ripe sliced pears, a squeeze of lemon and a dash of cinnamon. Or just eat them with a spoon or funnel them from the bowl right into your mouth. Um. Of course, nobody would do something like that.

Bonus points: Just to let you know, in addition to the above we have also sprinkled them on raclette, put them into quesadillas and on salads, tossed them with sliced steak, put them in crepes and on cereal and thrown them in smoothies. And no, I have not yet roasted them, but the holiday season is young.

skihats

Are you still with me? Are you intrigued by the above? My sister turned me on to this video and my captive son and I got a little obsessed with yarn/toilet paper roll pom-pom hats. I figure there are worse obsessions, and who doesn’t need another decorative totally useless bottle topper? Right?

Merry Christmas all!

Vail trees

Bringing on the Holidays

I am just reentering the real world after a trip to Vail, CO, where their trees look like this. One day they were just, you know, trees. And the next day we were living in a patriotic LED forest. In addition to designer trees I had three days of life in the VIP tent at the base of the race course, a fantasy world I hope everyone can experience at least once.

Here’s what goes down in the VIP tent:

Pretty women in puffy pink coats pass glasses of champagne filled at the outdoor bar, where Bloody Marys are also mixed to order. Next to the bar juicy burgers are grilled up, nestled into buttered buns and wrapped up so you can grab them if you’re the outdoorsy type. Inside, tables are laden with fruit, cheeses and nuts, fresh baked breads, a Veggie Nirvana of salads, a Carnivorama of roasted beasts, coconutted shrimp, and steamy soups topped with mini grilled cheeses. And then comes the dessert table which is completely off the hook. I never even made it to dessert because another roving server appeared with a tray of whipped cream-topped hot chocolate with vanilla vodka, which sort of ended the lunch conquest.

VIP-tent-2VIP tent-1


I’m not going in to such detail to be mean, but to establish the high bar going in to prime, party intensive, holiday season. If you need some ideas for what to bring to your next soiree, here are just a few ideas from the Bring It! repertoire.

Bringing the cheer:

Cut to the chase and get the party started by bringing a premixed, seasonal cocktail like these ones we had at Thanksgiving. If you are going to be outdoors bring a Thermos of hot cocoa or tea and the hootch to add. Dark rum is a solid go-to for hot drinks and, as noted above, apparently so is vodka. Fixin’s for a big batch of mint chocolate milk will build your snack cred with all ages.

Apps for a crowd?

You can’t go wrong with Sue’s marinated shrimp and artichoke number, or the ever-festive, ridiculously easy Funitella Bruschetta. Below see a basic recipe for the cheddar cheese rounds that make their way into every spiral-bound community cookbook for good reason. (Bonus feature: they can be made with ingredients procured at any mini mart.) Bacon wrapped dates? Yes, have some! And really, putting that fondue pot in a tote bag with a big bag of grated cheese, and firing up some Guinness fondue is always the right thing to do.

DIY Hostess Gifts/Party Fare:

Bottle up some ginger simple syrup that goes in our previously mentioned cocktails, or get creative with help from the full simple syrup tutorial here. Go Mediterranean with a jar of Sicilian Caponata, go healthy with a loaf of Life Bread (thinly slice it and toast it for a tasty snack foundation), sweeten the deal with Salted Caramel Cholliesauce orrrrrrr, get nutty with some sweet and spicy roasted nuts. Oh-so-sophisticated thyme honey walnuts are pure gold on some lusty soft cheese. If you’re shamelessly vying for a quick hit of popularity bust out the Crackle.

Wrapping it all up:

Remember wrap master Boot Camp Bonnie? ‘Tis the season to revisit her tips for packaging brilliance.

You’ve got the week to prep for this weekend’s shenanigans, and a whole lot of joy on the calendar, so let’s do this holiday thing!

Can’t Go Wrong Cheddar Crisps

Ingredients:

  • 1 stick butter, softened
  • 1 cup extra-sharp cheddar cheese, finely shredded
  • 1 cup flour
  • 1/8 teaspoon cayenne pepper (some curry powder is also good if that’s your thing)
  • 1/2 teaspoon salt
  • 1 cup Rice Krispies cereal

Method:

Preheat oven to 350 F. In a medium bowl, mix together the butter, cheese, flour, cayenne and salt until it forms a ball stuck lightly together. (Use your hands or a wooden spoon to fully incorporate all ingredients.) Gently fold the cereal into the dough. Pinch off nickel-size balls and roll tightly between your hands. Place them about an inch apart on an ungreased cookie or baking sheet. When all the balls are rolled, flatten each one with the tines of a fork. Bake 15 minutes.

Cool crisps 5 to 10 minutes before removing from the pan to serve. Leftovers may be stored in a tin up to 1 week. Makes about 4 dozen.

Note: Alternatively, you can roll the dough into a long log, wrap it in plastic or waxed paper chill. When ready to make them, slice log into ¼” (or so) rounds and bake as directed above. They’ll take a bit longer so just watch them. The whole make ahead, roll and chill (or freeze if needed) thing comes in handy and the end result looks pretty pro.

Party Time Hummus


Don't bring that hummus. Bring THIS hummus.

Don’t bring that hummus. Bring THIS hummus.

It’s getting to be party season. And what’s a party without that token tub of hummus with the perfect swirl on top? Yes, it’s healthy, it’s appreciated, it gives you something to do with those mini carrots. But it’s, yawn, hummus. Wake up and smell the chickpeas! You can bring something healthy and easy that also has seasonal flair and cha-cha. Bust out the roasted beet or pumpkin hummus for a totally different vibe—hot pink, vibrant orange and totally delish.

The beauty of making these together is that you roast the garlic in olive oil and then use both in both recipes. No need to measure. Just roast a whole load of garlic because when is it ever a bad thing to have roasted garlic and garlic flavored oil on hand in the fridge? Yeah. Rhymes with never. You’ve got your base for awesome salad dressings, crazy good roasted vegetables, a drizzle for soup, dipping oil for bread, etc etc etc.

Now, I happened to have roasted squash and roasted beets begging to be used up so I was going to make up a batch of each of these. But somehow my pantry only coughed up one can of chickpeas. Stranger still is that I had six cans of sliced beets. How does that happen? Rest assured a recipe for canned beets is on the horizon. Given the situation I made a half batch of each hummus which is not a bad tactic. Note (with joy) that the pumpkin/squash hummus does not involve tahini, which is handy if you ran out of your stash or if having another expensive tub of nut butter is going to put you over the edge. You can use canned pumpkin if that’s what you’ve got, and as soon as I get more chickpeas I’m going to try using canned beets as well. Stay tuned!

The final thing you need to know before embarking on this food processor adventure is that hummus is not an exact science. Get the basic ingredients and then tweak as desired. I always put in extra lemon and (when nobody’s looking) salt. We’re making this stuff from scratch fergawdssake, so just think about how much crap we are NOT putting in there. A scootch more kosher salt isn’t going to hurt.

Pumpkin Rosemary Hummus

Adapted from Pinch of Yum

If you use kabocha squash it will be a little sweeter and a little thicker so you may need to add some warm water at the end to achieve your ideal texture.

Ingredients

1-2 cloves roasted garlic (see #1)
2 Tbsp olive oil
2 Tbsp water
1 can chickpeas, drained and rinsed
2/3 cup pumpkin puree (or hint hint, kabocha/butternut squash puree)
1 Tbsp maple syrup or honey
squeeze or more of fresh lemon (optional)
1/2 tsp finely minced fresh rosemary (more to taste)
salt to taste

Method

  1. To roast the garlic, simmer the peeled cloves in a small saucepan with olive oil for 15-20 minutes over low/medium heat. See note above and make more if you can.
  2. Puree all ingredients except rosemary in a blender or food processor until smooth. Add more oil or water as needed. Stir in the rosemary at the very end.
  3. Serve with warm naan, apple slices, crackers, carrots, wheat toast, roasted vegetables, pita bread, and/or anything.

Roasted Beet Hummus

From Minimalist Baker

Ingredients

1 small roasted beet
1 15 oz. can (1 3/4 cup) cooked chickpeas, mostly drained
zest of one large lemon
juice of half a large lemon
healthy pinch salt and black pepper
2 large cloves roasted garlic, minced or mashed (see garlic step in previous recipe)
2 heaping Tbsp tahini
1/4 cup extra virgin olive oil

Method

  1. Roast Beets (see below)
  2. Once your beet is cooled and peeled, quarter it and place it in your food processor. Blend until only small bits remain.
  3. Add remaining ingredients except for olive oil and blend until smooth.
  4. Drizzle in olive oil as the hummus is mixing.
  5. Taste and adjust seasonings as needed, adding more salt, lemon juice or olive oil if needed. If it’s too thick, add a bit of warm water.
  6. Will keep in the fridge for up to a week.

Roasting beets: Preheat oven to 375°F, remove the stem and most of the root from your beets, and scrub and wash them underwater until clean. Drizzle on a bit of canola oil, wrap tightly, and roast for one hour or until a knife inserted falls out without resistance. They should be tender. Cool to room temperature.

Halloween Soup: So easy it’s scary


Almost instant squash soup, with pro toppings for extra credit.

Almost instant squash soup, with pro toppings for extra credit.

This is the whiny thing I was going to post: “I give up. I will never, ever be able to produce an exact recipe for soup. I’m into my third pot of butternut squash soup of the season and have yet to really measure the ingredients, or actually even keep track of them. For me, homemade soup is like a hall pass to use whatever I have and crave at the moment….”

But then…but then…then it all changed. I discovered a trove of pumpkin/squash soup recipes that take the same basic ingredients and, with nary a knife unsheathed, produce a deliciously complex and satisfying soup. A soup that can be served hot in a big bowl as a meal, or cold in a shot glass as an appetizer.

I am including my non-recipe below, for when you have the time and ingredients to create something uniquely yours. In the meantime, here is the sheer brilliance of nearly instant pumpkin/squash soup.

A few notes: I love red curry paste so I probably sneak in a bit extra. You can also use red curry powder, though you would be missing out on the twin goodness of garlic and lemongrass.  I roast my own kabocha squash because its thicker and sweeter than other squash, and makes the house smell good. But dang, the option of opening two cans instead is money! Finally, I cannot tell you how much I love toasted unsweetened coconut flakes and the healthy, tasty, crunchy I daresay almost bacony finishing touch they add.

Now my little kitchen witches and goblins, go forth to your pantry and make some Halloween Soup!

Ingredients

2 Tbsp red curry paste (more or less to taste)
4 cups chicken or vegetable broth, about 32 ounces (one carton)
2 15 ounce cans pumpkin puree (or 4ish cups cooked squash of choice.)
1 3/4 cup coconut milk, or a 13.5 ounce can, reserving 1 Tbsp (slackers—pour in the whole
an and be done with it)
1 large red chili pepper, sliced (totally optional but a nice touch for hotties)
Cilantro for garnish if desired
Toasted coconut flakes for garnish if desired (strongly encouraged)

Method

  1. In a large saucepan over medium heat, cook the curry paste for about one minute or until paste becomes fragrant. Add the broth and the pumpkin and stir.
  2. Cook for about 3 minutes or until soup starts to bubble. Add the coconut milk and cook until hot, about 3 minutes.
  3. Ladle into bowls and garnish with a drizzle of the reserved coconut milk and sliced red chilis. Garnish with cilantro leaves if desired.
  4. Serve with Best French Bread, Paleo Crackers, Dirt Bread or your dipper of choice.

And now for…

Edie’s Seat of Pants Squash Soup

While I can’t provide an exact recipe, I can provide a process, some ingredient guidelines and of course my sincere encouragement at every step. There really is nothing that says comfort like a pot of your own signature soup.

Ingredients

Olive oil (for silkiness)
Butter (for tastiness)
1 onion
1 apple or pear
Savories (your choice of curry, garam masala, cumin, dried or fresh herbs, fresh ginger, red or green curry paste, a squeeze from a tube of lemongrass paste my new fave go to ingredient.)

  • Optional deglazing hooch (sherry, wine, calvados, hard or regular apple cider)
  • Cooked winter squash (and/or any leftover cooked root vegetables)
  • Diced potato (if no leftover roasted potatoes were in your leftovers above)
  • Maple syrup, a tablespoon or more to taste
  • Chicken or vegetable broth

 Method

  • Saute chopped onions until slightly soft.
  • Add apple or pear and continue cooking until all are soft and starting to brown.
  • Add savories and continue to cook a minute or two, or until aromatic. You want to really get the flavor infused before adding liquid.
  • Just as you are thinking “OMG look at the stuff sticking to my pan!” pour in a healthy splash of deglazing liquid of choice and give the pot a good stir/scrape. Watch the browned bits disappear and rejoice as the liquid cooks down.
  • Add in broth and potatoes. If potatoes are raw let them cook for 10 minutes or so before adding squash. If cooked add them with squash.
  • Add squash and maple syrup. Continue cooking, giving flavors time to meld. I have no idea if this step is necessary, but it gives me ample time to check email, read The Skimm, take a shower or get through a few more minutes of Serial.
  • Turn off heat, let soup cool a bit and then process until smooth with an immersion blender (you just plain need one for fall) or in a blender.
  • Season with salt and pepper.
  • Serve with Best French Bread, Paleo Crackers, Dirt Bread or your dipper of choice and be very, very happy.

Squash On!… on toast that is


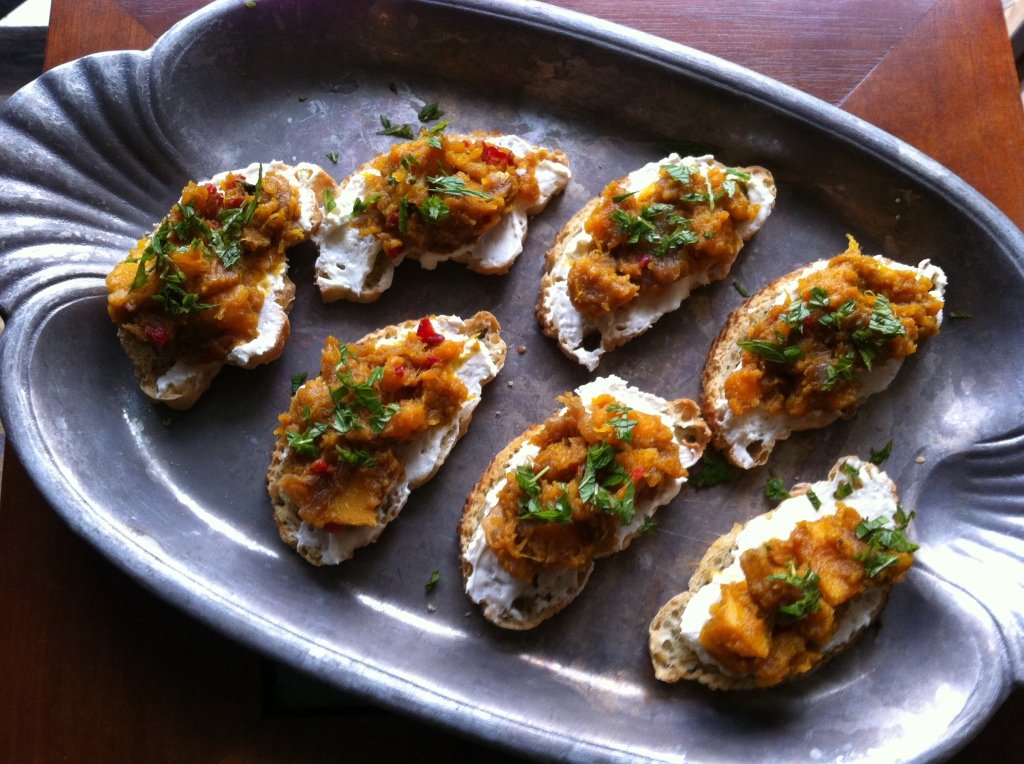
Fall all over squash on toast

Fall all over yourself for these apps. Yep, they’re that good.

Foodwise, fall is my dream come true. First come the apples, and we’ve been through my apple addiction. They give us good excuses to make things like salted caramel cholliesauce and Joni Mitchell Apple Pie. Then comes Halloween season (it’s really not just a day you know) and all those excuses to make things like Crackle and Salty Malty Rice Krispy Treats with whatever Whoppers you didn’t polish off. And of course you’ve got the crock pot bubbling in the background with goodness like no-fuss chicken taco chili. Honestly though, what I love most are the fall veggies—the squash, brussels sprouts, beets and various roots all begging for their turn to get roasted in the oven.

In my fall food frenzy I’ve gone a little nutty on the winter squash, and now I find I’ll have to pace myself  because I have so many orange recipes to post. I’m starting with an appetizer, because it is the one that surprised me the most with its popularity and because party season is upon us!

Here, courtesy of  Jean Georges Vongerichten via NYT Minimalist Mark Bittman is the elegantly named “Squash on Toast.” I knew I’d like it well enough, because you know, the weirder the better. And onions caramelized into jam with maple syrup and apple cider vinegar? Come on! The mainstream was just as smitten. The first time I made these I brought them to a party and they were devoured. Crazy good.

Here we go with my disclosures. I used a kabocha squash, hollowed, filled with water and cooked whole in the oven. For cheese I used a spreadable brie because that’s what I had. Whipped cream cheese is also excellent. I adhered to directions and included the fresh mint which got high praise from all, so play by the rules here. For the bread I brushed thin slices of Easiest French Bread Ever with olive oil and toasted them in the oven. Make a lot of toasts so you don’t have to be mean and hide them from your family before party time.

Ok, squash on!

Ingredients

1 2 1/2- to 3-pound kabocha or butternut squash, peeled, seeded and cut into pieces 1/8- to 1/4-inch thick
3/4 cup extra-virgin olive oil
1/2 tsp dried chile flakes, more to taste
3 tsp kosher salt
1 yellow onion, peeled and thinly sliced
1/4 cup apple cider vinegar
1/4 cup maple syrup (or agave)
4 slices country bread, 1-inch thick
1/2 cup ricotta, goat cheese, feta or mascarpone
Coarse salt
4 Tbsp chopped mint

Preparation

1. Heat the oven to 450. Combine the squash, 1/4 cup olive oil, chile flakes and 2 teaspoons of salt in a bowl and toss well. Transfer the mixture to a parchment-lined baking sheet and cook, stirring every few minutes, until tender and slightly colored, about 15 minutes or a little longer. Remove from the oven.
 2. Meanwhile, heat another 1/4 cup olive oil over medium-high heat, add the onions and remaining teaspoon salt and cook, stirring frequently, until the onions are well softened and darkening, at least 15 minutes. Add the vinegar and syrup, stir and reduce until syrupy and broken down, again at least 15 minutes or so; the mixture should be jammy.
3. Combine squash and onions in a bowl and smash with a fork until combined. Taste for seasoning.
4. Add the remaining oil to a skillet over medium-high heat. Working in batches if necessary, add bread and cook until just golden on both sides, less than 10 minutes total; drain on paper towels. Spread cheese on toasts, then top with the squash-onion mixture. Sprinkle with coarse salt and garnish with mint.

Bring It

Deconstructed is the only way to transport, and remember to bring the right sized platter and a spreading knife. When you get to your destination have a fine little chat while assembling the toasts (and try to keep up with production as they are eaten off the platter).