Cauliflower and Pear Soup


My Dad’s favorite soup was vichyssoise, which is French for a cream, leek and mashed potatoes milkshake. While vichyssoise is delicious, I always feel a little guilty having a day’s worth of calories in a cup. It’s also traditionally served cold, which makes it a tough sell in winter. This soup, from Food52, reminds me of Vichyssoise in its creamy texture and in its potato/leek provenance. It is, however, downright healthy and served hot—key features for all food in January.

The addition of pears here is all upside, especially if you need a way to use up any Christmas pears. By the way, if you happen to have that problem, I’ll be right over! It also cooks in one pot. And that’s not all…it can easily be Veganized by replacing the butter with your fat of choice, and using vegetable broth instead of chicken broth. Swirl in some cream if you need a hug.

Cauliflower and Pear Soup
Serves 4 to 6

Ingredients

  • 1 T olive oil
  • 2 T butter
  • 1 large leek, white and light green parts, chopped
  • 1 small shallot, chopped
  • 1 head cauliflower, green leaves and trunk removed, florets chopped
  • 2 small yukon gold potatoes, peeled and chopped
  • 1 large or 2 small pears, peeled, cored, and chopped
  • 5 leaves fresh sage (or about 2 tsp chopped), plus more for garnish, if desired
  • 1 T chopped fresh thyme leaves
  • 5 to 6 cups chicken stock
  • kosher salt + freshly ground black pepper
  • 2 to 3 tsp sherry vinegar, or to taste (champagne vinegar also works well)
  • 2-3 Tbsp maple syrup (optional)

For Serving:

Method:

  1. Heat the oil and butter in a soup pot over medium heat. Add the leek and shallot, and cook until they are soft, stirring occasionally, about 5 minutes.
  2. Add the cauliflower, potato, pear, sage, and thyme, stirring to thoroughly coat them with the oil and butter. Season with salt and pepper. Cook until lightly browned, stirring frequently, another 8 to 10 minutes. (if your pot is pretty full it may take quite a bit longer. Be loose and go with your instincts here). You’re aiming for a little caramelization around the edges for depth of flavor.
  3. Add 5 cups chicken stock. Season to taste with salt and pepper. Bring to a simmer, lower heat to just maintain the simmer, and cook until all of the ingredients are very tender, about 30 minutes.
  4. With an immersion blender or regular blender, puree the soup until it’s smooth. If using a blender, you may need to do this step in batches, then return to pot. You’re looking for a smooth, velvety texture, so take your time to blend thoroughly. Thin with more chicken stock, if needed, until you reach desired consistency.
  5. Season to taste with vinegar, maple syrup if desired (when would it not be?) and salt and pepper. Serve in heated bowls, with garnish of choice

The experts say you should serve this with a gooey grilled cheese sandwich. Who am I to argue? And in case you wondered, it’s darned good cold as well. Buck would approve!

Winter’s back. Stay warm out there!

Salted Peanut Butter Cookies: Gluten-Free and Mini-Mart Sourced

Gluten-free, marmot approved.

Gluten-free, marmot approved

Here’s a hypothetical situation. It’s Christmas Eve, you gave away all your homemade cookies (if you happen to have made them in the first place), and you just found out Santa (or a guest) is gluten-free. There’s no way you’re going to the grocery store for special ingredients but you may be able to pull off a mini mart run. What if all that happened? What would you do?

You would make these cookies.  These are barely adapted from Smitten Kitchen who got them from the Ovenly cookbook. It’s the gift that keeps on giving. Here’s hoping you don’t need these tonight, and you stay clear of mini marts, but in case of emergency, you’re covered. Have a good one all, enjoy your people, and see you on the other side!

Salted Peanut Butter Cookies

Yield 26 to 28 cookies with a 1 2/3 tablespoon or #40 scoop.

  • 1 3/4 cups (335 grams) packed light brown sugar
  • 2 large eggs, at room temperature
  • 1/2 teaspoon vanilla extract
  • 1 3/4 cups (450 grams) smooth peanut butter (see note at end)
  • 1 cup (or so) of your favorite chocolate chips (optional)
  • Coarse-grained sea salt, to finish

Preheat the oven to 350°F. Line a rimmed baking sheet with parchment paper.

In a medium bowl, whisk together the light brown sugar and eggs until smooth. Whisk in the vanilla extract, then the peanut butter until smooth and completely incorporated; you shouldn’t be able to see any ribbons of peanut butter. Stir in chocolate chips, if desired.

Scoop or spoon the dough into balls — from a heaping Tablespoon to monster 1/4 cup sized. Place on prepared pan. For the tallest final shape, place the tray in the freezer for 15 minutes before baking.

Sprinkle the dough balls lightly with coarse-grained sea salt just before baking. Bake smaller cookies for 14 to 15 minutes and larger for 18 to 20. When finished, cookies should be golden at edges. They’ll need to set on the sheet for a minute or two before they can be lifted intact to a cooling sheet. With any luck Santa hits your house late enough to let them cool completely so the crispy outside/soft inside thing can really happen. 

Do ahead: You can make the dough in advance and either refrigerate it for a couple days or scoop out the cookies, freeze them, then bake them right from the freezer.

About chilling the dough: You can scoop and bake the cookies right away, but they keep their shape better if you chill them in the freezer for 15 minutes first.

rosemary walnuts

Spicy Rosemary Maple Nuts

It’s here people. Crunch time. This is your week to bake or cook your way out of small gift madness.  Let’s review some options: We have, of course, the standby Crackle, and the more grown up Guinness and dark chocolate version. We have easy as pie (crust) cookies and jars of salted caramel cholliesauce or honey thyme walnuts. And speaking of nuts…we now also have an updated riff on sweet and savory roasted nuts.

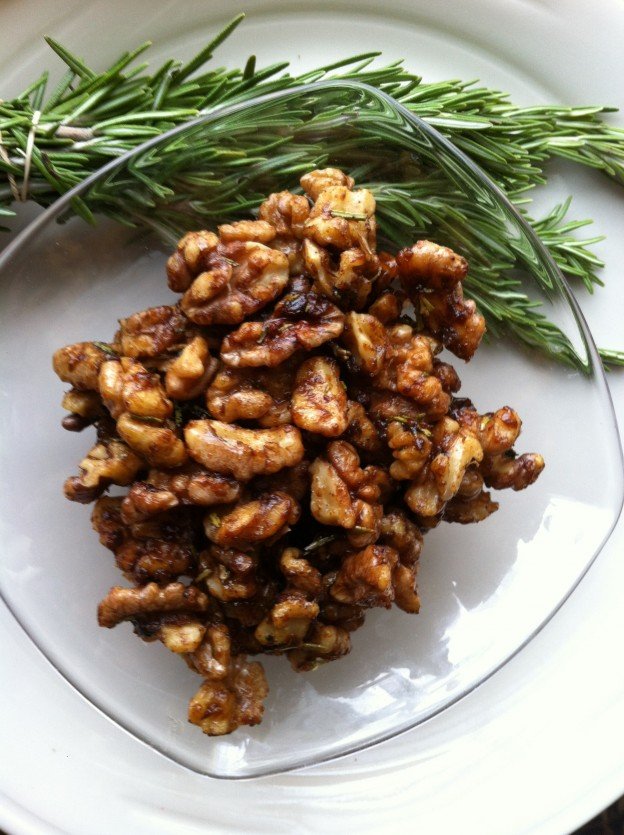
Sadly, I have no kill switch when it comes to sweet and spicy roasted nuts. Until now the men in my house have allowed me to make them, give them and sample (hoard) them with no interference. This year, however, when I made these for Thanksgiving they disappeared before they were cool enough to hide. Either the locals’ tastes have evolved or this recipe is just that good.  It calls for fresh rosemary, maple syrup and cayenne—standard issue stuff amongst us nut fans. What takes them over the edge is the amount of rosemary (lots) added both before and after baking. Oh, and flaky sea salt. No secrets here.

They’re sweet but not too sweet, and have enough heat to get your attention but not in a scary way. Best of all, there are no egg whites or other fussy things involved. Yes, those are angels singing. You’ve got to get fresh rosemary—I’m not letting you off the hook there—but you can use a mix of whatever raw nuts strike your fancy. Pictured is the full walnut monty, but a mix with pecans, almonds and/or cashews is divine. Love the one you’re with, baby.

Make a lot so you don’t have to be stingy with your family. It’s so close to Christmas and all.

Spicy Rosemary Maple Nuts

From Kitchen Konfidence

Ingredients

  • 1 pound unsalted mixed nuts (cashews, walnuts and almonds are delish)
  • 1 tablespoon melted butter
  • 1 tablespoon maple syrup
  • 2 tablespoons + 1 teaspoon chopped fresh rosemary, divided
  • 1 tablespoon dark brown sugar
  • ½ teaspoon cayenne pepper
  • 2 teaspoons flaky sea salt or kosher salt, plus more to taste

Method

  1. Preheat oven to 350°F. In a large bowl, toss mixed nuts with melted butter and maple syrup. Add 2 tablespoons chopped rosemary, dark brown sugar, cayenne pepper and 2 teaspoons flaky sea salt, mixing until the nuts are well coated . Spread nuts out onto a rimmed baking sheet lined with parchment paper. Bake until glazed and golden (about 18 – 20 minutes), stirring twice during the cooking process.*
  2. As soon as the nuts come out of the oven, season with an additional 1 teaspoon chopped fresh rosemary, and flaky sea salt to taste (I added an additional 3/4 teaspoon). Serve warm immediately or store in an airtight container at room temperature for up to 5 days.

Notes

  • Set the timer and If your oven runs hot, be sure to check the nuts a bit early. Nuts can turn on you and go from golden to bitter if you ignore them.

Up next: What if you find out Santa is gluten free….and you only have access to a mini mart? Got ya covered.

nuts-n-stuff


Slippery Slope Ginger Beer Margaritas

cranberry-ice

       Just add ice…and cranberries. ‘Tis the season to winterize your drinks. I’m here to help.

Watch your step. Holiday season snuck right up on us again. Just as we stood up from prying the squirrel-nibbled pumpkins off the patio, the holidays were staring us straight in the face. From here on it’s a slippery slope of parties, visitors, events and hastily concocted reasons to gather right through January 2. Are you ready? Do you need a drink? This could help.

Let’s ease into this transition by taking a summer standby and winterizing it. Meet the ginger beer margarita. I stumbled across this while going down the Internet rabbit hole in pursuit of butternut squash tacos. Did I mention the slippery slope? After some exhaustive testing of ginger beers, following the comments on Minimalist Baker, I can definitely recommend the lighter ones like Fever Tree. It IS a margarita after all.

These are the easiest drinks in the world to make. You can get fancy and line the rim with lime juice and salt, or you can a just make the darned drinks. You can stir the ingredients together in a cocktail shaker with ice and strain, as directed, or you can just stir them up up in a pitcher, and pour over ice in each glass giving each drink another good stir. Just save yourself the anxiety and the outfit change and DO NOT shake them in a cocktail shaker. Remember the volcano experiment in 2nd grade? Yep.

A quick brush up on simple syrup: Combine equal parts sugar and water. Stir to dissolve sugar, heat to boiling, and let cool. Keep some stored in your fridge at all times, in case of emergency.

The best part about this drink, from a social perspective, is that you can easily bring the parts and assemble on site, AND the ginger beer makes a festive non-alcoholic drink as well (see top picture). For more ideas you can always revisit these fine drinks from last year.

The contenders. It wasn't really exhaustive, but it was a Wednesday

        The contenders. OK,  it wasn’t really exhaustive, but it was a Wednesday evening. Points for that.

Ginger Beer Margaritas

From Minimalist Baker, and adapted for high volume

Ingredients

Single serving version

  • 1.5 ounces (3 Tablespoons) 100% agave tequila
  • 1 ounce (2 Tbsp) fresh lime juice
  • 3 ounces (6 Tbsp) ginger beer (Fever Tree regular or light are awesome)
  • .5 ounce (1 Tbsp) simple syrup
  • Coarse salt for lining rim (also optional and fancy)

Team player version, for four

  • ¾ cup tequila
  • ½ cup fresh lime juice
  • 1 ½ cups ginger beer
  • 4 Tbsp simple syrup
  • coarse salt

Method

  1. If you’re feeling fancy, Line a small serving glass with fresh lime juice and dip in coarse salt
  2. Add tequila, simple syrup, ginger beer and lime juice to a large glass (single serve) or cocktail shaker (let’s not drink alone) with lots of ice and stir vigorously. Don’t shake with a lid on!
  3. Pour liquid (reserving ice) into serving glass with a few ice cubes Garnish with a lime wedge and serve immediately. Repeat for more drinks, or double/triple the amounts for more people.

What to do with your leftover ginger beer, once you have settled in on “the one.” Here’s an idea. Pour it over these cranberry rosemary ice cubes that you made for Cran-rosemary prosecco punch, which is basically equal parts prosecco and white cranberry juice, a splash of bitters and these fancy ice cubes.  The fancy ice cubes also winterize the flavored seltzer you can’t help from buying on every trip to the store. Did I mention it’s a slippery slope?

Of Empty Nests and Butternut Squash


butt-pizzaSometimes—most times really—I’m not the quickest to pick up on the obvious. When I was wondering why it had been so hard to get inspired for fall a post I looked within, to all manner of character flaws, for an explanation. It took a friend in the grocery store, mocking the paltry contents of my grocery cart to make it obvious. I no longer have two of my biggest, loudest, stinkiest, most wonderful reasons to cook. If, like me, you are slow to notice signs here some dead giveaways.

You might be an empty nester if:

  • You no longer park near the cart collection stands at the grocery store.
  • You buy milk in half gallons, then quarts, and still wonder if it’s gone bad.
  • You put everything you can imagine needing into your cart and it still costs less than $50.
  • Your ice cream has freezer burn.
  • You actually pay attention to special diets, and try to accommodate them.

This last point is what today’s post is about. Well, that and butternut squash, my food champion of fall. (Let’s remember squash on toast, sugar and spice soup and Halloween Soup and on and on in the butternut/kabocha hall of fame.) The empty nest is suddenly available for visitors, which is awesome, and they bring with them special diets. At one point recently three guests joked that one was gluten free, one was sugar free and one was calorie free. Guest Number 4 was Vegan. This all worked because a: They all had a sense of humor and adventure, and b: I had time to care (see above).

In my quest as a Vegan sympathizer I’ve tried a lot of things recently. I’ve tried to make both cheese and pizza crust out of cauliflower. No and no. I’ve made Reuben sandwiches out of seitan, a thousand times NO. I’ve also found some reasonably good stuff like grain-free carrot bread, and mayonnaise made with chickpeas. And, with much inspiration from Minimalist Baker and other sites, I’ve made some unbelievable stuff, like butternut squash pizza, the key ingredients of which I share below.

It’s been a fun experiment, and I like being able to find things that can broaden my own food horizons and make people on special diets happy. That said, life is about finding the right balance. When I asked my husband if he was game to try black bean sweet potato burgers for dinner, he merely went to the freezer, removed a steak and thunked it on the counter. Know your audience, people, and enjoy whoever is in your nest.

Butternut Squash Sauce

From the Minimalist Baker, with amounts adjusted

butt-pizza2

Also makes a mean pizzadilla, on a corn tortilla procured by the Vegan for the gluten-free girl.

Ingredients

For every cup of cubed butternut squash you will need:

  • 2 tsp olive oil ( 1 tsp oil for roasting and another tsp for adding to the sauce)
  • 1 garlic clove, whole, skin removed
  • 1 tsp maple syrup
  • a pinch of salt and pepper.

Keep in mind 1 Tbsp is 3 tsp. Sooooo, math whiz that I am, for 3 cups squash you will need 1 Tbsp of oil for roasting, and another Tbsp oil to add to the sauce, and 1 Tbsp maple syrup. A baking sheet easily holds 4 cups, so amp up ingredients if you’ve got the squash.

Method:

Preheat oven to 400 degrees F and position a rack in the middle of the oven.

Add cubed butternut squash and peeled garlic cloves to a baking sheet and drizzle with half total olive oil and a pinch each salt and pepper. Toss to combine.

Bake for 15-20 minutes, or until all squash is fork tender.

Transfer squash and garlic to a blender or food processor with remaining olive oil and maple syrup. Purée until creamy and smooth, adding more olive oil or a touch of water if it’s too thick. The consistency should be creamy and spreadable (not pourable). Taste and adjust seasonings as needed.

Use sauce as you would pizza sauce, topping it with your desired cheese and toppings and baking the pizza at 425. Make a great Pizzadilla as well, as evidenced on the fine corn tortilla pictured above.

fall-food

Old fall favorites and some new ones

Vegan Parmesan Cheese

Also from Minimalist Baker

This is surprisingly good. As with any imposters, better to think of it as its own thing. (I’m looking at you, black bean “brownies”). It’s sort of a weird craving now. Like I needed another.

Ingredients

  • 3/4 cup (90 g) raw cashews (try raw slivered almonds or brazil nuts too)
  • 3 Tbsp (9 g) nutritional yeast
  • 3/4 tsp sea salt
  • 1/4 tsp garlic powder

Method

Add all ingredients to a food processor and mix/pulse until a fine meal is achieved. Store in the refrigerator to keep fresh. Lasts for several weeks.

But that’s not all! Some bonus fall accessories:

Tahini Miso Sauce

If you don’t have miso in your fridge, do yourself a favor and get some. Merely figuring out how to use it up you will take you on a flavor adventure. Toss this sauce with pretty much anything roasted, but especially cauliflower, brussels sprouts, butternut squash, sweet potatoes, etc, etc.

Ingredients:

  • 2 Tbsp. tahini
  • 1 Tbsp. white miso
  • 2 tsp. red wine vinegar
  • 1 tsp maple syrup
  • optional: grated fresh ginger, pinch of red pepper flakes, splash of Tamari. Do experiment here!

Whisk or stir all ingredients, adding enough water, a spoonful at a time, to make a smooth sauce.

Fried Sage Leaves

Put them on anything for fall goodness

Ingredients:

  • Olive oil
  • Fresh sage leaves, twice as much as you think you want
  • Coarse salt

Method:

Heat oil in a pan. Fry sage leaves 6 or so at a time until crisp. Remove to a paper towel with slotted spoon and sprinkle with salt. Repeat until you have enough to actually share with others.

sage-coffee

Fried sage next to the very best Vitamin C!


California Dreamin’: Pickled Grapes and other Weird Things

Pickled grapes, accessorized for fall.

Pickled grapes, accessorized for fall.

Well hello fall! I’m not sure how we got from frosé season to apple season so fast, but here we are. Have we all fit an unreasonable amount of fresh corn and tomatoes into our diets these past few weeks? And rescued every last watermelon from the cardboard bins? If so, good job. If not, there’s still time…but barely!

I’m just back from a long trip to Cali, and it of course involved lots of weird food. Why even go to California if you’re not going to dive all in? My weird food fest got rolling at Jack London Square in Oakland, first at a vegetarian restaurant with a mushroom pecan pate that still haunts me in the best way, and then at an event called Eat Real. Very groovy indeed. Super tart, super strong Red Branch hard cherry cider kicked it off. Fabulous street eats ensued, including sesame peanut zucchini salad with furikake…Damn! So good and so fun to say. The miso sesame muffin from Berkeley’s own Sam’s Patisserie wrapped it all up with an oddly addictive bow.

A beer drinker's decision tree. Takes the pressure off.

A beer drinker’s decision tree at Eat Real.

From there I went south, for pink pepperberry gin and tonics in Santa Monica, Tuna poke and tamales in Pasadena, and then—because you’ve got to be on your A game of weirdness in Topanga—rosemary-brined grapes and basil pickled cantaloupe.

Today, I’m bringing you the grapes, because they are stupid easy and crazy good. Plus, they are red and green and would be a perfect offering for any holiday feast. Make them now, try them in a week or so, and if you like them you’ll have plenty of time to go into production. So, let’s not be sad as we let summer and linen and the quest for perfect toenail color drift away. There are apples to be eaten, pies to be baked and ciders of all potencies to be quaffed.

This comes straight from the Wall St. Journal food section, which is awesome. Read the article for other pickled fruit recipes, including cantaloupe. And if there’s a deal on grapes just make a ton. As the article instructs, their flavors improve after about a week, and they’ll keep in the fridge for months… unless I come over.

Pickled Grapes

Adapted from “The Lee Bros. Simple Fresh Southern” by Ted and Matt Lee

Active time: 15 minutes Total time: 45 minutes Makes: 1 pint

  • 2 cups seedless red and/or green grapes (about 10 ounces)
  • ¾ cup distilled white or white wine vinegar
  • ¾ cup water
  • 1 teaspoon kosher salt, plus more to taste
  • 1 teaspoon sugar
  • 2 small cloves garlic, peeled and crushed
  • Leaves from 1 (2-inch) sprig rosemary
  • ⅛ teaspoon dried red chili flakes
  1. Pack grapes into a glass jar or airtight plastic container. Pour vinegar and water into a saucepan over medium-high heat. Add salt, sugar, garlic, rosemary and chili flakes. Bring to a simmer and cook 1 minute.
  2. Remove pan from heat and pour brine over grapes to fill container. Strain remaining brine into a measuring cup (you should have a little less than ½ cup left over) and reserve for making butter lettuce salad with pickled grapes, toasted pecans and soft goat cheese (recipe below). Transfer any garlic, rosemary and chili flakes remaining in strainer to container with grapes.
  3. Cover container tightly, shake to distribute seasonings, uncover and let cool to room temperature, about 30 minutes. Cover again, and transfer container to refrigerator to chill further, about 15 minutes more.
Among the least weird things in Topanga

Among the least weird things in Topanga

img_5160

Straight up awesomeness in the East Bay


Frosé and Frosecco: Summer’s Coolest Celebs


You say frosé, I say "Be right over!"

You say frosé, I say “Be right over!”

It’s been called the summer of Frosé, the “it” drink of summer, even the “God of summer.” Suffice to say, Frosé is a thing. At first I resisted jumping on the Frosé bicyclette. We are, after all, no stranger to the slushy drink rodeo. Plus, I learned the hard way that there is significant recovery involved after an entire summer quenching one’s thirst with things like watermelon sangria. All that said, I also have obligations to the Bring It devoted, so at my cousin D’s urging I took the plunge into trying, tweaking and bringing Frosé. While I was at it, I decided to try the same method with the beverage mascot of brunch, Prosecco, subbing peaches for strawberries to get the Bellini effect.

I’m happy to say the experiment was a grand success and I can bring you not one but two fun, fabulous, delicious summer drinks that can be made and transported in large quantities with little effort. Cue the late summer victory dance here.

The premise is simple: frozen rosé or prosecco, emboldened with fresh fruit-infused syrup then sweetness-balanced with fresh lemon juice. Some versions add more complicated mixers or liqueurs and even fresh herbs. I’m all for experimentation, but there’s not a thing wrong (and a whole lot right) with the basic version.

I started with this one in Bon Appetit, added a splash of vodka to keep it loose, and then slackerized it by eliminating pretty much every step beyond dumping it in the container. This is because summer entertaining at the beach, the lake or even the patio is ideally a “no host” experience. As in no host needed to get yourself a damn drink.

This is very easily scaled up, based on the size of your container. My two vintage yard sale gallon-plus Tupperware beverage containers hold 5 bottles of wine so I used 4 bottles in each to make room for the other ingredients and freezing expansion. When finished they pop right into a cooler, doing double duty as ice packs, and are ready for action at your destination.

Use the leftover fruit in smoothies, over yogurt and ice cream, or stirred with cubed watermelon and fresh mint into a batch of limeade for the world’s easiest aqua fresca. Kids and your wiser, sober friends, will worship you for this.

Here, my pretties, is your date for hot the summer nights ahead:

Frosé and Frosecco

Servings: Makes 4–6

Ingredients:

  • 1 750 ml bottle hearty, bold rosé (such as a Pinot Noir or Merlot rosé) or Prosecco
  • ¼ cup vodka (optional but helps keep it a little looser and sassier)
  • ½ cup sugar
  • 8 ounces strawberries, hulled, quartered (or peaches, raspberries, based on flavor and color preference)
  • 2½ ounces fresh lemon juice

Note: Here are at Bring It central, we’re pretty much done after Step 2. There is no blender involved. The cooled syrup goes right into the semi frozen Rosé or Prosecco and into the freezer. Extra points if you stir it and scrape it with a big spoon every few hours while it is freezing.

Preparation

  • Pour rosé into a 13×9″ pan (or, a transportable Tupperware/beverage container of choice) and freeze until almost solid (it won’t completely solidify due to the alcohol), at least 6 hours. Allow longer if working with multiple bottles.
  • Meanwhile, bring sugar and ½ cup water to a boil in a medium saucepan; cook, stirring constantly, until sugar dissolves, about 3 minutes. Add strawberries, remove from heat, and let sit 30 minutes to infuse syrup with strawberry flavor. Strain through a fine-mesh sieve into a small bowl (do not press on solids); cover and chill until cold, about 30 minutes. (Reserve still-delicious berries for another use.)
  • Scrape rosé into a blender. Add lemon juice, 3½ ounces strawberry syrup, and 1 cup crushed ice and purée until smooth. Transfer blender jar to freezer and freeze until frosé is thickened (aim for milkshake consistency), 25–35 minutes.
  • Blend again until frosé is slushy. Divide among glasses.

Bringing It:

Transport the entire container in a cooler, using it to cool your other offerings.  At your destination, pull out the container, stir or scrape frosé/frosecco to a uniform consistency and pour into glasses. You might need a spoon at first, but a hot summer day will soon take care of that!


Blueberry Dutch Bunny

Blueberry Durch Bunny

Fresh from the field and hot from the oven.

Sometimes you just get lucky. Friday was my day. I took a flyer and called Super Acres in Lyme to see if they were open for blueberry picking and learned it was opening day. Hallelujah! If you’ve never been to this PYO paradise it’s an Upper Valley rite of summer, and well worth a trip up River Rd.

Blueberry pints

The fruits of your labors

I coerced a friend— Super Acres newbie— to make the trek and he was suitably impressed.  This is not tedious, back-breaking work in a scorching field (I’m looking at you, strawberries). These are grassy rows of high bushes laden with so much ripe fruit that you can pick them like grapes. Somehow you can always seem to find a shady spot. Sheer brilliance! In about a half hour we easily picked four lbs each, without even taking a rest in the Adirondack chairs. Berry picking is about digging deep.

Super Acres provides picking buckets and pint baskets, though the pros bring their own giant Tupperware to make their pies and fill their freezers at home. Despite my aspirations, the allure of fresh berries is too much to resist in our house, and I have yet to freeze a single blueberry.

As for what to make, I had been angling for an excuse to make a blueberry version of Dutch Bunny, inspired by a recipe in Yankee magazine. Dutch Bunny (known outside my household as Dutch Baby, Sunday Pancake and Swedish Pancake) is my go-to weekend breakfast when I’m aiming to win friends. (Lifelong friends have been made over the magical emergence of Dutch Bunny on a vacation morning. True story) It’s hard to imagine a dish that is easier, more impressive or more appreciated by a houseful of guests.  Baking fresh blueberries into the whole shebang takes it over the top.

This is simply my standard Dutch Bunny recipe with fresh blueberries added to the mix. I linked you up but this saves you the trouble of hunting. You need your strength for blueberry picking.

Yield: Serves 4, or one hungry teenager.

 Ingredients

  • 3  Tbsp butter
  • 3  large eggs
  • 3/4  cup  milk
  • 1/2  tsp vanilla
  • 1/2  cup  all-purpose flour
  • 2  Tbsp sugar
  • 1/8  tsp salt
  • 1/2-3/4 cup fresh blueberries
  • Powdered sugar and fresh lemon wedge for topping
  • Whipped cream for topping, optional

 Method

  1. Melt butter in a 10-inch ovenproof frying pan over low heat. Remove from heat.
  2. In a large bowl or blender, beat or whirl eggs until light and pale. Beat or blend in milk, vanilla, flour, sugar, and salt.
  3. Pour batter into prepared pan and sprinkle blueberries on top (they will plop and sink—it’s all good).
  4. Bake in a 425° oven until pancake is puffed and lightly browned, 15 to 20 minutes.
  5. Dust with powdered sugar and squeeze fresh lemon on top. Slice into wedges and serve immediately.

Top with more berries, and whipped cream is you’re feeling it.

If you’re in the Upper Valley and want to visit Super Acres, it is located at 722 River Rd, north of Lyme. For more info call the hotline at (603) 353-9807. Unsprayed and awesome blueberries are $3/lb at the self-serve slot. Do the right thing and round up if you’re belly hurts from all the sampling. Oh, and it wouldn’t be a crime to save some room for a little detour to Whippi Dip in Fairlee on your way home.

Thanks to Olivia the great for her awesome pictures!

Super acres-kisk

Weighin’ and payin’ on the honor system.


ABC Summer Sauce

Green goodness with a kick

Green goodness with a kick

Summer. It gets away from you. As in, we’re halfway through July ?!?! and #$%^&*! Recipe-wise, I don’t have a whole lot to show for summer so far, but I have been doing some background work, like: ongoing watermelon rind experiments, which will save you from some pretty scary concoctions; exploring Vegan frontiers with the mysterious magical Aquafaba; making rhubarb vanilla jam and rhubarb vinegar that I promise to post before the end of strawberry rhubarb season next year; mixing up all kinds of drinks and mocktails (ginger limeade, watermelon aqua fresca), even homemade grenadine, which it turns out is nothing more than pomegranate simple syrup. Who knew? I’ve also been brewing up herbal Sun Tea like it’s my job and adding fresh citrus and mint simple syrup.

This will all be tasty Intel for later summer lovin’. In the near term, I am steeling myself for an exhaustive test of the many frosé recipes (thank you Cousin D) now trying their best to break the Internet. We need a hot weekend, a boatload of rose and some thirsty volunteers. Who’s with me?

Mostly, I’ve been thinking about good people, and how they are the most important ingredient to summer fun. As it happened the US Ski Team announced their 2016/2017 team yesterday, and it includes some really, really fine young people, many of whom I’ve been fortunate to get to know. Sure, they are amazing athletes, but way more importantly they are stellar people who make their ski people proud.

AJ and Ollie

AJ Ginnis, building his fan base.

Pro move: Lila's got the tools of the trade—parchment paper and high tech oven mitts.

Lila Lapanja baking up some Champion Chip Cookies.


In honor of this moment we’re looking to Anna Marno (U.S. Ski Team member, National Super G Champ, healthy eater and cooker, part unicorn) for a summer recipe that is exactly what summer is about. This gorgeous cilantro-packed sauce is fresh, easy, delicious, and versatile enough to liven up most anything you feel like roasting, grilling or dipping.

It was photographed by Rocky Mtn Tania, who’s contributions seriously raise the Bring It! bar.

Says Tania: “This sauce is simply amazing on almost everything: as a side for street tacos, with chicken, fish or pasta even on crackers with cheese.  The ingredients work together so well, but the amounts can and should be adjusted to taste.”

Shall we just call this Anna’s Best Cilantro Sauce? Yes we shall!

Anna-ripping

Anna Marno…ripping!

ABC Summer Sauce

Ingredients:

  • 1 large bunch of cilantro
  • Juice from 2 limes
  • 1 jalapeno, seeded and chopped
  • 1/2 tsp sea salt
  • 1 clove garlic peeled and coarsely chopped
  • 1 tsp cumin
  • 5 oz plain greek yogurt *
  • 2-3 Tbsp agave sweetener
  • 1/3 cup olive oil

Method:

Put everything but the olive oil in a blender (a Vita Mix if you’re showing off, but a regular blender will do). You have to push the ingredients down to blend.  Slowly drizzle olive oil into blended ingredients while the blender is running to emulsify the sauce.  Make ahead of time so flavors come together.

*The beauty of this recipe is that you can omit the yogurt and you have an incredible vinaigrette for a salad.

Bringing it:
This travels well and is a wonderful hostess gift.

Watermelon: Summer’s Cheap Sweet Thrill

watermelon-sorbet-glass

Call it sorbet, or granita, or just pure refreshment.

The big blockbuster summer weekend is creeping up on you like a kid with a loaded super soaker. Be ready! When agonizing over what to bring to any summer occasion you just can’t go wrong with watermelon. Whoever had too many of these, especially when they can be eaten at any meal, stored at room temperature and, when really unnecessary for nutrition, greased up and used for water games?

So here’s what you do. Get a watermelon every time you go by the bin at the grocery store and then figure out what to do with them. I suggest saddling up to a big cutting board for some watermelon prep, because one melon can really go a long way and satisfy many cravings. Here are some options:

Instant gratification: Cube it and eat it. If you have a crowd or just a couple of teenage boys it will disappear and everyone will have a dose of fruit and fiber.

Instant gratification, fiesta style: Sprinkle your cubes or wedges with chili powder. It’ll take you right back to that first trip to Tijuana. Or maybe this will spare you that trip to Tijuana.

Gourmet Move 1: Cut it into rounds then quarter rounds and make a shmancy arugula/feta/pepitas (or whatev) salad on top, using the watermelon as a plate. Here’s one from Simply Scratch for inspiration.

Gourmet Move 2: Make this watermelon and goat cheese salad that won the watermelon contest at Food52. If you don’t happen to have a crop of lemon verbena out your window use some lemon zest instead.

Drink Your Dinner: Watermelon Gazpacho involves some chopping, but otherwise this refreshing soup is about as easy as it gets. Plus it travels well and enjoys paper cups. Hello picnic!

Just Drink: Scoop watermelon into your food processor or blender, then strain it for watermelon juice. The juice can be used in things like watermelonade (basically watermelon juice and lemonade) or in the ever wonderful watermelon sangria.

As you can see this is not our first watermelon rodeo. For the 2016 edition though my focus is on the simple straight watermelon, cubed, pureed and frozen into a sorbet. It is known across the internet as “one-ingredient watermelon sorbet.” The thing with one-ingredient miracle recipes is that they are all a little better with, say, two or even three ingredients. This is the case here. Frozen pureed watermelon is pretty dang good, but it’s even better when you stir in some mint simple syrup and a splash of lime juice. A fourth ingredient, should you be inspired, could most certainly involve your liquor cabinet. You be the judge there.

1 ish Ingredient Watermelon Sorbet

Notes: Texturally this is more granita than sorbet. Save yourself the anxiety of expecting it to make pretty scoops, and just serve it in a cup with a spoon.

Ingredients:

  • 1/2 large seedless watermelon, peeled and cubed
  • 1-2 Tbsp fresh lemon or lime juice (optional)
  • 1/4 cup mint simple syrup* (optional)
  • Hootch of choice (optional)

Directions:

1. Arrange the watermelon cubes in an even layer on a baking sheet. Transfer the baking sheet to the freezer and freeze until the watermelon is solid, about 2 hours.

2. Working in batches, transfer the watermelon cubes to a blender or food processor and puree until smooth. (My processor fits about half the cubes at a time)

3. Divide the puree among two loaf pans (or put it all in one deep baking dish), packing it down as you add more on top.

watermelon sorbets

Straight up watermelon on left; with lime syrup and mint on right

4. Transfer the pans to the freezer. Freeze until the sorbet is scoopable, 1 to 2 hours more. You can also scrape it with a fork. If it freezes too firm let it sit out for a few minutes.

5. To serve, scoop (or scrape) the sorbet into dishes or cups and eat immediately. Or top with hootch and drink immediately.

*Simple syrup 101:  Combine equal parts sugar and water in a saucepan. For a minted version, add a bunch of chopped or torn fresh mint. Heat to a boil, stirring to dissolve sugar. Remove from heat and let steep for 30 minutes or so. Strain into container and chill.


Sneak Preview of late summer watermelon edition:

As a half Yankee by blood (thanks Mom) I am cursed with the urge to use every scrap of any ingredient. This leads me to watermelon rind pickles, a thing in the south, and watermelon rind jam. I’ve made one version of the pickles and do like them, though my tastes admittedly tweak towards science experiments—guests be warned. I am just now making the jam, which I suspect will have wider appeal. Either way, this is making something edible out of something that was going straight into the compost pile. If it all ends up in the compost pile, at least you tried.

The many forms of watermelon, including pickled science experiments.

The many forms of watermelon, including pickled science experiments.