Category Archives: Veggie Delight

Gnocchi Verde

Kale GnocchiI was driving home from a great visit with my family in Connecticut the other day, which is a 4 hour car ride.   This is an easy drive, but one still needs a good plan with books on tape, radio shows, and downloaded podcasts to get you through without too much twitch. I planned it perfectly so that I could listen to a full, uninterrupted hour of Lynne Rossetto Kasper on The Splendid Table. It made one of the four hours pass very quickly (if you don’t know Lynne, go to this link and check it out – she’s great!). I adjusted the sound, sat up straight, and got ready to absorb as much information as I could. There are food experts, new recipes, seasonal fare, cooking lessons, guest questions, and so much more for all the foodies out there. I was psyched!

One of the stories on Lynne’s show that day was how to make kale gnocchi. I thought, I love kale, but I don’t eat gnocchi – it’s too much starch. But if I substitute the kale for the potato in the gnocchi I might be in business. Plus, there are so many recipes for kale salads, kale chips, braised kale, kale with pasta, and so on. But kale gnocchi was something new. So, I listened in and tried to remember the tips and tricks from Lynne’s description of how to make these from scratch.

I got home, picked fresh kale from my garden (PS I love my garden this year – new raised beds are making me very happy!) and got started. It was my first time through so it took a bit of time to make but they are actually very easy and could be thrown together in a flash now that I know the routine. These nuggets are delicious and a fun way to use the abundance of kale out there now.

Eat more kale!

Ingredients

4 lbs. kale (or Swiss chard), ribs removed
5 Tbsp fresh bread crumbs
2 eggs
1 cup plus 2 Tbsp ricotta cheese
1 cup parmigiana-reggiano cheese, plus more for topping
Dash of nutmeg
Salt and pepper
All-purpose flour for dusting
Olive oil (or butter)

Method

Clean kale and remove ribs. Tear into small pieces and blanch in boiling water for 3 minutes. Remove with slotted spoon to ice bath and let cool. Once cool, ring out excess water by squeezing and chop. Set aside.

Put bread crumbs in food processor and processes until finely ground. Add kale, eggs, ricotta cheese, parmigiana-reggiano cheese, nutmeg, salt and pepper, and process until mixed well. Taste and add salt and pepper as needed.

Fill pot with water and bring to gentle boil. Meanwhile, flour work surface and hands, then roll mixture into smallish balls. Drop balls into boiling water (if water is boiling too hard it will break gnocchi apart). Boil for 5-6 minutes and remove with slotted spoon to plate covered with paper towel. Let dry.

Place gnocchi in shallow baking pan, drizzle with olive oil and sprinkle with cheese. Broil for a few minutes until cheese is melted and just starting to brown. Serve immediately.

YUM!

THE Panzanella

PANZANELLA

It’s toasted bread! It’s veggies! It’s panzanella coming to the rescue!

First off, apologies all around for the technical difficulties last week, and to those of you who got a sad, gray, “Legacy IP DNS blah blah” message instead of a recipe for Watermelon Rosemary Lemonade. Thanks to a kind man named Piotr who desperately needs a vowel, we are back up and running. Now, on to this weekend.

Some recipes you just have to know. Ina Garten’s panzanella is one of them, especially in summer. In addition to being a way to use a whole lot of summer’s best produce, it’s easy to prep, easy to bring, easy to assemble and it’s DELISH. Plus, it’s a way to eat crispy bread and call it dinner (or breakfast if you can’t help yourself the morning after). Ina (AKA The Barefoot Contessa, and the goddess of bringing it) has many panzanellas in her repertoire, including an awesome greek version, but if you only master this one (and you will on your first try) the Kingdom of Picnic Greatness is yours. 

As I mentioned in the recipe for Asparagus Panzanella, you can use your imagination, your cravings and the contents of your produce bin to tweak panzanella in all kinds of ways. It’s a tasty go-to on some seriously hot days. And by the way, if you live in the Upper Valley and are looking for some places to cool off check out this post on Swimming Holes and Soft Serve.

Ok peeps, stay cool out there!

Ina’s Panzanella

Serves 12

INGREDIENTS

For the Salad:

  • 3 tablespoons good olive oil
  • 1 small French bread or boule, cut into 1-inch cubes (6 cups)
  • 1 teaspoon kosher salt
  • 2 large, ripe tomatoes, cut into 1-inch cubes (I have used halved cherry or grape tomatoes as well.)
  • 1 hothouse cucumber, unpeeled, seeded, and sliced 1/2 inch thick
  • 1 red bell pepper, seeded and cut into 1-inch cubes
  • 1 yellow bell pepper, seeded and cut into 1-inch cubes
  • 1/2 red onion, cut in half and thinly sliced
  • 20 large basil leaves, coarsely chopped
  • 3 tablespoons capers, drained

For the vinaigrette:

  • 1 teaspoon finely minced garlic
  • 1/2 teaspoon Dijon mustard
  • 3 tablespoons champagne vinegar
  • 1/2 cup good olive oil
  • 1/2 teaspoon kosher salt
  • 1/4 teaspoon freshly ground black pepper

Method:

Heat the oil in a large sauté pan. Add the bread and salt; cook over low to medium heat, tossing frequently, for 10 minutes, or until nicely browned. Add more oil as needed.

For the vinaigrette, whisk together the ingredients.

In a large bowl, mix the tomatoes, cucumber, red pepper, yellow pepper, red onion, basil, and capers. Add the bread cubes and toss with the vinaigrette. Season liberally with salt and pepper. Serve, or allow the salad to sit for about half an hour for the flavors to blend.

Bringing it:

You can prep the bread, veggies and vinaigrette in advance and store in their own containers. Mix it all up on site a half hour before serving.

Beet Caviar—for the No Roe Gourmet


beet-caviar

Meaty, beety, sorta sweety. Keep some of this in your fridge to fancy up any toast or cracker.

Yes, summer should be about melons and berries and fruity deliciousness. But let’s have a moment with beets, shall we? They are hearty but also virtuous, sneakily sweet without being considered dessert. Put them with a few other secret ingredients (like dates, walnuts, and a dollop of creme fraiche) and they are downright decadent. Speaking of secret ingredients, a note here on the booze: When using bourbon I went a little overboard once and it was overpowering. Stick with the 2 Tbsp. And if you’re not into booze, try using some good apple cider instead.

Roast a load of beets, however you like to do them, and keep them in the fridge for this, or easy deconstructed salads, or beet hummus or pretty smoothies. And hang in there—fruity summer goodness is coming at you soon…I promise!

Beet Caviar

Lifted from 101 Cookbooks and adapted from The Eastern and Central European Kitchen: Contemporary and Classic recipes by Silvena Rowe (2007).

Prep time: 5 min – Cook time: 60 min

If you have bourbon or vodka on hand, you can use one of those in place of the cognac.

Ingredients:

  • 4 medium beets, washed and trimmed
  • 5 plump dates, pitted and chopped
  • 2 tablespoons cognac (bourbon, or vodka)
  • 4 garlic cloves, peeled and smashed
  • 2 tablespoons lemon juice, plus more to taste
  • 1/2 cup chopped toasted walnuts
  • 3/4 teaspoon fine grain sea salt
  • 3 tablespoons creme fraiche, plain yogurt, or sour cream
  • lots of freshly chopped chives

Method:

Preheat the oven to 400F with a rack in the center. Puncture the beets with a fork a few times, and roast for an hour, or until the beets are completely tender when you test by cutting into the center with a knife.

In the meantime, gently heat the cognac in a small saucepan. Place the dates in a glass bowl, and, when just hot, pour the alcohol over the dates. Jostle around a bit, and soak for at least 10 minutes.

When the beets are cooked and cool enough to peel, remove the skins and chop into cubes. Place in a food processor with the dates, cognac, and garlic. Puree until the texture is to your liking – I left a bit of texture here, but you can go smoother if you prefer.

Transfer to a serving bowl before adding the lemon juice, walnuts, and salt. Taste, and adjust the seasoning if needed. Serve swirled with the creme fraiche* (or on a creamy little mattress of it), and finished with chives.

Serves 6.

*buy creme fraiche, or make your own by one of these two methods, depending on what you have on hand:

Whisk together equal parts heavy cream and sour cream. Cover loosely with plastic wrap and let stand in the kitchen or other reasonably warm spot overnight, or until thickened. Cover and refrigerate for at least 4 hours. The tart flavor will continue to develop as the creme fraiche sits in the refrigerator.

or…Mix one cup of room temperature heavy or whipping cream with two tablespoons of butter milk in a glass jar and cover. Let it stand at room temperature for 8 to 24 hours, or until it thickens. Stir well and refrigerate for up to two weeks.

Lemon Cauliflower Couscous Charade

couscous2

Honest to lemony goodness!

I hate being duped. As when people say, “These black bean brownies or date/cocoa truffles or chickpea chocolate chip cookies will fool you!” I’m all about dates and black beans and chickpeas stretching themselves into baking pans, and dressing up as treats, but don’t try to pass them off as anything like the original. We’re friends. We can be honest on this.

So, with that little tirade out of the way we move on to cauliflower, the multitasking food imposter du jour. I tried in vain to make a palatable buffalo cauliflower, and my family breathed a fiery sigh of relief when I gave up. You have no doubt heard of cauliflower “rice,” made by pulverizing the florets in the food processor then cooking/steaming the whole shebang. It’s fine, but it’s not rice, and I resent being made to pretend it’s rice. However, when it comes to couscous, I’m all about pretending. After all, what is couscous but pasta pretending to be a grain? It’s such an understudy already that usurping its identity is almost a favor.

So cauliflower, come on in to my food processor and take the stage. A local Hanover High grad Ellen Jackson just came out with The Lemon Cookbook, and the Valley News published this recipe of hers. I’ve made it about four times, never entirely correctly, and loved it every time. Time #5 I actually took a picture. It’s great right away, a few hours later and the next day, and you have to work really hard to screw it up. I even made it with a bag of frozen cauliflower when the fresh stuff was going for $7 at the Coop. ($7? Do you have a hidden camera in the cruciferous section?) At any rate, all of the above makes it a Bring It all-star.

A few changes/notes, because we have to: The key to toasting the cauliflower well is ample surface area, so dig out your largest pan. (Yes, the one at the bottom of the pile. You’re a few weeks in to that beach body routine so I know you can do it.) Cauliflower heads vary wildly, and I got way more than 4 cups out of mine. I used it all, brushing that big, used pan lightly with oil and toasting the extra separately. I also don’t add the other 2 Tbsp of oil at the end of the recipe. Five Tbsp of oil in a vegetable dish puts us in the tempura range, and at that point you might as well just eat the fries you’d rather have anyway. Ok, here we go!

Toasted Cauliflower “Couscous” With Lemon, Parsley and Almonds

Makes 4 servings

  • 1 (2-pound) head cauliflower, cut into small florets with ½-inch or less of stem
  • 1/3 cup slivered or sliced almonds or pine nuts
  • 5 tablespoons extra-virgin olive oil, divided (my version uses 3, not divided)
  • 1½ teaspoons kosher salt
  • 1 small garlic clove, finely grated or minced
  • 1 tablespoon finely grated lemon zest
  • 3 tablespoons freshly squeezed lemon juice
  • 1 cup lightly packed flat-leaf parsley leaves, coarsely chopped (I use the curly variety because that’s what I had and I prefer its sassy attitude)
  • Freshly ground black pepper

Using a food processor with either the grating attachment or blade, grate or pulse the cauliflower in batches until it resembles grains of couscous. You should have about 4 cups. You can also use a knife to dice the florets, which will easily break into very small pieces as you go. (I got more like 7 cups from one head and used it all)

In a large, wide skillet over medium heat, toast the almonds, stirring frequently, until they smell nutty and are golden brown, about 7 minutes. Set the nuts aside and wipe out the pan.

Warm 3 tablespoons of the oil over medium-high heat. When the oil is hot, add the cauliflower and salt. Sauté, stirring frequently, until the cauliflower pieces are toasted and tender, 12 to 15 minutes.

Remove the pan from the heat and immediately add the garlic and zest, stirring well to distribute the flavors throughout.

After the mixture has cooled slightly, add the remaining 2 tablespoons oil (or not), the lemon juice, almonds, and parsley. (While this was happening I toasted up the rest of the cauliflower and added it in. You can add a little more lemon juice to taste if you like, but it’s already darned lemony.)

Season with additional salt and pepper, and allow the cauliflower to sit for at least 15 minutes, partially covered, for the flavors to develop.

It is excellent at room temperature or can be rewarmed briefly over medium-high heat before serving.

Bringing it:

As with the making of this salad, you have to try pretty hard to mess it up in transport. And it’s good at room temperature. Hello picnics!

Indian Spiced Quinoa over Portabellas

Quinoa plant

Quinoa plant

I found a recipe for Samosa Inspired Quinoa Stuffed Portabellas.  I almost flipped past the recipe given the lengthy title.  But, the recipe intrigued me so I pushed on. Taken individually, I really liked each part of the title of this recipe….

  • Samosa equals Indian spices which I love.
  • Quinoa equals super grain which is always a bonus.
  • Portabellas equals, well, just delicious.

Then came my hesitancy, because, taken individually, I was not so keen with other parts of the title of this recipe…

  • Samosa also equals pie crust and you all know I don’t do pie crust.
  • Stuffed sounds like extra work and I like easy peasy.

Weighing both sides, I decided to forge ahead and make these but with my own twist.  I re-tooled the title to call it “Indian spiced quinoa over portabellas”.  That way, I didn’t have the whole pie crust thing looming over me.  I also thought, why stuff when you can layer which is so much easier! And so, here it is Indian spiced quinoa over portabella mushrooms.   It’s a winner – enjoy!

Ingredients

6 Portabella mushrooms
Olive oil
Salt & Pepper
1 cup dry quinoa
1 medium onion
2 medium carrots
1 cup chopped cilantro
1 Tbsp ginger, minced
1 Tbsp ground coriander
1 Tbsp chili powder
1 tsp cumin
1 tsp garam masala
1 can chickpeas
Sharp cheddar or other cheese for topping

Method

Clean portabellas with damp paper towel, cut off stems and scrape out black gills. Coat both sides with olive oil and sprinkle with salt and pepper. Place on oiled baking sheet, underside up and cover with aluminum foil. Bake at 350 for 10 minutes.

Rinse quinoa thoroughly and cook according to package directions.

Heat olive oil in heavy bottomed skillet. Saute onion and carrot until softened (maybe 7 – 8 minutes). Add ginger and cook 2-3 more minutes. Add spices and toss to coat. Add chickpeas (you can mash them a bit if you like). Stir in cilantro.

Spoon veggie mixture over cooked portabellas, sprinkle with cheese and put back in oven until for 20 minutes. Oh and the quinoa that falls off the mushrooms will be extra crispy – this is a huge bonus (save this part for yourself!)

Minty Snap Pea Salad and Spring Training.

Spring training with Minty Snap Pea Salad

Spring Training. Oh baby. Inspiring? Depressing? Hopeful? Daunting? All of the above? At least it can be tasty.

I have a friend who, at the end of ski season, assessing the toll of too many fries and cheeseburgers and not enough training, used to wish for a week on an island with a bag of oranges. I’m feeling her pain. But as much as I need it, I’m not getting that island.

I am, however, going to Mexico in a mere three weeks. As if that hard deadline wasn’t daunting enough, the Title Nine catalog arrived. For me that catalog is usually about 30 percent inspiring and 70 percent depressing. Given my circumstances, however, I’m trying to embrace the inspirational aspect of seeing the hard-bodied microbiologist/organic baker/pro surfer/mother-of-four riding her skateboard to the beach in a cute clingy dress.

This is the long way of saying that it’s salad week here. I had this salad last week at my sister’s house in CA, where Meyer lemons are free for the taking off neighborhood trees. Pure fantasy. It comes from an old issue of Cook’s Country, an off-shoot of the notoriously meticulous Cook’s Illustrated. I included the link but forget about getting any free content from these cats.

Cook’s Country tests the hell out of every recipe, which means two things: a. Every recipe is the most perfect version of what it can be; and b. you have to follow the recipe exactly. This is not a problem for my sister, who gives her recipes the respect they deserve, but it is an issue for a serial slacker like myself. Not surprisingly her version turned out way better than mine, so I’ve added some cautionary notes (in italics) based on my freelancing. My version was still darned good, but hers was better. And if you’re going to be eating salads for three weeks they might as well be as good as they can be.

Speaking of salads, now is a great time to try the kale and brussels sprouts salad if you haven’t already. It’s more of a fall thing, but it’s green and fibrous and delicious, all of which work for spring.

In a leap of faith and a show of hope, I sent back the swim dress/muu-muu and ordered board shorts and a suit. We’ll see how it goes.

Minty Snap Pea Salad

  • 1 ½ pounds sugar snap peas, stems snapped and strings removed (Not all of them require snapping and stringing, but do take out the guess work and weigh them at the store)
  • salt and pepper
  • ¼ cup finely chopped fresh mint
  • 1 small shallot minced
  • 1 tsp grated zest plus juice from 1 lemon (Meyer, Meyer, Meyer if possible. you know my deal by now)
  • 1 tsp Dijon mustard (regular, not the last of the honey dijon)
  • 1 tsp honey
  • 3 Tbsp extra virgin olive oil
  • ¼ cup crumbled goat cheese

Peas: Combine 4 cups water and 4 cups ice in a large bowl; set aside. Bring 4 quarts water to a boil in a large pot over high heat. Add peas and 1 Tbsp salt (regular, not kosher) and cook until crisp tender, about 2 minutes (I overdid mine by about a minute. Not ideal). Drain peas then transfer to ice bath and cool completely (yeah, they mean completely. If they are the tiniest bit warm the goat cheese shmoozes over everything instead of keeping its crumbly integrity.) Remove peas from water, pat dry with kitchen towel (drying is also key to cheese/pea interface) and cut in half crosswise. At this point the peas can be refrigerated in a Ziploc bag for up to two days.

Dress salad: Whisk mint, shallot lemon zest and juice, mustard, honey and oil in a large bowl. Add peas and cheese to bowl and toss to combine. Season with salt and pepper (remember the seasoning step). Serve chilled or at room temperature. The salad can be refrigerated in an airtight container for 1 day.

Bringing it:

Make it all ahead and bring it. Or, if you need to prep it ahead, bring peas, dressing and cheese in separate containers and combine before serving.


Flower Power! Cauliflower Farro Salad

The new kale?

The new kale?

You’ve probably heard the buzz around cauliflower being billed as the new kale. Now, I love cauliflower, don’t get me wrong…. but the new kale? That sounds like a stretch, for me anyway. I think of kale as so pretty and versatile. I think of cauliflower as so muted and routine. Could I be missing something? I decided to do some homework and find out what all the buzz is about. It didn’t take much Googling before I found a plethora of recipes and photos that were fun, interesting, colorful, delicious and healthy.   You can grill it like a steak, crush it into a pizza crust, mash it instead of potatoes, and much more. It takes on many roles without a hitch and everyone is surprised when they learn the “secret” ingredient. Not to mention, the health benefits of cauliflower are plentiful. It’s full of vitamin C, lots of the B’s, omega-3 fatty acids and vitamin K. And it is low in calories. What more could you want?

Try this recipe and don’t forget (from a previous blog post), farro is chewy. The “high chew factor” is good for fast eaters because you have to chew it a lot to get it down! Enjoy and send us your favorite cauli-flower-power recipes!

Ingredients

Roasted Cauliflower:
1 large head cauliflower, cut into bite-sized florets
2 Tbsp olive oil
1/4 tsp red pepper flakes
Light sprinkle of fine-grain sea salt

Garlicky Farro:
1 cup uncooked farro, rinsed
2 tsp olive oil
2 cloves garlic, minced or pressed
1/4 tsp fine-grain sea salt 

Everything else:
15 pitted Kalamata olives, chopped
1/4 cup oil-packed sun-dried tomatoes, rinsed and roughly chopped
2 oz feta cheese, crumbled (a heaping half cup)
1 Tbsp fresh lemon juice
Fresh ground black pepper to taste
1 avocado, sliced into thin strips
4 handfuls leafy greens (spinach, arugula, spring greens, other)

Method

To roast cauliflower, preheat the oven to 425 degrees. Toss the cauliflower florets with olive oil, red pepper flakes, and a sprinkle of sea salt. Roast for 25-30 minutes, tossing occasionally until the cauliflower is tender and golden on the edges.

To cook the farro, in a medium saucepan, combine rinsed farro and 3 cups of water. Bring water to a boil, then reduce burner to low and simmer for 35-40 minutes (if you are using pearled farro, it takes only about 15 minute so to cook).   Once cooked, drain off any excess water and toss with olive oil, garlic, and sea salt (I like to roast the garlic in my toaster oven for a couple minutes before chopping but raw garlic is fine too).

In a large serving bowl, toss together roasted cauliflower, cooked farro, olives, sun-dried tomatoes, and lemon juice. Taste and season with salt and pepper if needed. 

Divide avocados and greens among salad plates. Top with generous amount of cauliflower and farro salad. Finish plates with an extra squeeze of lemon juice and a drizzle of olive oil if desired.

Party Time Hummus


Don't bring that hummus. Bring THIS hummus.

Don’t bring that hummus. Bring THIS hummus.

It’s getting to be party season. And what’s a party without that token tub of hummus with the perfect swirl on top? Yes, it’s healthy, it’s appreciated, it gives you something to do with those mini carrots. But it’s, yawn, hummus. Wake up and smell the chickpeas! You can bring something healthy and easy that also has seasonal flair and cha-cha. Bust out the roasted beet or pumpkin hummus for a totally different vibe—hot pink, vibrant orange and totally delish.

The beauty of making these together is that you roast the garlic in olive oil and then use both in both recipes. No need to measure. Just roast a whole load of garlic because when is it ever a bad thing to have roasted garlic and garlic flavored oil on hand in the fridge? Yeah. Rhymes with never. You’ve got your base for awesome salad dressings, crazy good roasted vegetables, a drizzle for soup, dipping oil for bread, etc etc etc.

Now, I happened to have roasted squash and roasted beets begging to be used up so I was going to make up a batch of each of these. But somehow my pantry only coughed up one can of chickpeas. Stranger still is that I had six cans of sliced beets. How does that happen? Rest assured a recipe for canned beets is on the horizon. Given the situation I made a half batch of each hummus which is not a bad tactic. Note (with joy) that the pumpkin/squash hummus does not involve tahini, which is handy if you ran out of your stash or if having another expensive tub of nut butter is going to put you over the edge. You can use canned pumpkin if that’s what you’ve got, and as soon as I get more chickpeas I’m going to try using canned beets as well. Stay tuned!

The final thing you need to know before embarking on this food processor adventure is that hummus is not an exact science. Get the basic ingredients and then tweak as desired. I always put in extra lemon and (when nobody’s looking) salt. We’re making this stuff from scratch fergawdssake, so just think about how much crap we are NOT putting in there. A scootch more kosher salt isn’t going to hurt.

Pumpkin Rosemary Hummus

Adapted from Pinch of Yum

If you use kabocha squash it will be a little sweeter and a little thicker so you may need to add some warm water at the end to achieve your ideal texture.

Ingredients

1-2 cloves roasted garlic (see #1)
2 Tbsp olive oil
2 Tbsp water
1 can chickpeas, drained and rinsed
2/3 cup pumpkin puree (or hint hint, kabocha/butternut squash puree)
1 Tbsp maple syrup or honey
squeeze or more of fresh lemon (optional)
1/2 tsp finely minced fresh rosemary (more to taste)
salt to taste

Method

  1. To roast the garlic, simmer the peeled cloves in a small saucepan with olive oil for 15-20 minutes over low/medium heat. See note above and make more if you can.
  2. Puree all ingredients except rosemary in a blender or food processor until smooth. Add more oil or water as needed. Stir in the rosemary at the very end.
  3. Serve with warm naan, apple slices, crackers, carrots, wheat toast, roasted vegetables, pita bread, and/or anything.

Roasted Beet Hummus

From Minimalist Baker

Ingredients

1 small roasted beet
1 15 oz. can (1 3/4 cup) cooked chickpeas, mostly drained
zest of one large lemon
juice of half a large lemon
healthy pinch salt and black pepper
2 large cloves roasted garlic, minced or mashed (see garlic step in previous recipe)
2 heaping Tbsp tahini
1/4 cup extra virgin olive oil

Method

  1. Roast Beets (see below)
  2. Once your beet is cooled and peeled, quarter it and place it in your food processor. Blend until only small bits remain.
  3. Add remaining ingredients except for olive oil and blend until smooth.
  4. Drizzle in olive oil as the hummus is mixing.
  5. Taste and adjust seasonings as needed, adding more salt, lemon juice or olive oil if needed. If it’s too thick, add a bit of warm water.
  6. Will keep in the fridge for up to a week.

Roasting beets: Preheat oven to 375°F, remove the stem and most of the root from your beets, and scrub and wash them underwater until clean. Drizzle on a bit of canola oil, wrap tightly, and roast for one hour or until a knife inserted falls out without resistance. They should be tender. Cool to room temperature.

Squash On!… on toast that is


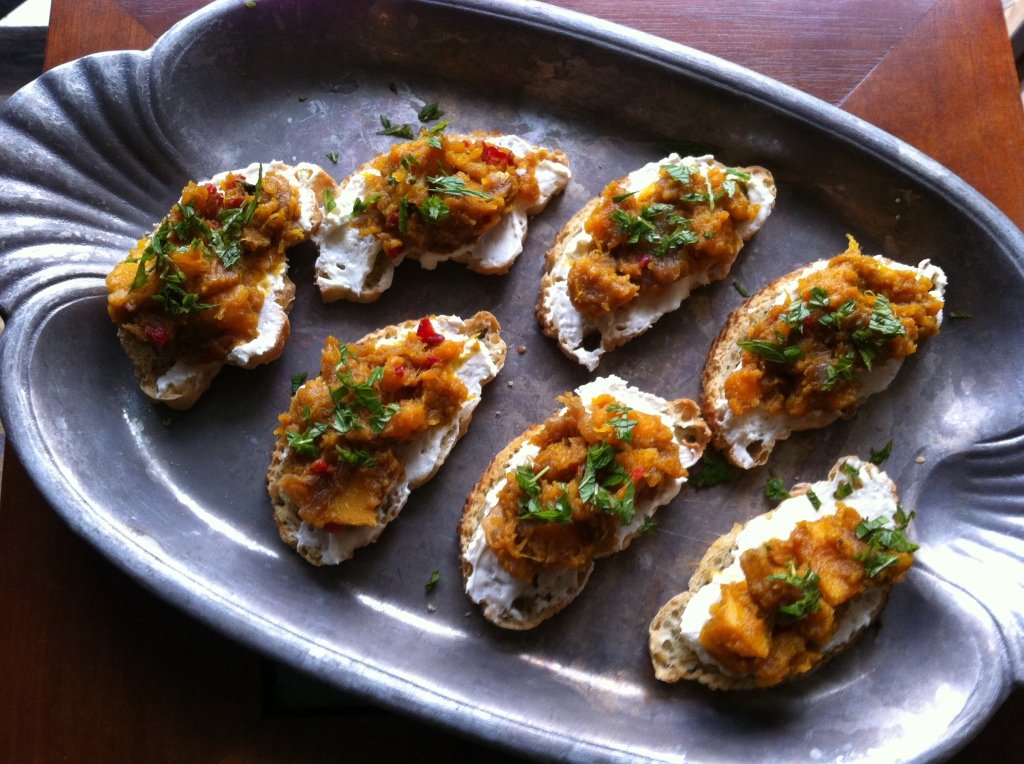
Fall all over squash on toast

Fall all over yourself for these apps. Yep, they’re that good.

Foodwise, fall is my dream come true. First come the apples, and we’ve been through my apple addiction. They give us good excuses to make things like salted caramel cholliesauce and Joni Mitchell Apple Pie. Then comes Halloween season (it’s really not just a day you know) and all those excuses to make things like Crackle and Salty Malty Rice Krispy Treats with whatever Whoppers you didn’t polish off. And of course you’ve got the crock pot bubbling in the background with goodness like no-fuss chicken taco chili. Honestly though, what I love most are the fall veggies—the squash, brussels sprouts, beets and various roots all begging for their turn to get roasted in the oven.

In my fall food frenzy I’ve gone a little nutty on the winter squash, and now I find I’ll have to pace myself  because I have so many orange recipes to post. I’m starting with an appetizer, because it is the one that surprised me the most with its popularity and because party season is upon us!

Here, courtesy of  Jean Georges Vongerichten via NYT Minimalist Mark Bittman is the elegantly named “Squash on Toast.” I knew I’d like it well enough, because you know, the weirder the better. And onions caramelized into jam with maple syrup and apple cider vinegar? Come on! The mainstream was just as smitten. The first time I made these I brought them to a party and they were devoured. Crazy good.

Here we go with my disclosures. I used a kabocha squash, hollowed, filled with water and cooked whole in the oven. For cheese I used a spreadable brie because that’s what I had. Whipped cream cheese is also excellent. I adhered to directions and included the fresh mint which got high praise from all, so play by the rules here. For the bread I brushed thin slices of Easiest French Bread Ever with olive oil and toasted them in the oven. Make a lot of toasts so you don’t have to be mean and hide them from your family before party time.

Ok, squash on!

Ingredients

1 2 1/2- to 3-pound kabocha or butternut squash, peeled, seeded and cut into pieces 1/8- to 1/4-inch thick
3/4 cup extra-virgin olive oil
1/2 tsp dried chile flakes, more to taste
3 tsp kosher salt
1 yellow onion, peeled and thinly sliced
1/4 cup apple cider vinegar
1/4 cup maple syrup (or agave)
4 slices country bread, 1-inch thick
1/2 cup ricotta, goat cheese, feta or mascarpone
Coarse salt
4 Tbsp chopped mint

Preparation

1. Heat the oven to 450. Combine the squash, 1/4 cup olive oil, chile flakes and 2 teaspoons of salt in a bowl and toss well. Transfer the mixture to a parchment-lined baking sheet and cook, stirring every few minutes, until tender and slightly colored, about 15 minutes or a little longer. Remove from the oven.
 2. Meanwhile, heat another 1/4 cup olive oil over medium-high heat, add the onions and remaining teaspoon salt and cook, stirring frequently, until the onions are well softened and darkening, at least 15 minutes. Add the vinegar and syrup, stir and reduce until syrupy and broken down, again at least 15 minutes or so; the mixture should be jammy.
3. Combine squash and onions in a bowl and smash with a fork until combined. Taste for seasoning.
4. Add the remaining oil to a skillet over medium-high heat. Working in batches if necessary, add bread and cook until just golden on both sides, less than 10 minutes total; drain on paper towels. Spread cheese on toasts, then top with the squash-onion mixture. Sprinkle with coarse salt and garnish with mint.

Bring It

Deconstructed is the only way to transport, and remember to bring the right sized platter and a spreading knife. When you get to your destination have a fine little chat while assembling the toasts (and try to keep up with production as they are eaten off the platter).

Sautéed Cabbage with Crisp Apples

Warm cabbage salad

Warm cabbage salad

I can’t stop with the apples! Here’s another recipe to help you use up all those great tart apples you have on hand. It also uses apple cider vinegar and apple cider – so all the bases are covered!

This coleslaw is vibrant, just like the foliage right now…perfect for a fall gathering with friends. You can sauté the cabbage to your liking – wilted, soft, or quite crispy. It’s up to you. And this is quite easy to make so go grab the ingredients and whip this up.

To give full credit, this recipe is from Clean Start, by Terry Walters. I’ve posted other recipes from her cookbooks. They have such beautiful food photos and they are all about “enjoying healthy, delicious, clean food every day”.  

Ingredients

1 medium onion, cut into thin wedges
2 Tbsp Olive Oil
3 cups thinly sliced red cabbage
3 cups thinly sliced green cabbage
1 cup dried cranberries
2 Tbsp mirin
1 apple (tart, firm variety)
Salt

Dressing:
2 Tbsp mustard seeds
2 Tbsp brown rice syrup
1 1/2 tsp apple cider vinegar
2 Tbsp apple cider

Method

In a Dutch oven over medium heat, sauté onion in oil 6 minutes or until very soft. Stir in cabbage and mirin and continue sautéing until cabbage starts to soften (about 4 minutes or to your liking). Remove from heat, add cranberries and set aside.

In a small dry skillet over low heat, lightly toast the mustard seeds for 2 minutes or until fragrant, being careful not to burn. Add brown rice syrup, apple cider vinegar, and apple cider and whisk 1 minute. Remove from heat and set aside.

Core apple and cut into thin slices. Return cabbage to medium heat, add apples, drizzle with dressing and fold to coat evenly through. Season to taste with salt, remove from heat and serve.

Bring It

Easy, just throw it in a bowl and BRING IT! J