Category Archives: Salads and Sides

The Unicorn that Jumped the Shark

A sign of the times, direct from the Jet Blue terminal in JFK.

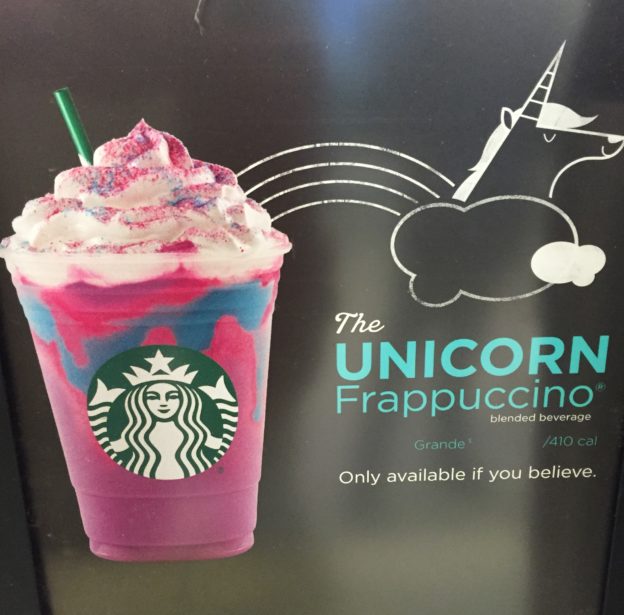
Unless you are living in, say, Narnia, you have likely noticed the Unicorn theme going on in the food world. There are rainbow-colored everythings, from cupcakes and cookies to noodles and sushi. I know of one person who got on a waiting list for $60 rainbow bagels…that reportedly “tasted like dirt.” And now, to punctuate the moment, Starbucks comes out with the Unicorn Frappuccino, an unnaturally bright, pink-to-purple, sweet-to-tart-morphing frozen beverage.

I tracked down the Unicorn Frappuccino at its source at a Starbucks in JFK, amidst a long line of bleary-eyed redeye survivors and dawn patrol flyers. Although nobody was ordering one at that hour, I got a few customer reviews of the mango flavored frozen slurry including: “Disgusting, with gross sweet tarty sugar on top,” or, as Stephen Colbert put it,  “a sugary affront to God.” This, my friends, is where Unicorn Food has, like the Fonz, jumped the shark, effectively creating “the moment when a brand, design, franchise, or creative effort’s evolution declines, or when it changes notably in style into something unwelcome.”

The unicorn food craze started out as a creatively wholesome pursuit, with unicorn toast. This is essentially cream cheese tinted with natural dyes from beet juice, freeze dried strawberry powder, turmeric root, chlorophyll, spirulina powder and freeze dried blueberry powder. Those little pots of fantasia, whimsically swirled on toast and garnished with star-cut vegetables, was innocent enough. Then Pinterest took over and things took a decidedly unnatural turn.

The trend must say something about a need for escapism (I am the Unicorn of Your Confidence, after all), or about the number of people on Pinterest with too much time on their hands. 

Whatever nefarious marketing ploy may be at the heart of this trend, one must concede that, throughout picnic season at least, rainbow colored food is a legit thing. If you want to bring your A Game to the table, you need to have unicorn food technology in your skill set.

A far safer, healthier, cheaper and more educational starting point—than ponying up $5 for 420 calories and 59 grams of sugar (the equivalent of 6 Krispy Kreme donuts and 22 Weight Watcher Points) for a Uni Frapp—are unicorn noodles. The basic recipe involves little expense and no fancy ingredients or techniques. As a bonus they involve a little bit of science. This is not Mentos in Diet Coke explosion excitement science, but acid (lemon juice) meets anthocyanin (cabbage mojo) color-changing science.

All you need to be trendy is some red cabbage, some lemon juice, and some clear rice noodles. (If you crave another white carb, make rainbow rice as featured in this unicorn sushi.) Once you have made the noodles, the challenge is finding something appealing to put on them. Peanut sauce? Not so pretty. Marinara? No grazie. Considering the lemon juice already at work, I went with olive oil, capers, parsley, salt and grated parmesan cheese (thank you Patti G!). Really any blanched or grated vegetables would work. Indigo Kitchen goes full Yellow Brick Road Technicolor and plates the noodles with every fresh vegetable and fun sauce on the planet, like this and this. I feel healthier and kind of magical just looking at these creations.

So here is the basic recipe, tightened up from Indigo Kitchen. If nothing else, just bring it to a friend’s house as a conversation starter. I mean really…unicorn side at the pot luck—you win!

Unicorn Noodles

Ingredients:

  • Water
  • Chunk Red cabbage
  • lemon or lime juice
  • toppings, mix-ins, fairy dust, etc…

Method:

Boil some water (enough to hold the amount of noodles you want) with the red cabbage. The amount of water used and the time you soak the noodles will affect the shade of blue your noodles will be. Less water/longer steep time= deeper color.

Turn off the heat and add the noodles. You can use basic white or clear noodles, but glass/clear noodles will get you the prettiest shade.

Let the noodles soak for about 5 to 10 minutes, depending on how deep you want the color to be. Remove the noodles and place them in a bowl.

before…

After. Rice noodles on left. Spaghetti on right. No contest really

Here comes the magic, and the chemistry lesson. Take a lime or lemon and squeeze some of the juice wherever you want it to be pink. Watch the noodles change color in front of your eyes. Hint: Bring the kids in here. Be a hero.

Purple cabbage has a pigment called anthocyanin, that changes color when it makes contact with something acidic or alkaline. When you cook a few pieces of purple cabbage for a short time in some water you’ll get a nice blue shade. Cook it for bit longer with a bit more purple cabbage for a nice purple shade. Add something acidic (lemon or lime juice) to the blue colored noodles and the pigment from the purple cabbage will react and take on a bright pink color.  It really happens. Try it! If you are not impressed, there’s always Starbucks.

Passing the Nina test. She is too nice to squawk.

Unicorn noodles: stars, mane and carrot horn for extra credit


turmeric-unicorn-noodles

Turmeric joins the party, lending yellow flair in unicorn land.

ABC Summer Sauce

Green goodness with a kick

Green goodness with a kick

Summer. It gets away from you. As in, we’re halfway through July ?!?! and #$%^&*! Recipe-wise, I don’t have a whole lot to show for summer so far, but I have been doing some background work, like: ongoing watermelon rind experiments, which will save you from some pretty scary concoctions; exploring Vegan frontiers with the mysterious magical Aquafaba; making rhubarb vanilla jam and rhubarb vinegar that I promise to post before the end of strawberry rhubarb season next year; mixing up all kinds of drinks and mocktails (ginger limeade, watermelon aqua fresca), even homemade grenadine, which it turns out is nothing more than pomegranate simple syrup. Who knew? I’ve also been brewing up herbal Sun Tea like it’s my job and adding fresh citrus and mint simple syrup.

This will all be tasty Intel for later summer lovin’. In the near term, I am steeling myself for an exhaustive test of the many frosé recipes (thank you Cousin D) now trying their best to break the Internet. We need a hot weekend, a boatload of rose and some thirsty volunteers. Who’s with me?

Mostly, I’ve been thinking about good people, and how they are the most important ingredient to summer fun. As it happened the US Ski Team announced their 2016/2017 team yesterday, and it includes some really, really fine young people, many of whom I’ve been fortunate to get to know. Sure, they are amazing athletes, but way more importantly they are stellar people who make their ski people proud.

AJ and Ollie

AJ Ginnis, building his fan base.

Pro move: Lila's got the tools of the trade—parchment paper and high tech oven mitts.

Lila Lapanja baking up some Champion Chip Cookies.


In honor of this moment we’re looking to Anna Marno (U.S. Ski Team member, National Super G Champ, healthy eater and cooker, part unicorn) for a summer recipe that is exactly what summer is about. This gorgeous cilantro-packed sauce is fresh, easy, delicious, and versatile enough to liven up most anything you feel like roasting, grilling or dipping.

It was photographed by Rocky Mtn Tania, who’s contributions seriously raise the Bring It! bar.

Says Tania: “This sauce is simply amazing on almost everything: as a side for street tacos, with chicken, fish or pasta even on crackers with cheese.  The ingredients work together so well, but the amounts can and should be adjusted to taste.”

Shall we just call this Anna’s Best Cilantro Sauce? Yes we shall!

Anna-ripping

Anna Marno…ripping!

ABC Summer Sauce

Ingredients:

  • 1 large bunch of cilantro
  • Juice from 2 limes
  • 1 jalapeno, seeded and chopped
  • 1/2 tsp sea salt
  • 1 clove garlic peeled and coarsely chopped
  • 1 tsp cumin
  • 5 oz plain greek yogurt *
  • 2-3 Tbsp agave sweetener
  • 1/3 cup olive oil

Method:

Put everything but the olive oil in a blender (a Vita Mix if you’re showing off, but a regular blender will do). You have to push the ingredients down to blend.  Slowly drizzle olive oil into blended ingredients while the blender is running to emulsify the sauce.  Make ahead of time so flavors come together.

*The beauty of this recipe is that you can omit the yogurt and you have an incredible vinaigrette for a salad.

Bringing it:
This travels well and is a wonderful hostess gift.

Let it Be Lentils

2016-04-25 lentil-salad

The incredibly sexy lentil, all dressed up and ready to go anywhere.

Yes it’s been a while. And yes, you so deserve something fabulous for all that time off. What I’ve got for you are lentils. But not just lentils. Lentils that are picnic and lunch-in-a-jar worthy. Lentils that are daringly pot-luck worthy.

The first recipe—known to Googlers and My New Roots fans as “The Best Lentil Salad Ever”—is one I’ve been making for quite a while and swore I had already posted. All I’ve given you in the past from the lentil family, however, is a beautifully simple recipe in lunch deconstructed. This recipe is on the opposite side of the ingredient scale, thanks to the spice-crazy dressing. But the dressing makes it, and takes mere measuring vs. skill or labor.

I have on occasion violated the heck out of this recipe, omitting all extras, substituting spices, using raisins instead of currants and brown lentils instead of the fancy French ones. But I have also, recently, made it exactly as instructed, and fallen in love with it all over again. So make it as you will, with or without artistic license. It may or may not be the best lentil salad ever. If you are my sons, who have vowed to never, ever, eat a lentil it is the best lentil salad they’ll never have. If you are new to lentils it may win you over. If you are already a fan, dig in.

The Best-ish Lentil Salad Ever

Makes: a ton

Ingredients:

  • 2 ¼ cups (1 lb.) Du Puy lentils
  • 1 medium red onion, diced
  • 1 cup dried currants (you could also use raisins or other dried fruit)
  • 1/3 cup capers

Vinaigrette:

  • 1/3 cup cold pressed, extra virgin olive oil
  • 1/4 cup apple cider vinegar
  • 1 Tbsp. maple syrup
  • 1 Tbsp. strong mustard
  • 2 tsp. salt
  • 2 tsp. pepper
  • 1 tsp. ground cumin
  • ½ tsp. turmeric
  • ½ tsp. ground coriander
  • ½ tsp ground cardamom
  • ¼ tsp. cayenne pepper
  • ¼ tsp. ground cloves
  • 1/4 tsp. freshly grated nutmeg
  • ¼ tsp. ground cinnamon

Optional add-ins:

  • Arugula
  • Walnuts (these are more like mandatory. Walnuts and lentils? Basically married)
  • Goat cheese
  • Fresh herbs: flat-leaf parsley, cilantro, basil
  • Sprouts
  • Crispy seasonal veggies

    Directions:

    1. Rinse lentils well, drain. Place in a pot and cover with a 3-4 inches of water, bring to a boil, reduce to simmer. Check lentils for doneness after 15 minutes, but they should take about 20 minutes in total. You will know they are cooked if they still retain a slight tooth – al dente! Overcooking the lentils is the death of this dish. Be careful!
    2. While the lentils are simmering, make the dressing by placing all ingredients in a jar with a tight fitting lid and shake vigorously to combine.
    3. Finely dice red onion – the salad is best if all the ingredients are about the same size. If using raisins, chop them roughly to make them a bit smaller, and do the same with the capers if they are large.
    4. When the lentils are cooked, remove from heat, drain and place under cold running water to stop the cooking process. Once cooled slightly but still a little warm, place lentils in a large serving bowl and toss with dressing. Add other onion, capers, and currants. If using other add-ins such as herbs, greens, or cheese, wait until just before serving. Otherwise, this salad can hang out in the fridge for a couple days.

Lentils doing lunch

Lentils doing lunch

Lentils Part Deux

This next one is new to me. Creamy and cool vs shiny and spicy. It’s good though, and it really does keep for several days. I ignored the part about not bruising the spinach and basil and cut it as best I could. Pros use the babiest, farmiest spinach possible. Non pros may have bought a bag of baby arugula and been done with it (shhh!) According to the original creator, Peter Miller, who is a bring-lunch-to-work master: “Make this with a light touch so you can taste the different ingredients involved. And serve it in smaller portions than you might imagine—let people come back for seconds. It is a nod to pesto and a salute to yogurt.” That, my friends, is solid lentil prose.

Adapted slightly from Lunch at the Shop: The Art and Practice of the Midday Meal

Peter Millers Lentils Folded into Yogurt

Serves 4

At home

Ingredients:

  • 1/2 cup pine nuts or chopped walnuts
  • 2 cups baby spinach
  • 1 cup fresh basil leaves
  • 1 cup cooked lentils (small green Puy, or any other that will hold its shape)
  • 2 tablespoons fresh flat-leaf parsley leaves, chopped
  • 1 garlic clove, finely chopped
  • 1 lemon
  • 1 cup Greek yogurt
  • 1/4 cup olive oil
  • Salt
  • Freshly ground black pepper

At the office (or the lodge, the car, the field or your friends house)

  • 1/2 lemon
  • 1/2 cup Parmesan cheese, sliced
  • Salt
  • Freshly ground black pepper

Method:

  1. At home: Heat a small sauté pan over medium heat. Add the pine nuts or walnuts and cook until lightly toasted, 5 to 7 minutes. Lay them out on a wooden cutting board to cool, then chop them roughly to the size of the lentils.
  2. If your knife is sharp enough to slice the spinach and basil leaves without bruising them, gently cut them into bite-size pieces. Otherwise, tear them by hand.
  3. Place the lentils in a bowl and mix in the spinach, basil, parsley, and garlic (note: If you’d like the spinach and basil to hold their green form better, add them toward the end instead). Squeeze the lemon into the lentils, mix, and then fold in the yogurt. Mix again, then slowly pour in the oil, stirring, as you do, to combine. At this point, taste the mixture, and season with salt and 2 good grindings of pepper. Finally, fold the roasted nuts into the dish, and finish with a drizzle of oil. The dish is now ready to serve.
  4. The lentils and greens will keep in an airtight jar or container in the refrigerator for at least 3 days.
  5. At the shop/eating venue: For lunch, bring the lentils and greens close to room temperature before serving. They can go on a slice of buttered (and perhaps grilled) bread, or on a lettuce leaf as a salad. Top the lentils with a squeeze of lemon juice, some Parmesan, and a final grind of fresh pepper. Sometimes, if there are any lentils left after lunch, we serve them as a late-day snack, with a little extra salt at the end.


Lemonpalooza

On-pillows-light

California Dreamin’ on Such a Winter’s Day

Lemonpalooza: n. a celebration of all that is warm, bright and tangy; hope in the home stretch of winter; antidote to a common addiction amongst native Californians and Floridians; yum.

As I was packing a shoe box of Meyer lemons in to my checked baggage, my sister suggested: “You need lemon rehab.” A day earlier I had packed a flat rate priority mail box with lemons and had just returned from the home tree with another batch. Earlier she had bottled a batch of lemon syrup for me, and the lemon possets for dessert were cooling in the fridge. Gnawing on the peel of a juiced half lemon (dentists everywhere are recoiling) I nodded. “You might be right.”

But there is no kicking this addiction. As I boarded my plane back to NH I could not help but have a pang for every Meyer lemon left unpicked in the family tree and in the entire Bay Area megalopolis. I take solace in knowing I did my best.

Here’s a small sampling of how those lemons will be worshiped this week:

The first recipe comes from “The Lemon Cookbook” (of lemon cauliflower couscous fame) which I gave to my sister. The book’s chicken and toasted bread salad has been among their family’s Bring-It staples ever since. It’s sturdy, hearty, delicately and boldly flavored (can that be? Yes, oh yes!) with co-roasted lemons and shallots. And here’s the real kicker—it’s even better the next day.

The ease of rotisserie chicken notwithstanding, reading and re reading all the steps makes the entire recipe a pain in the butt to make the first time. That said, virtually all the labor (and flavor) is in the dressing. So we’re going to take just that element on now, and it will make for many happy salads with or without chicken and toasted bread. 

The other recipes are ridiculously easy: Meyer lemon simple syrup is a juice-intensive staple to brighten tea, seltzer, pancakes, vodka, etc; and lemon posset is a sweet, tart, creamy, perfectly textured pudding/custard with no eggs or special techniques involved.

As good as these recipes are, they are merely a gateway to all the transformational possibilities of Meyer lemons in winter. Roast them, juice them, preserve them (Pickled lemon chutney? I’m looking at you next!), and let them bring a little sunshine in to your life.

Roasted Lemon-Shallot VinaigretteLemon-salad

Ingredients:

  • 1 lemon, halved and seeded with the tip of a sharp knife
  • 8 oz shallots peeled and halved if large
  • 3 large cloves garlic unpeeled
  • ¾ cup extra virgin olive oil, divided
  • 4 sprigs fresh thyme, divided
  • 2 ½ tsp kosher salt, divided
  • juice of one lemon

Method:

Preheat oven to 400. Toss lemon, shallots, garlic and 2 sprigs thyme in 1/4 cup oil and 1 tsp salt. Spread in baking dish in one layer, with cut sides of lemon down. Cover with foil and bake 45-55 minutes or so, until shallots are caramelized and lemons are totally soft. Remove from oven and let cool.

When cool, remove lemon pulp from peel and put it (minus peel and any remaining seeds) into the blender. Add shallots, garlic insides (squeezed from skin), lemon juice, and any accumulated liquid to the blender. Process until smooth. Add remaining oil in a stream. Stir in thyme leaves from remaining sprigs and salt to taste.

Say tuned for a pro version of the chicken and toasted bread salad, pictured above, which is leftover roasted chicken tossed with arugula, plumped currants, rustic bread—torn, tossed with oil and oven-toasted— and this dressing.

This next recipe comes from Cooks Illustrated, so even though it is super simple of course it has some crazy essential step. In this case it is measuring the hot liquid until it is the proper volume. They have a workaround which is even more complicated, so let’s just stick to Plan A. It’s no big.

Lemon Possetposset

  • 2 cups heavy cream
  • 2/3 cup sugar
  • 1 Tbsp lemon zest
  • 6 Tbsp Meyer lemon juice
  • Fresh blueberries or raspberries

Combine cream, sugar and zest in a medium saucepan over medium heat and stir to combine. Heat, stirring as mixture boils. Boil, stirring frequently, for 8-12 minutes, until reduced to 2 cups (pour it off into pyrex measuring cup to check when it’s there). Remove from heat, stir in juice and let cool 20 minutes. Strain into bowl or directly into six individual ramekins/posset containers (see at right. who knew?). Discard strained zest, or eat it when nobody is looking. Chill possets uncovered until set, at least 3 hours. Wrap and store in refrigerator for up to two days. To serve, unwrap and let sit at room temperature 10 minutes. Garnish with berries.


Meyer Lemon Simple SyrupSyrup-tree

2 cups strained fresh Meyer lemon juice
2 cups granulated sugar
zest of 3 Meyer lemons

Wash and gently scrub lemons. Using a zester or vegetable peeler, remove strips of zest from fruit, being careful to remove only the yellow zest, none of the bitter white pith.

Combine sugar, zest and lemon juice in medium saucepan. Heat until simmering over medium heat, stirring to completely dissolve sugar. Increase heat and bring to a gentle boil. Remove saucepan from heat. Cover and set aside to steep 10 minutes. Strain into glass containers. Discard zest, or, you know what I’d do.

Makes 3 cups. The syrup will keep 1 week in the refrigerator, 6 months in the freezer.

granite-lemons

Southern Comfort in the Granite State


Fry Your Grains Out Apple Fennel Salad

Fried-Grains-Fennel

Get your ancient on: Apple Fennel Salad with Roasted Buckwheat, and a side of Crunchy Spelt.

I am not trendy. The Dansko Clogs I wear 360 days a year make this clear. But as your liaison between the glut of food blogs out there, it is my responsibility to stay a bit on top of food trends, which brings us face to face with fried grains. Like the ones in crispy brown rice “kabbouleh.” Let’s all take a moment to say… DUH. Frying grains makes them taste even better. Doubling down on trendiness let’s consider fried ancient grains. Among others I’m looking at you, spelt.

Frying grains requires cooking them first, spreading them out to dry, and then deep frying them. I’ve done it a few times now, because it turns out fried grains are just as addictive as fried anything. That said, it’s a bit of a pain if you don’t happen to have an Ancient Grains Fry Baby on hand. It was enough to seek a slacker alternative.

This recipe came to me from Rocky Mountain correspondent Tania (ahem, cranberry chutney, get on it!), who got it from the Bitten Word who got it from Cooking Light. The provenance should assure you that it has been thoroughly vetted and approved. It is delicious, refreshing, colorful, different and—aside from frying the spelt— incredibly easy. It would make an excellent Thanksgiving side for non-traditionalists, and the red and green colors take it the distance through the holidays.

As for the slacker alternative, on a hunch Tania and I decided to steal from our new favorite weird recipe and use roasted buckwheat instead of the spelt. The result was awesome— it was way easier than deep frying and the buckwheat lent a satisfying earthy crunch that requires less jaw strength than the fried spelt. That said, one of us had an issue with soggy leftovers the next day. The solution: if you go the buckwheat route, sprinkle it on each serving so you can store the leftover salad and grains separately. I’ve included the original recipe as well as the (gluten free I swear) roasted buckwheat option. People, it’s time to start your Thanksgiving engines!

Shaved Apple and Fennel Salad with Crunchy Spelt

Ingredients:

3 tablespoons canola oil
2 tablespoons cider vinegar
1 1/2 teaspoons sugar
1 1/2 teaspoons whole-grain Dijon mustard
3/8 teaspoon kosher salt
1/4 teaspoon freshly ground black pepper
1 fennel bulb, halved and cored
1 small green apple, quartered and cored
1 small red apple, quartered and cored
1 cup fresh flat-leaf parsley leaves
1 cup Crunchy Fried Spelt or roasted buckwheat (recipes below)

Method:

Combine first 6 ingre­dients in a large bowl, stirring well with a whisk.

Cut fennel and apples into 1/16-inch slices using a mandoline (or a good sharp knife). Add fennel, apples, parsley leaves, and Crunchy Fried Spelt to vinaigrette; toss well to combine.

Crunchy Fried Spelt

Ingredients:

3 cups cooked spelt (about 1 cup uncooked grains)
6 cups canola oil or peanut oil

Method:

Line a jelly-roll pan with several layers of paper towels. Spread spelt out into a thin layer on paper towels. Let stand 1 to 2 hours to dry out surface moisture, stirring grains occasionally.

Heat oil in a large Dutch oven over high heat until a thermometer submerged in oil registers 375°. (Do not use a smaller pot; moisture in the grains will cause the oil to bubble up vigorously.) Add 1/2 cup spelt to hot oil; cook 4 to 5 minutes or until grains are browned and crisp. (Maintain oil temperature at 375°, and fry in small batches.) Remove fried spelt from pan with a slotted spoon; drain on paper towels. Repeat with remaining spelt, 1/2 cup at a time.

Slacker Roasted Buckwheat

Ingredients:

  • 1 cup Buckwheat groats
  • 1 Tbsp olive oil
  • a healthy pinch or two of kosher salt

Method:

Line a baking pan with parchment paper. Combine buckwheat and olive oil. Stir to coat. Spread on baking sheet. Sprinkle with salt. Bake at 350 for 20-30 minutes until browned, stirring at least once along the way. Cool. Store in airtight container.


Pa Amb Oli (Bread with Oil)


Great bakery in town with Pa Amb Oli if you are ready for savory. Otherwise, go for the chocolate croissant.

Great bakery in town with Pa Amb Oli if you are ready for savory. Otherwise, go for the chocolate croissant.

I just got back from a great trip to Mallorca, Spain. I was biking for a week with 4 amazing, funny, strong, and interesting women.  I had not heard of this biking mecca until I asked a friend where she goes on biking trips.  She said without taking a breath, “go to Mallorca”.  Well, she was right!  It is an island off the coast of Spain in the Mediterranean.  The roads are in great shape, the entire island is bike-able, and what’s not to like about biking along the Mediterranean coast!  We rode everywhere, and in between rides, we feasted at the cafes, restaurants, and farmer’s markets along the way (good thing for all the biking because the eating was constant). We tried to pick favorites in different categories like…. what was our favorite ride (Sa Colabra), what was our favorite village (Bunlyola), what was our favorite bakery (Fornalutx – see photo above).   But when it came to the food, hands down the Pa Amb Oli won across the board. It is a must do when on the island of Mallorca and it will be a must bring on our list of Bring It recipes. Plus, it really doesn’t get any easier than this. It’s just bread with oil after all! .

Ingredients

Brown country bread that you can find in local bakeries
Extra virgin olive oil
4 beefsteak tomatoes
Optional: Cheese, processed meat, olives, sautéed vegetables
Salt

Method

Cut bread into slices (not to thin) and place on a plate. Rub the tomatoes into the bread to remove the pulp and skin, leaving a sort of mashed tomato on the bread. Add salt to taste and olive oil, which will help the salt and tomato to penetrate into the bread. Add cheese, meat, vegetables, olives or whatever toppings you choose. Place in 350 degree oven to heat for 10 minutes.

If it’s hard to imagine what this is, Google Pa Amb Oli and you will see a plethora of ideas for this “bread with oil” treat.  Here is a link for your optional research.

It’s Pickling Time!

PicklesAugust is my favorite time of year for gardening. It’s when the garden gives more than you can manage, and you don’t have to do any work (or very little). Right now, I’m on overload with cucumbers and I’ve had one too many cucumber salads. So, I figured, time to make cucumber pickles. This pickle recipe is a win, win, win. In fact, my husband said, don’t bring these anywhere because he wants to eat them all.  I can hardly keep them to myself. I have a blog called BRING IT after all which is about sharing food with others.  I’d feel guilty if I did not share in the wealth.  My husband reluctantly agreed.  However, if I come bearing a jar of pickles to your house, you will also have to take a boat-load of cucumbers with it. That’s the price you pay!

Okay, on to the recipe. Enjoy the last few days of August and good luck to everyone trying to keep up with the summery bounty!

Ingredients

4 lbs cucumbers, cut into 1/4 inch disks
2 lbs onions, thinly sliced
1/3 cup kosher salt
2 cups sugar
2 Tbsp mustard seed
2 tsp turmeric
2 tsp celery seed
1 tsp ginger
1 tsp peppercorns
3 cups cider vinegar

Method

Wash and dry the jars.

Combine cucumber and onion slices in a large bowl, layering with salt; cover with ice cubes. Let stand 1 1/2 hours. Drain, rinse, drain, rinse again.  Combine remaining ingredients in large pot and bring to a boil.  Add drained cucumbers and onions and return to a boil.  Pack hot pickles and liquid into pre-heated jars, leaving 1/2 inch headspace. Remove air bubbles by tapping on counter or stirring gently with spoon.  Adjust 2 piece cap and process 10 minutes in boiling water canner.  NOTE: for shelf stability you will need to carefully follow canning process. Click here for link on canning instructions.

Gnocchi Verde

Kale GnocchiI was driving home from a great visit with my family in Connecticut the other day, which is a 4 hour car ride.   This is an easy drive, but one still needs a good plan with books on tape, radio shows, and downloaded podcasts to get you through without too much twitch. I planned it perfectly so that I could listen to a full, uninterrupted hour of Lynne Rossetto Kasper on The Splendid Table. It made one of the four hours pass very quickly (if you don’t know Lynne, go to this link and check it out – she’s great!). I adjusted the sound, sat up straight, and got ready to absorb as much information as I could. There are food experts, new recipes, seasonal fare, cooking lessons, guest questions, and so much more for all the foodies out there. I was psyched!

One of the stories on Lynne’s show that day was how to make kale gnocchi. I thought, I love kale, but I don’t eat gnocchi – it’s too much starch. But if I substitute the kale for the potato in the gnocchi I might be in business. Plus, there are so many recipes for kale salads, kale chips, braised kale, kale with pasta, and so on. But kale gnocchi was something new. So, I listened in and tried to remember the tips and tricks from Lynne’s description of how to make these from scratch.

I got home, picked fresh kale from my garden (PS I love my garden this year – new raised beds are making me very happy!) and got started. It was my first time through so it took a bit of time to make but they are actually very easy and could be thrown together in a flash now that I know the routine. These nuggets are delicious and a fun way to use the abundance of kale out there now.

Eat more kale!

Ingredients

4 lbs. kale (or Swiss chard), ribs removed
5 Tbsp fresh bread crumbs
2 eggs
1 cup plus 2 Tbsp ricotta cheese
1 cup parmigiana-reggiano cheese, plus more for topping
Dash of nutmeg
Salt and pepper
All-purpose flour for dusting
Olive oil (or butter)

Method

Clean kale and remove ribs. Tear into small pieces and blanch in boiling water for 3 minutes. Remove with slotted spoon to ice bath and let cool. Once cool, ring out excess water by squeezing and chop. Set aside.

Put bread crumbs in food processor and processes until finely ground. Add kale, eggs, ricotta cheese, parmigiana-reggiano cheese, nutmeg, salt and pepper, and process until mixed well. Taste and add salt and pepper as needed.

Fill pot with water and bring to gentle boil. Meanwhile, flour work surface and hands, then roll mixture into smallish balls. Drop balls into boiling water (if water is boiling too hard it will break gnocchi apart). Boil for 5-6 minutes and remove with slotted spoon to plate covered with paper towel. Let dry.

Place gnocchi in shallow baking pan, drizzle with olive oil and sprinkle with cheese. Broil for a few minutes until cheese is melted and just starting to brown. Serve immediately.

YUM!

THE Panzanella

PANZANELLA

It’s toasted bread! It’s veggies! It’s panzanella coming to the rescue!

First off, apologies all around for the technical difficulties last week, and to those of you who got a sad, gray, “Legacy IP DNS blah blah” message instead of a recipe for Watermelon Rosemary Lemonade. Thanks to a kind man named Piotr who desperately needs a vowel, we are back up and running. Now, on to this weekend.

Some recipes you just have to know. Ina Garten’s panzanella is one of them, especially in summer. In addition to being a way to use a whole lot of summer’s best produce, it’s easy to prep, easy to bring, easy to assemble and it’s DELISH. Plus, it’s a way to eat crispy bread and call it dinner (or breakfast if you can’t help yourself the morning after). Ina (AKA The Barefoot Contessa, and the goddess of bringing it) has many panzanellas in her repertoire, including an awesome greek version, but if you only master this one (and you will on your first try) the Kingdom of Picnic Greatness is yours. 

As I mentioned in the recipe for Asparagus Panzanella, you can use your imagination, your cravings and the contents of your produce bin to tweak panzanella in all kinds of ways. It’s a tasty go-to on some seriously hot days. And by the way, if you live in the Upper Valley and are looking for some places to cool off check out this post on Swimming Holes and Soft Serve.

Ok peeps, stay cool out there!

Ina’s Panzanella

Serves 12

INGREDIENTS

For the Salad:

  • 3 tablespoons good olive oil
  • 1 small French bread or boule, cut into 1-inch cubes (6 cups)
  • 1 teaspoon kosher salt
  • 2 large, ripe tomatoes, cut into 1-inch cubes (I have used halved cherry or grape tomatoes as well.)
  • 1 hothouse cucumber, unpeeled, seeded, and sliced 1/2 inch thick
  • 1 red bell pepper, seeded and cut into 1-inch cubes
  • 1 yellow bell pepper, seeded and cut into 1-inch cubes
  • 1/2 red onion, cut in half and thinly sliced
  • 20 large basil leaves, coarsely chopped
  • 3 tablespoons capers, drained

For the vinaigrette:

  • 1 teaspoon finely minced garlic
  • 1/2 teaspoon Dijon mustard
  • 3 tablespoons champagne vinegar
  • 1/2 cup good olive oil
  • 1/2 teaspoon kosher salt
  • 1/4 teaspoon freshly ground black pepper

Method:

Heat the oil in a large sauté pan. Add the bread and salt; cook over low to medium heat, tossing frequently, for 10 minutes, or until nicely browned. Add more oil as needed.

For the vinaigrette, whisk together the ingredients.

In a large bowl, mix the tomatoes, cucumber, red pepper, yellow pepper, red onion, basil, and capers. Add the bread cubes and toss with the vinaigrette. Season liberally with salt and pepper. Serve, or allow the salad to sit for about half an hour for the flavors to blend.

Bringing it:

You can prep the bread, veggies and vinaigrette in advance and store in their own containers. Mix it all up on site a half hour before serving.

Summer Salad with Maple Balsamic Dressing

Summer Salad with Maple Balsamic DressingGreens, greens, greens! They are everywhere.  Plus, strawberry season has been outstanding.  I can’t stay away from my local farm where they have pick-your-own strawberries.  You can easily pick 5 pounds of strawberries in about 15 minutes.  GREENS and STRAWBERRIES must be prioritized so do what you can to get those two items to the top of the list.  Then once you have all these fresh greens and berries at home, why not combine the two in this wonderful and easy summer salad.  

This salad that will take you 4 minutes to put together….yes, literally 4 minutes. You shred some fresh lettuce, slice some strawberries, sprinkle with nuts (I used salted, roasted pistachios), and add a little feta cheese. Voila, you’re done. Oh, right, you still have to make the dressing….okay, so maybe it will take you 15 minutes, tops.

Make the salad, cook some pasta with pesto, toast some bread on the grill and you have a quick easy summer meal that can’t be beat. I just ate this for dinner and it was so light and nice.

Enjoy the long days and all your beautiful salads!

Ingredients

12 cups fresh greens
1/2 cup crumbled feta cheese
3/4 cup toasted nuts (almonds, walnuts, pecans, pistachios, or whatever you like)
1 cup fresh strawberries, sliced

Vinaigrette:
1 Tbsp maple syrup
2 Tbsp balsamic vinegar
1 Tbsp soy sauce
1 clove garlic, crushed
1 Tbsp sesame oil
1 tsp fresh ground pepper
1/2 cup olive oil

Method

In a large bowl, toss fresh greens with cheese, nuts and fruit. To prepare the vinaigrette, mix together all ingredients except olive oil until well blended. Add oil in a slow, steady stream until incorporated. Toss greens with dressing.