Category Archives: Appetizers

It’s Labor Day. So g’wan, Beet It!


End of summer yum-fest.

End of summer yum-fest.

I don’t want to be the one to say it, but Labor Day is coming. Too soon too soon! I know. I feel your pain. School has started, signaling the best weather of the summer. That is just so wrong. And that linen you barely got a chance to wear? It’s days away from being banished to plastic bins (if you pay attention to the fashion police that is.)

But here’s the bright side, and the bright side always wins. We’ve got a whole long weekend to pretend it’s still summer, and that homework doesn’t really matter and that we really don’t have to respond right away to every work email. Instead, we will play. And then we will eat, and drink, and we will not worry about what to bring to any gathering because we have so many fabulous dishes to choose from (scroll all the way down for a list of no-fail ideas).

At the top of the list, I propose beets. My friends Ron and Lisa have the Vermont garden everyone dreams about, minus the weeds and deer. On a recent evening they served these beets along with homegrown bounty like purple and blood red tomatoes, and even home grown pork.

The original recipe serves this salad deconstructed into its various elements: greens, beets, cheese, nuts. I took Lisa’s cue and put it all together for ease and deliciousness. Feel free to sub feta for goat cheese. I’ve had both and they are both fantastic. Now, go find a good friend with a garden and beet it!

Ingredients

4 medium beets – scrubbed, trimmed and cut in half
1/3 cup chopped walnuts
3 tablespoons maple syrup
1 (10 ounce) package mixed baby salad greens
1/2 cup frozen orange juice concentrate
1/4 cup balsamic vinegar
1/2 cup extra-virgin olive oil
2 ounces goat cheese

Method

Place beets into a saucepan, and fill with enough water to cover. Bring to a boil, then cook for 20 to 30 minutes, until tender. (Or, as I prefer, wrap in foil, spatter with olive oil ans salt and roast in hot oven until tender). Drain and cool, then cut in to cubes.

While the beets are cooking, place the walnuts in a skillet over medium-low heat. Heat until warm and starting to toast, then stir in the maple syrup. Cook and stir until evenly coated, then remove from the heat and set aside to cool.

In a small bowl, whisk together the orange juice concentrate, balsamic vinegar and olive oil to make the dressing.

Place a large helping of baby greens onto each of four salad plates, divide candied walnuts equally and sprinkle over the greens. Place equal amounts of beets over the greens, and top with dabs of goat cheese. Drizzle each plate with some of the dressing. (Or, throw it all together, toss and enjoy!)


A serious summer spread, complete with fresh caught Nantucket tuna (cooked by blow torch on a Vermont stone wall). Some things just end up working out.

An All Star Summer Revue and Review:

Beets not your bag, baby? Here are some other fabulous brings. Of course, there is THE SLAW, aka Hero Slaw, which is welcome any season at any gathering but is especially excellent as a barbecue co-star…and the lovely Funitella Bruschetta, so brilliant in its simplicity, ease of preparation and universally appreciated tastiness. Never underestimate the power of Bruschetta Deconstructed when you make your toasts from Easiest French Bread Ever. (It’s not even fair how many points you get for making your own toasts with homemade bread, and it’s soooo easy. Top them with fresh tomatoes and burrata and your point total quadruples.)

Keeping it simple you can never go wrong with an armful of fresh farmers market corn, or really anything from the holy trinity of late summer produce (corn, tomatoes and zucchini). It doesn’t get much fresher or easier than zucchini, corn summer swansong salad. Oh, and don’t forget the drinks. A pitcher of Freezer daquiris or watermelon sangria will help you and your friends achieve Hakuna Matata Nirvana one more time.


Grilled Proscuitto Quesadillas

Grilled quesadillas couldn't be easier

Grilled quesadillas couldn’t be easier

My son came home one day recently and asked, “can you buy prosciutto”?  I guess he had a prosciutto sandwich somewhere in his travels and he really liked it.  He knows I’m a sucker for anything he or my husband ask for in the kitchen.  Next thing I knew, I was standing at the deli counter ordering prosciutto with this little Italian lady standing next to me saying “ next time get the boiled ham – it’s much cheaper and nobody will know the difference”. I looked at her, smiled and thought she’s probably right.

I went with my original plan and purchased the precious prosciutto (try saying that 3 times fast), then I made my way home to concoct what I thought would be a crowd pleaser…. grilled prosciutto quesadillas. I got the recipe from one of my favorite recipe resources, Fine Cooking Magazine. I whipped up a double batch of these quesadillas and wow, were they ever a hit. I got a mighty big thank you from my son and even a hug (he’s not much of a hugger so I knew he was really happy!).

These quesadillas are super easy to put together and they would be great as an appetizer at your next party.

Ingredients

1 Tbsp extra virgin olive oil
2 medium cloves garlic, smashed
5 oz. baby spinach (approx. 5 lightly packed cups)
Kosher salt and freshly ground black pepper
1 1/4 cup grated fontina
1/4 cup freshly grated Parmigiano-Reggiano
6 oil-packed sun-dried tomatoes, drained and chopped
3 7-8 inch pitas split into two rounds (or 2 wraps stacked one on top of another)
6 thin slices prosciutto

Method

Heat oil and garlic in 10 inch skillet over medium high heat until the garlic starts to sizzle steadily and browns in places (about 2 mins but watch it carefully because it can quickly go from sizzling to burnt). Add the spinach, sprinkle with approximately ¼ tsp each salt and pepper, and cook, tossing until just wilted which will take about 2 minutes. Transfer the spinach to a colander.  Let cool for a few minutes, discard the garlic, and gently squeeze out the excess liquid from the spinach.

In a medium bowl, toss the spinach with the fontina, Parmigiano-Reggiano, sun-dried tomatoes, and ¼ tsp pepper. Set 3 of the pita halves on a workspace and top each with 2 slices of prosciutto. Top each evenly with the spinach mixture and set the remaining 3 pita halves on top (or if using wraps set the remaining wraps on top).

Wipe the skillet clean with a paper towel and heat the pan over medium heat. When the pan is hot, coat the bottom with canola oil and place one of the pita sandwiches in the hot pan. Set another medium skillet on top. Put 2 lbs of weight in the empty skillet on top and cook the sandwich until the bottom starts to brown, about 2 minutes. Flip and cook the other side until it browns and the cheese melts. Transfer to a baking sheet and keep warm in the oven. Cook remaining sandwiches the same way. Cut into wedges and serve.

PS The last step of cooking the sandwiches can be made super easy with a Panini maker. My Panini maker was one of the best kitchen gadget investments I’ve made and I hate to buy unnecessary kitchen gadgets.

Tomato Appetizers

Tomatoes Apps KR Close Up

Our Ingredient of the month for July is tomatoes, so I’m squeezing this tomato post in just as we are about to flip the calendar to August (I know, deep breath, it is still summer!).  There are so many things you can do with tomatoes. It was hard to choose what to make for this post.  I settled in on two appetizers, Tomato Bruschetta, which is a classic and beloved by everyone everywhere; and Greek Salad on a Stick, which is a fun way to have the burst of Greek salad in one bite. By selecting these two appetizers, I was able to purchase beautiful heirloom tomatoes for the bruschetta and colorful cherry tomatoes for the Greek Salad (shown below). 

On that note, I have nothing to add. What do you say about tomatoes in the summer? They speak for themselves.  Here’s to summer, enjoy the warm sunny days!

Tomato Bruschetta

Ingredients

Extra-virgin olive oil
1 crusty baguette (cut baguette into slices on the diagonal)
1 or 2 cloves garlic, peeled and halved (optional)
Chopped tomato topping (see recipe below) 

Method

Coat rimmed baking sheet with olive oil and set bread slices on top in a single layer. Brush the tops with a little more oil and set aside until you are ready to grill.

Light charcoal grill or turn on gas grill to medium high. Grill the bread slices until one side has dark grill marks or is deep golden brown all over and then turn to toast the other side. Watch out, as these puppies can burn quickly. As soon as the slices are done, rub the bread with the cut side of the garlic (if using). Add chopped tomato topping. Enjoy!

Chopped Tomato Topping

1.5 lbs. ripe tomatoes, seeded and diced into ¼-inch pieces
Kosher salt
Pinch of cayenne
1 clove garlic, mashed into a paste with a pinch of salt (using a mortar and pestle or a knife)
1/4 cup extra-virgin olive oil
2 leafy sprigs basil, leaves picked and torn or roughly chopped

Method

Season the tomatoes with salt and put them in a colander to drain for 10 minutes. Transfer the tomatoes to a bowl and fold in the cayenne, garlic paste, olive oil, and basil. Taste for seasoning and add salt or a pinch more cayenne if you would like.

Greek Salad on a Stick

Ingredients

1/4 English cucumber
Kosher salt and fresh ground black pepper
¼ lb feta cheese cut into small cubes
6 pitted Kalamata olives, cut in half
8 ripe grape or cherry tomatoes, cut in half or quarters depending on the size
2 Tbsp extra-virgin olive oil

Method

Cut four 1/2 inch thick slices from the cucumber then quarter each slice. Set the cucumber pieces on a platter and season with salt and pepper. Top each with a piece of feta cheese and an olive half. Stab a piece of tomato with a toothpick and then thread through one of the cucumber stacks, pushing the cucumber down to secure it. Drizzle with olive oil, sprinkle with a little more black pepper and serve.

A party in your mouth!

I love the beautiful colors

I love the beautiful colors

Tomato Jam, co-starring sugar and spice

spicy tomato jam

Tomato jam and all the fixin’s for an alfresco summer feast. As ever, bacon helps.

Oh yeah. We’re jamming on tomatoes because it’s the ingredient of the month. It’s a little early for many of you New England gardeners, but pretty soon we’ll be in full tomato overload, so I’m getting you prepped. Tomato cheddar pie, featuring big honkin’ full-sized red bombers will be coming at you soon. But let’s ease into tomato season, and give it some sass while we’re at it, with this sweet and spicy number.

 Let me first say that there’s nothing quite as perfect as a fresh tomato from the garden, so it feels a little sacrilegious to futz with fresh tomatoes in high summer. BUT, sometimes we go overboard, and just have too much of a good thing. When that happens, make this jam.

It adds some zing to a BLT (along with crunchy iceberg or romaine, not shmancy wispy greens) or any caprese type appetizer with basil and fresh mozzarella or my new best friend, burrata (thank you Jeanie!). Use it with a creamy base in bruschetta deconstructed, as an element of lunch deconstructed, put it in quesadillas, on pizza, over a poached egg or my favorite way, on a lusty piece of That’s Life Bread spread with avocado. It’s sort of like grown up ketchup, and you can dial the sweet and spice up or down as you see fit.

Ok, here we go.

 Ingredients

3 Tbsp olive oil
1 1/2 pounds cherry or grape tomatoes, halved
3 Tbsp packed dark brown sugar
3 medium cloves garlic, minced (about 1 tablespoon)
1 small shallot, minced (about 2 tablespoons)
2 Tbsp red wine vinegar
2 Tbsp Worcestershire sauce
1 tsp red pepper flakes (or some finely diced jalapeno for extra cha-cha)
Kosher salt and freshly ground black pepper

Method

Heat oil in large skillet over medium-high heat until shimmering. Add tomatoes, brown sugar, garlic, shallot, vinegar, Worcestershire, red pepper flakes or jalapenos, 1/2 teaspoon salt, and 1/2 teaspoon pepper, and cook, stirring until tomatoes are softened and lightly browned, about 15 minutes. Transfer to bowl and let cool to room temperature.

Bring It!

Bring this in your mason jar of choice, is a brilliant addition to any picnic, and an excellent contribution to any summer gathering, peace offering or gift basket.

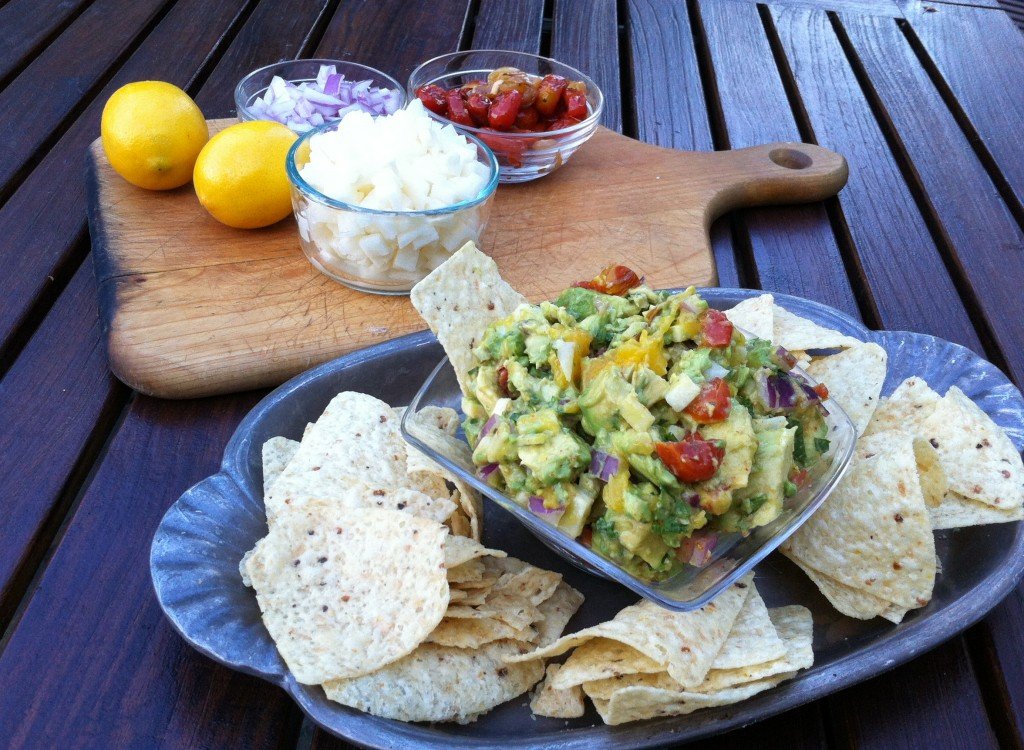
Mango Jicama Guacamole

Mango jicama guacamole

Let the Sunset fantasy begin.

We’re past Memorial Day, so you can all bust out the linen togs and start working on your guacamole recipes. You know how it rolls from here on out: Casual parties start to happen. You want to bring something that you know will be appreciated and eaten, that is homemade but not terribly taxing and that can probably be pulled off without a recipe. As long as you can lay your hands on ripe avocados you simply can’t go wrong with a good guacamole.

And you can go really right with this guacamole, because it has jicama AND mangoes, both of which (along with avocados) make me fantasize that I am actually in a Sunset magazine photo shoot. You’ve got crisp, sweet and creamy mixed in with spicy, tangy and juicy. And then you add cilantro, which makes everyone but my sister happy. And since it’s almost her birthday we can all just go ahead and substitute fresh mint for the cilantro if we want. Because it’s guacamole…and the first rule of guacamole is to improvise at will! No adobo? No problemo! Just sprinkle in some chile powder. It’ll all work out, even without a drop of tequila.

To show bicoastal reverence of a good guacamole, this recipe comes from Meracadito Cantina in Manhattan via Food and Wine, and with many thanks to our friendly local Hannaford’s where jicama is a totally reasonable $1.99/lb and where they double your refund if it turns out to be no bueno (see note below).

Ingredients

3 Hass avocados, cut into 1/2-inch dice
1 medium plum tomato, seeded and cut into 1/4-inch dice
1/2 small onion, cut into 1/4-inch dice
3/4 cup finely diced ripe mango
1/2 cup finely diced peeled jicama
3 Tbsp finely chopped cilantro
1 medium chipotle in adobo, minced (1 tablespoon)
1 small jalapeño, seeded and minced
2 Tbsp fresh lemon juice
Kosher salt
Tortilla chips, for serving

Method

In a large bowl, gently stir the avocados with the tomato, onion, mango, jicama, cilantro, chipotle, jalapeño and lemon juice until well mixed but still slightly chunky. Season with salt and serve with tortilla chips. Olé!

Note: Whereas in California the jicama roots make a quick jaunt from Mexico, they travel much further to get to our stores in New England. You most often find them heavily waxed…Brazilian super model before the SI swimsuit shoot waxed. We’re talking a thick coat that can prevent you from seeing the jicama’s true self.  Look for jicama with no soft spots and no oozing juices (never an excellent sign of health on anything). It should be firm, crisp and mild tasting when peeled. You won’t need it all for this recipe so slice up the rest, add some lime juice and store it in the fridge for snacks… or the next party. 

Brussels Sprouts Chips

Mtn Roots Food truck and brussels sprouts chips

Want some taro fries with that? Localvore ski bums rejoice at the Mtn. Roots truck in Squawllywood.

You know you don’t get out much when your culinary discoveries come from a food truck at a ski area. Granted, this was a California ski area, and the truck was a tricked out Mystery Machine called “Mtn Roots.” But still. On a recent visit home to Squaw Valley my sister snagged “us” some crispy Brussels sprouts chips off the truck and a new addiction was born. And no, she did not get anywhere near her fair share.

That was a month ago, so I was beyond psyched when a post for these very delicacies came to me via Bevin Wallace’s Real Life Delicious blog. RLD is a great site for fuss-free healthy eating, and Bevin is in to the paleo thing now, so its all healthy and paleo, which is totally overachieving. But as long as it tastes good I’m good with it. If you live in the Denver area get on over to Bevin’s kitchen classes. If you don’t, hunker in for some Beviliciousness right now.

Brussels Sprouts chips, New England style

Brussels sprouts chips, New England style

There are a few things to love about this recipe, beyond the sheer yum factor. First Bevin tells you exactly what types of tools and containers to use. Less guesswork. More direction. All good. As you are trimming your sprouts you may be thinking, “Boy this is a lot of work for one snack,” until you realize that you are actually doing the prep work you have to do anyway for Brussels sprouts, which brings me to the next stroke of recipe brilliance here—it’s two-fer! You get ready-to-roast Brussels sprouts AND some yummy snacks out of the deal. (Who loves ya baby? I would never ever make you work too hard.)

I’d say the kids loved them but that would be overselling because only one kid was around. But he is a bit of a Russian judge of my food and I had to beg him to leave some for his Dad. (I ate them anyway because when  Dad arrived he wasn’t quick enough.)

And now, here it is— Groovy California ski area food right in your own kitchen. My only suggested tweaks would be to up the temp to 375, expect them to take at least 15 minutes, and make a real effort to get those suckers in only one layer so they really crisp up. Now dig in!

Ingredients

1 bunch Brussels sprouts (about 2 lbs)
1 tbs. olive oil
Pinch of salt

Method

Preheat the oven to 350 degrees. Start by getting out a cutting board, a bowl, and a lidded storage container. Trim the ends off the Brussels sprouts and then remove the darker-green outer leaves; some will fall off when you cut the ends, some you might need to pull off. Put the leaves in one bowl; cut the remaining sprouts in half or quarters and put them in the lidded container. When you’re done, put the container of trimmed sprouts in the fridge for later use.

Toss the leaves with the oil and salt (go easy on the salt; it’s easy to get too much) and spread them in a single later on a baking sheet lined with parchment paper (you might need to do this in two batches). Bake for 10 mins. and check to see if they’re done to your liking. They should be somewhat crispy and brown on the edges. If not, rotate the pan and bake another 3-5 mins., watching closely so they don’t burn. When they’re done, lift the parchment with two hands and use it as a spout to pour the delicate chips into a bowl.

Now, try to eat just one.

Note: When you want to roast your trimmed sprouts, just toss them with some olive oil and salt, spread them on a baking sheet and pop them into a hot (400 or so) oven until they look awesomely roasty.

California-green-dreaming

Who said it ain’t easy being green?


Ollie’s Trip Salsa

Ollies trip salsa

La Salsa. Prepared and photographed by the chef. #nofilter, #yeah…right!

Happy Ocho de Mayo! I know, I know. You thought I forgot about the annual excuse for midday margaritas. Not on your life! I merely saved it for a day more conducive to celebrating. God knows there are enough margarita recipes floating around so I’m giving you a healthier gift. In fact, I’m not even the one giving it—my son Oliver is.

Two summers ago we sent the lad into the wilderness in a canoe for three weeks, and he came back knowing how to make his own salsa. Better yet, he knew how to make it by a campfire armed with nothing but a cutting board, a can opener and a knife. And the very best part was that he came back loving his homemade salsa. This from a kid, who, though good with roasted vegetables and the occasional carrot, had never previously eaten a raw tomato or pepper. “That was pretty much the beginning of my salsa eating career,” he reflects.

I love this recipe because it is easy and infinitely tweakable for individual tastes. Some of us would add more onion and perhaps jalapeno, or maybe some additional seasonings. Others might get crazy and add mango or even jicama. But this is a great place to start, will be appreciated at any gathering, might just get your kids eating veggies and, if you keep your pantry somewhat stocked, will set you free from store bought salsa forever.

 Ingredients

1 red (or any color) pepper, finely chopped
I large clove garlic, minced
2 cans diced tomatoes (preferable petite diced), lightly drained
1/2 medium onion, finely chopped
1 cup (+/-) Niblets corn (it’s gotta be Niblets I’m told), drained
1 tsp oregano
1/2 tsp paprika
1/2 tsp chili powder
1/2 tsp salt
2 tsp fresh lime juice
2/3 cup cilantro, finely chopped

Method

Mix it all in a bowl. Enjoy it on chips, in burritos or by the spoonful, at home or by the closest campfire.

Note: Chop the vegetables as fine as your patience allows. Our early versions were decidedly large format, but a finer texture gives your awesome salsa more versatility.


Garam Masala Roasted Chickpeas

garam masala roasted chickpeas

It’s chickpeas. It’s feta. It’s olives. It’s a Mediterranean feast!

This is mean. I probably shouldn’t admit it, but this was supposed to be a fun post about highballs. The drinks, that is. All was going swimmingly until my research detected a procedural discrepancy on the shaken vs. stirred question (which has little place in a discussion of highballs, but nonetheless opened up a gushing artery of doubt). On top of that my R&D was a little challenging so early in the week. So the good news is, there is a fabulous highball post in your near future (perhaps in time for Derby Day). The even better new is….

We’ve got chickpeas! Oh yeah baby, hold me back. Honestly, I have been experimenting with roasted chickpea recipes off and on for several years. My quest for the perfect, crunchy chickpea snack started in a crockpot, moved to a pot of oil and then settled on a roasting pan. The results were always ok, but texturally not quite right. Too moist and underdone, or dryly overdone. Nevertheless, my kids ate them by the handful whenever I did make them so I was inspired to continue.

Then yesterday, just when my highball mission seemed irretrievably stymied, I came across this recipe that I had torn out of Sunset magazine way back and never tried. It turns out the secret lies in—here’s a shocker—plenty of olive oil. These are the closest I have gotten to chickpea perfection and they make your house smell really good. And they’re easy. And cheap. And if you make them now you’ll have something healthy to go with your highballs this weekend.

Roasted Chickpeas with Garam Masala

From Sunset Magazine

Makes 3 cups

Ingredients

4 cans (15 oz. each) chickpeas (garbanzos), rinsed and drained well
6 Tbsp olive oil
2 tsp garam masala
About 1 tsp fine sea salt

Method

1. Preheat oven to 350°. Gently roll chickpeas in batches between clean kitchen towels to blot dry and slough off papery skins; discard skins. (Edie note: rubbing off the skins is good, and dries the chickpeas, but if you don’t feel like picking through for the skins just roast them up too.) Divide chickpeas between 2 rimmed baking sheets. To each pan, add 3 tbsp. oil, 1 tsp. garam masala, and 1/2 tsp. salt and mix well to coat. Spread in an even layer.

2. Bake, stirring occasionally, until chickpeas are crisp all the way through, 75 to 80 minutes. Add more salt to taste if you like. Serve warm or at room temperature.

Note: These are also great on salads or as a component of lunch deconstructed.

Bring It 

Store up to 1 week, chilled airtight. (Edie here again. Chill shmill. Just put them in a Tupperware and leave them within easy reach of your kids.)


Balsamic Black Beans

Balsamic black beans

Fiesta- It’s always the right thing to do. And frijoles Italiano are the right thing to bring.

Let’s be honest. It is never too early to prepare for Cinco de Mayo. If you haven’t perfected your margs, your guac, your mango salsa, your chicken enchiladas there’s still some time. But you’ve got to get on it! I’m going to take on the black bean situation for you and solve it the easy way.

Buy yourself a can of Pastene black beans (playing it incognito in the Italian section), turn the can around, and make the recipe that’s always been right there. It’s easy, fresh and the balsamic gives it a zing that makes these beans more abondanza than just plain bueno. Ok, I have no idea if abondanza is even a word, but they used it in an Olive Garden commercial so I’m going with it.

These beans are great as a dip for chips or sturdy veggies, as a filling for quesadillas, as a component of lunch deconstructed, as a topping for huevos or as something to put on your spoon as you stand in front of the fridge craving protein. By the way if you see limes on sale, go long! I hear they are in short supply in Mexico and you’ll be needing lots of those tangy babies in the weeks ahead.

 Ingredients

1 15.5 oz. can black beans
3 Tbsp olive oil
1 medium onion
1Tbsp balsamic vinegar
1/2 jar (7 oz. size) roasted red peppers, diced
1/4 cup (or more) chopped celery
salt and pepper to taste
dash of oregano
splash of maple syrup (optional, unless you are in New England, then mandatory)

Method

Saute onion and celery in olive oil until clear. Add roasted peppers and cook for a very short time. Add beans (with liquid), vinegar and seasonings. Simmer for 5-10 minutes.

Pastene black beans

Not so secret Pastene family recipe

Pastene black beans

Black Beauties


Moveable Feasts

    A fine spread for between runs, or really any old time.

A fine spread for between runs, or really any old time.

We apologize for the slight delay in Bring It posts, but due to THE FREAKING OLYMPICS, our nighttime blogging hours are seriously limited. Amidst all the TV watching, however, life, and eating, goes on. We are, in fact, at the height of Bring It season with all the shoveling, snowshoeing, skiing, aprés skiing and general warming up from the cold that’s going on here in the heart of the Polar Vortex.

As mentioned in Lunch Deconstructed, prepping and toting the midday meal can take me down. But a fresh new philosophy has come to my rescue. With apologies to past presidents it goes something like this: “Ask not what you can make and bring for lunch. Ask what lunch you can make from what you bring.” Or, more simply, instead of letting lunch prep bring you down, pack all your favorite food into a bag and figure out what to do with it when you get there. This is a win all the way around. First, you minimize chafe in the morning. Second, you have lots of options for picky eaters and changing moods/appetites. Third, aforementioned picky eaters learn the essential life skill of making their own lunches.

Bringing all of the elements and prep tools sounds complicated, but as I learned recently from Bring It master (and fellow ski racer parent) Pennie Rand, it’s not that tough. You just have to have a kit. Hers is a canvas bag stuffed with a Thermos, jars, loaves, cheese, veggies, fruit and little containers of bonus quelque chose as well as cutting boards, cloth napkins, and stylish wooden knives that make her look like a Scandinavian picnic goddess. She’s like the sport version Ina Garten, who knows that part of the fun of a meal is making it a social activity.

At a recent ski race, when Pennie handed my cold, hungry parents a hearty cracker topped with brie and baby spinach (vs. the bag of day old muffins I had grabbed at Shaw’s on the way to the race), they accepted and nearly teared up. When she followed up with a slice of whole grain bread smeared with peanut butter and Nutella, I’m pretty sure they wanted to trade me in.

This past weekend I got a glimpse of real Bring It pros in the ski lodge during Dartmouth Winter Carnival. By 8 am “Carnie” parents were trouping in with plastic storage bins full of food, and assembling an armada of crock pots on cloth-clad tables. Ski lodges, when they turn a blind eye to such large scale picnicking, are a venue more suited to crock pot warmery than crock pot cookery. Things like meatballs, chili’s and stews, are staples.

When lodges forbid profit-stealing crockpots you have to be a bit more creative. One dedicated ski parent stands hot dogs in a wide mouth Thermos then fills it with boiling water. She fills another Thermos with chili and brings a baggie of shredded cheese. At lunchtime each kid fishes out a dog, puts it in a bun from her kit, tops it with chili and cheese then finishes it off with foraged ski lodge condiments.

It is with no particular fondness or pride that I recall the free saltine/ketchup/relish ski lodge condiment sandwiches from my youth. Comparatively the DIY chili dogs would have been quite a feast. But so would some salami and cheese, a few slices of turkey, avocado and salsa wrapped in a tortilla or pretty much anything dipped in Nutella. As winter wears on, get fresh, be creative and for goodness sake invite everyone to the make-your-own-darned lunch party.

Ski lift lunch

Bringing it, extreme version. The chairlift lunch.