Monthly Archives: September 2014

How About Them Apples?

Full disclosure. This post is really an excuse to put up my favorite video clip of the season. Behold the way one chef dealt with a huge order of tarte tatins.   

https://www.youtube.com/watch?v=nbzw6y0pF3U

If more men knew that this was a step in the process of making apple pie we’d have a whole lot more male pie bakers. And while we are on the subject of men and food prep, you might enjoy the exploits of our favorite Russian Food hacker  (the kiwi and the pomegranate hacks were news to me).

But power tools aside, this is also the right time to remind everyone of all the great things to do with apples. There are lots of them this year, though not really in our orchard, which is a mixed blessing. No hauling bushels and grain sacks full of apples to the cider maker, but no homegrown apple cider. There are, however, more apples than we can possibly use, and here are my favorite ways to approach the task.

For Snacks:

Best, of course, is just eating these crisp juicy apples, which are the ideal for taking on the road or the trail. But when you need something a little more interesting, get dipping. Peanut butter and almond butter are excellent, healthy options, as is vanilla yogurt or one of my faves, a mixture of ground flaxseed and cinnamon. If you really need to make the hard sell on apple slices serve them with Nutella or, even better, with homemade salted caramel Cholliesauce.

For Breakfast:

It’s time for apple cheddar scones. It just is. Trust me on this. For apple cheddar pancakes (thank you Doug Haney) thinly slice up some Granny Smith or Mac- like apples and cook them down. Slice up sharp cheddar. Add both to the pancake right after you pour it on the griddle and cook the cakes as usual. You know to top them with–only real stuff!

For Lunch:

Add thinly sliced apples to your sandwich, especially if it’s in turkey and cheddar or grilled cheese family. Make a frittata with chopped apples and cheddar. Make an apple/ butternut squash soup like this one , or my slacker no recipe version that I swear I will post soon.

For Dinner:

Dip them in Guinness Fondue. Serve up some pork tenderloin with homemade caramelized applesauce. See below.

For Dessert:

If you haven’t already made this Apple Cake, do it! If you don’t have the mojo to make the cake at least make the brown sugar frosting and just smear it on an apple and call it good. Really good. The frosting is totally easy and all-time delish. And, especially if your apples aren’t winning any beauty contests make a Joni Mitchell apple pie.

For Fun:

Finally, if you prefer to drink your apples, mix up some hard cider sangria and enjoy the season!

Caramelized Applesauce Plus

rosy applesauce

Rosy pink applesauce from tree to table with one little stop on the stove.

This came about as a total mistake, after I got distracted while making a batch of applesauce with the thin-skinned apples that come off my favorite tree.  It appeared to be yet another burned disaster, another charred pot headed to the graveyard, but it did smell pretty good. The happy result was Applesauce Plus, which is sweet without added sugar and prettily pink. It was an instant family fave.

Ingredients:

  • As many tart, unpeeled red-skinned apples as you want.
  • Squeeze (or more) of fresh lemon juice.

Method:

Cut the cores from the apples and put them in a pot, barely covered with water. Boil until the water is thick and bubbly and the pot smells a bit like caramel. This takes a while, so you’ll want to ignore them for a while, but not be so far away that all the water boils away and you ruin your pot.

When the apples are sticking to the bottom just a bit and the pot smells really good, turn off the stove and let the whole thing cool. Smash the apples through a sieve or a food mill like this one (which is totally worth having), and add a squeeze of lemon. Enjoy it as is or on pretty much anything.

Stuffed Spaghetti Squash

Squash goodness is always worth the effort!

Squash goodness is always worth the effort!

With the start of fall, who doesn’t want to enjoy the fall vegetables to their fullest?  I thought what better way to start the season than with spaghetti squash.  However, when you buy a spaghetti squash, it is a commitment. Not only do you have to haul the thing home, but once you get it into your kitchen, you actually have to do something with it. If you are like me, it sits on the counter for a day or so while you think, eh, I’ll deal with that another day. But once you roll up your sleeves and dig in you realize, it’s not that bad. You cut it, cook it, and then savor the goodness of your efforts.

There are a million things you can do with spaghetti squash. It is one of the more versatile vegetables out there. It makes a great side dish no matter what you are serving and you can pair it with just about anything.  I choose to make this stuffed spaghetti squash with curry seasoning and chick peas, but really, anything goes! Try this recipe out or send us your favorite.  Enjoy the squash, enjoy the start of fall, and here’s to a fun transition into all the goodness this season has to offer.

Ingredients

2 small spaghetti squash (about 1 1/2 lbs each)
1 cup cooked chick peas
1 small red onion, sliced
1/2 cup oil-packed sun-dried tomatoes, drained and thinly sliced
1/3 cup golden raisins
1 Tbsp finely chopped jalapeno chili
1/2 cup light coconut milk
1 1/2 tsp curry powder
2 Tbsp thinly sliced basil, optional

Method

Preheat oven to 375 degrees.

Pierce squash in several places with knife. Microwave on high for 3 minutes to soften. Slice off ends, and stand squash upright. Cut straight down length of squash. Remove seeds with spoon. Place halves cut side down on rimmed baking sheet and add 1 1/2 cups water to cover surface. Bake 30 minutes or until squash yields when pressed.

Cool squash cut side up 10 minutes. Scrape squash halves with fork to release strands. Transfer strands to a large bowl and stir in chick peas, onion, sun-dried tomatoes, raisins, and jalapeno. 

Whisk together coconut milk and curry powder in bowl. Stir into squash mixture and toss to combine. Season with salt and pepper to taste.

Fill squash shells with mixture and return to baking sheet, cut side up.  Bake 20 minutes or until heated through. Top with basil and serve.

Bring It!

Wrap each half in foil and ask host if you can place in oven when you get there.


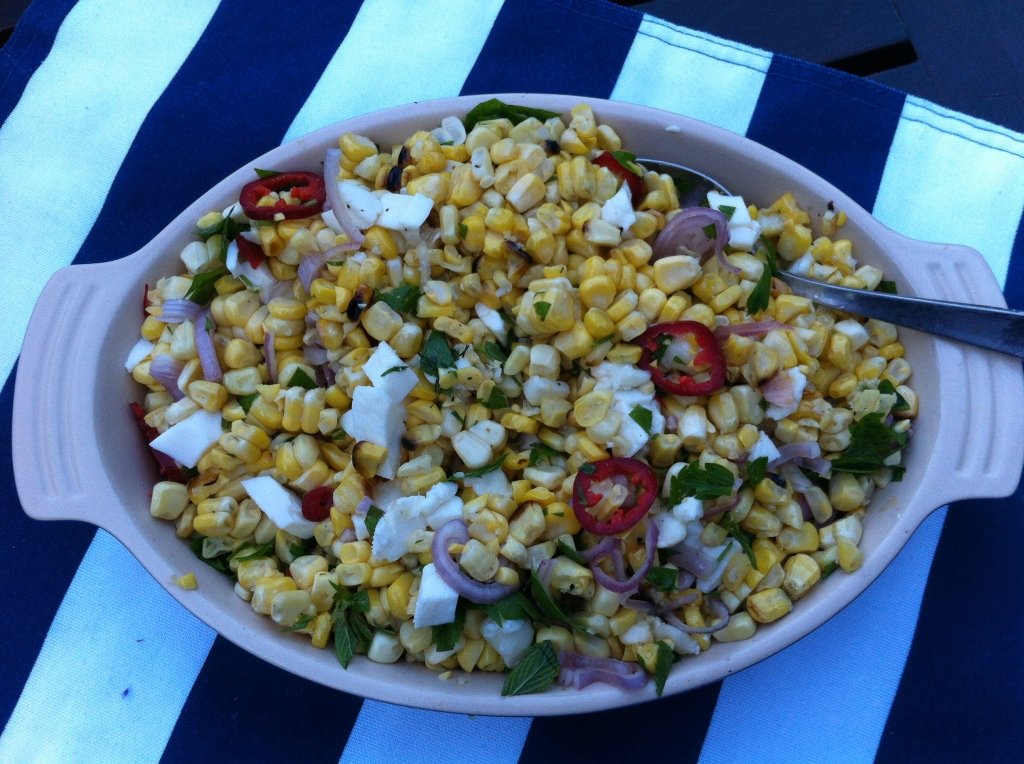
Corn a plenty! Charred and Raw Corn Salad


When you can't quite make it to your favorite Mexican food truck, try this.

Can’t quite make it to your favorite Mexican food truck? I feel your pain. But try this and you’ll feel better.

This just in: You can refrigerate fresh tomatoes with no ill effects to their taste or texture. I realize this may seem of little consequence to many. But for those of you who have pounds of luscious fresh tomatoes on your counter tops, diligently saving them from “ruin” in the fridge while trying to think of ways to use them before they rot…for you this is a revelation. Read all about the science of it here at Serious Eats, or just take my word for it and reclaim your counter space right now. You’re welcome.

And now, on to the pure gold of the late summer harvest. Fresh corn. Oooh baby do we have fresh corn and is it ever good! Around this time every year my kids ask when we are going to stop having fresh corn every night. My answer is always the same: “Until it’s gone.”

In my search for a fabulous recipe using fresh corn, I made some pretty good savory corn pancakes and explored all the “easiest ways to grill corn” including soaking and removing the silk but not the husks (got an update for you: not that easy!), but none of the recipes really seemed blog worthy. My very favorite uses for fresh corn are inevitably not recipes but impulses: adding it to jarred salsa; making it the star if its own salsa with leftover guacamole fixings; or just tossing it into a salad or frittata. It sort of becomes a happy, use-me-capriciously-while-I’m-here condiment.

Indeed, no fresh corn recipe really spoke to me until Tania, my Rocky Mountain correspondent, sent me this Charred and Raw Corn recipe from Bon Appetit, which has all the goodness of fully-loaded Mexican grilled corn without the hand-held mess. After making it four times in a week I can say it is one of my faves, in taste and in method. It features a truly easy way to grill corn, for use in salads or salsa or for just plain eating off the cob, which to me is still the best way to eat fresh corn.

So, enjoy this totally portable side/salad in the glow of Indian Summer, and get yourself some extra cilantro and peppers just in case you find yourself making it a few more times than you anticipated.

Ingredients

4 ears of corn, husked
1 large shallot, thinly sliced into rings
½ red chile (such as Holland or Fresno), with seeds, thinly sliced into rings
¼ cup fresh lime juice
Kosher salt and freshly ground black pepper
4 tablespoons vegetable oil, divided
2 oz. fresh Cotija cheese or queso fresco, crumbled (I used goat cheese. (*LTOYW)
¼ cup cilantro leaves with tender stems

Method

  • Prepare grill for medium heat. Cut kernels from 1 corn cob and toss with shallot, chile, and lime juice in a large bowl; season with salt and pepper and set aside.
  • Brush remaining 3 ears of corn with 2 Tbsp. oil and grill, turning occasionally, until very tender and charred in spots, 10–12 minutes. Let cool.
  • Cut kernels from cobs and add to reserved corn mixture along with cheese, cilantro, and remaining 2 Tbsp. oil. Toss to combine; season with salt and pepper.

Bring it

Tupperware baby! This dish all about picnics and tailgates.

*I use this often enough that it deserves it’s own acronym. Love The One You’re With. As in, embrace what you’ve got. As in don’t let a few missed ingredients spoil the moment. As in, when you live in New Hampshire you won’t find Mexican specialty cheese at the corner store.

Apple Cake with Brown Sugar Frosting

It's apple picking season!

It’s apple picking season!


It’s apple picking season, hooray! I love this time of year when there are so many variations of apples and you want to try them all. To celebrate, we’ve decided to make September’s ingredient of the month apples. And so it’s time to get going with your apple tasting, apple picking, and apple recipes. I’m sure this will keep you busy for a while.

I was trying to think of what I wanted to post using apples, when on a hike a friend mentioned an apple cake he made recently. He was explaining the recipe and my mouth was watering for the next 10 minutes. I asked him for the recipe and it was from one of our favorite sites, King Arthur Flour. And so, I went home, bought the ingredients and went to work chopping, mixing, and baking. All was going well until I realized I was making this cake on a Monday night and I had no plans to go anywhere this week except driving the kids to soccer. What was I to do with a whole apple cake! I threatened my blog partner that I was going to drop it at her house under the cloak of darkness so she couldn’t refuse. Not that either of us didn’t want a piece or two – but a whole cake? You’ve seen my dessert posts – you know how much I like dessert!  This was very dangerous.

I decided to see if my husband and son would dig into it for dessert that night and maybe make a dent in it. They are big fans of dark chocolate so I wasn’t sure an apple cake would trump the specialty chocolate in the cabinet. Sure enough, one piece led to two, which lead to many more slivers until much of the cake was gone. Needless to say, it was a huge success. Make this cake, but be sure you have plenty of people to share it with or you might be on a cleanse the next day to ward off the sugar coma!

Ingredients

Cake
2 1/3 cups flour
1 2/3 cups sugar
2 tsp baking soda
1 tsp ground cinnamon
1/4 tsp ground ginger
1/4 tsp ground nutmeg
2 large eggs
1/2 cup (8 Tbsp) unsalted butter, softened
4 cups peeled, cored, chopped apples, about 1 1/3 pounds whole apples
1 cup diced toasted walnuts

Frosting
7 Tbsp unsalted butter
2/3 cup brown sugar
1/4 tsp salt
1/4 cup milk (regular, soy, or almond)
2 1/4 cups confectioners’ sugar
3/4 tsp vanilla extract 

Method

Preheat oven to 325. Grease and flour 9 x 13 inch pan.

To make the cake, mix all of the ingredients in a large bowl except the apples and nuts. Beat until well combined. The mixture will be very stiff and maybe even crumbly. Add the apples and nuts and mix until the apples release some of their juices (I did this step by hand and squeezed a little bit as I mixed). Continue to mix until you form a thick batter, somewhere between cookie dough and brownie batter in consistency.

Spread the batter in the prepared pan, smoothing with wet fingers (wet fingers are key as this stuff will stick to you like crazy and you’ll never get it spread across the pan evenly).

Bake cake for 30-45 minutes (I give a wide range because the recipe said to bake for 45 minutes and luckily I checked the cake at 30 minutes and it was done!). Basically, set the timer for 30 minutes, check for doneness by inserting a toothpick into the center of the cake to see if it comes out clean. If clean, then take the cake out of the oven and let cool. If it needs more time, continue to bake, checking every few minutes.

To make the frosting, melt the butter in a small pan over medium heat. Stir in the brown sugar and salt and cook, stirring until sugar melts. Add the milk, bring to a boil, and pour into a mixing bowl to cool for 10 minutes.

After 10 minutes, stir in confectioners’ sugar and vanilla. Beat well; if mixture appears too thin, add more confectioners’ sugar. Spread on cake while the frosting is still warm. Serve it up.

Hakuna Frittata


Hakuna-Frittata

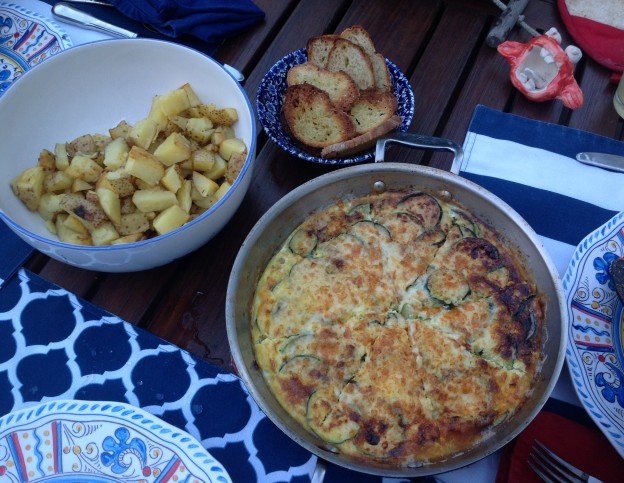
Lots of garden-fresh zucchini finds a happy home (and some sweet camouflage) in this frittata. Watch out–that freaky ceramic salt guy wants a bite of yours.

Stay with me here. This will all make sense. I promise. One of my favorite food sites is Food52, but sometimes I avoid clicking on their emails because it opens a time-sucking Pandora’s box of recipes and ideas. The whole concept of spending oodles of time looking for timesaving ideas is perverse and ends up making me angry, after much time is gone forever. BUT, all that anxiety aside, one of my go-to features on Food 52 is their “How to make X without a recipe.” Learning a method vs a recipe really sets you free because you never have to worry about having exact ingredients, exact amounts or an Internet connection.

One anytime meal for which I never ever use a recipe is a frittata. I can’t be 100 percent certain on this but I read (while looking for something else no doubt) that frittatas were actually invented to use up leftovers. If that’s not enough to make them the home cook’s best friend, consider these features: they use simple ingredients that are pretty universally loved and that you usually have on hand; they are infinitely tweakable for food issues (unless you are Vegan); they are cheap, quick, comforting and tasty. Yes folks, frittatas will indeed set you free.

When you are thinking of something simple yet substantial to serve for dinner or breakfast, or of something nutritious that you can eat hot or cold on the road, or of a quick, easy dish to bring to a pot luck, or of what you can make right now (when you are not busy), to eat later (when you are so busy you can’t take time to boil water)—in all these situations you can either starve, lament your inability to plan menus, buy $60 of takeout or…you can Hakuna Frittata.

That’s right. Go ahead and sing the rest of the verse, if only to pay back your kids for years of Lion King songs stuck in your head….It means don’t worry, as long as you have some eggs.

I went ahead and looked on Food52 and sure enough they beat me to it with How to Make Any Frittata in Five Steps. If you think you can resist the rabbit hole of fabulous recipes, pictures and ideas on Food 52 check theirs out. If, like me, you thrive within Internet boundaries, check out my version here. I have purposefully not included exact amounts, but rather loose guidelines which beg to be challenged:

Ingredients:

  • Onions etc: 1 cup or so of diced onions or something in the onion family, like leeks, shallots, scallions. You can use a combo of them as well.
  • Seasonings: salt, pepper, dried or fresh savory herbs of choice.
  • Vegetables: Any veggies you like or have on hand: Broccoli and cauliflower–good. Leftover roasted potatoes–so Spanish of you! Fresh corn and peppers–yum. Last night’s roasted root vegetables–yep. A whole lot of zucchini from the neighbor? Bring it on!
  • Meat option: Cooked meat like bacon, crumbled sausage, ham, cut up chicken or turkey.
  • Eggs: Start with about eight for a normal frying pan. You can work up or down from there depending on what you have.
  • Cheese: A handful or more of your favorite. Cheddar is king here, but dollops of soft goat or ricotta works well too. Go Gruyere to pretend you’re in the Alps. If you’re feeling a little mean or lactose intolerant or both you can skip the cheese.

 Method:

Saute the onions in some olive oil or butter or a mix of both. Sprinkle some salt on them as they cook. If you are cooking for someone on a low sodium diet make sure they are not looking during this step.

When softened add other veggies. Cook them up until all browned and yummy looking. Here is where to add fresh or dried herbs of choice and let them ramble around with the veggies at the end of cooking.

This is a good time to stir in the meat, if you are using it.

Whip up eggs with a fork or in a blender, and pour them into hot skillet. Lift up the edges a bit as the eggs cook so that the uncooked parts run onto the hot part of the skillet. A little omelet art is in order here.

When the eggs are getting near set, sprinkle on the cheese and put the whole shebang under the broiler until is it browned to your liking.

Serve it up hot or at room temp and enjoy realizing that there is only one pan to clean. Go you!


Summer Vegetable Curry

Beautiful summer vegetables in full swing

Beautiful summer vegetables in full swing

I saw this recipe for summer vegetable curry and I thought, what better way to round out the summer than to make a dish that uses lots of summer vegetables that are in full harvest right now. You can either go to your local farm stand or farmers market to load up on these vegetables.  Or, if you are talented enough to grow your own vegetables, then a short trip to your garden will probably do it.  Take the vegetables and add the curry spices found in this recipe, and you’ll have a dish packed with flavor.

This is a simple recipe.  All you need to do is prep the veggies and mix the spices first.  Then, it’s just a matter of throwing things in from longest cooking time to shortest. You can serve over brown rice or quinoa. And definitely have a chutney on hand. Or, I used this amazingly good tomato chile sauce that I found at the farm stand where I bought the vegetables.  But, whatever the topping, you’ll feel like you’re maximizing summer for all that it has to offer.

Ingredients

2 Tbsp vegetable oil
1 large onion (2-3 cups sliced)
2 cloves garlic, minced
1 Tbsp peeled and grated fresh ginger
1 tsp salt
2 tsp ground cumin
2 tsp ground coriander
1 tsp ground turmeric
½ tsp ground fennel
½ tsp ground cardamom
¼ tsp cayenne 
1 cup sliced carrots
3 cups sliced zucchini or summer squash
1 red, yellow, or orange bell pepper
1 1/2 cups water
2 cups chopped fresh tomatoes
1 1/2 cups corn kernels
4 cups chopped kale or baby spinach
1/2 cup chopped cilantro

Method

Before you begin to cook, shuck the corn and steam for 10 minutes.  Let cool and cut kernels off the husks.

To prep the onion, slice in half end to end and cut into half inch thick slices. Mince the garlic and grate the ginger. Then cut the carrots into 1/4 inch thick rounds, then halve or quarter depending on the diameter of the carrot. Same with the zucchini. Chop the pepper into roughly ½ inch pieces.

In a large skillet or soup pot, warm the oil over medium low heat. Add the onion, garlic, ginger and salt and cook for 5 minutes. Increase the heat to medium and add the spices. Stir for a minute or so. Add the carrots and 1 1/2 cups of water and bring to a simmer. Cover and simmer gently for 3-4 minutes. Add the bell pepper, zucchini, and kale, stir well, cover, and cook for about 5 minutes, stirring frequently. Stir in tomatoes, cover and cook until the tomatoes release their liquid. Stir in the corn and cook covered for 5 minutes. Add the cilantro, stir, and serve right away with chutney or tomato chili topping.