Gnocchi Verde

Kale GnocchiI was driving home from a great visit with my family in Connecticut the other day, which is a 4 hour car ride.   This is an easy drive, but one still needs a good plan with books on tape, radio shows, and downloaded podcasts to get you through without too much twitch. I planned it perfectly so that I could listen to a full, uninterrupted hour of Lynne Rossetto Kasper on The Splendid Table. It made one of the four hours pass very quickly (if you don’t know Lynne, go to this link and check it out – she’s great!). I adjusted the sound, sat up straight, and got ready to absorb as much information as I could. There are food experts, new recipes, seasonal fare, cooking lessons, guest questions, and so much more for all the foodies out there. I was psyched!

One of the stories on Lynne’s show that day was how to make kale gnocchi. I thought, I love kale, but I don’t eat gnocchi – it’s too much starch. But if I substitute the kale for the potato in the gnocchi I might be in business. Plus, there are so many recipes for kale salads, kale chips, braised kale, kale with pasta, and so on. But kale gnocchi was something new. So, I listened in and tried to remember the tips and tricks from Lynne’s description of how to make these from scratch.

I got home, picked fresh kale from my garden (PS I love my garden this year – new raised beds are making me very happy!) and got started. It was my first time through so it took a bit of time to make but they are actually very easy and could be thrown together in a flash now that I know the routine. These nuggets are delicious and a fun way to use the abundance of kale out there now.

Eat more kale!

Ingredients

4 lbs. kale (or Swiss chard), ribs removed
5 Tbsp fresh bread crumbs
2 eggs
1 cup plus 2 Tbsp ricotta cheese
1 cup parmigiana-reggiano cheese, plus more for topping
Dash of nutmeg
Salt and pepper
All-purpose flour for dusting
Olive oil (or butter)

Method

Clean kale and remove ribs. Tear into small pieces and blanch in boiling water for 3 minutes. Remove with slotted spoon to ice bath and let cool. Once cool, ring out excess water by squeezing and chop. Set aside.

Put bread crumbs in food processor and processes until finely ground. Add kale, eggs, ricotta cheese, parmigiana-reggiano cheese, nutmeg, salt and pepper, and process until mixed well. Taste and add salt and pepper as needed.

Fill pot with water and bring to gentle boil. Meanwhile, flour work surface and hands, then roll mixture into smallish balls. Drop balls into boiling water (if water is boiling too hard it will break gnocchi apart). Boil for 5-6 minutes and remove with slotted spoon to plate covered with paper towel. Let dry.

Place gnocchi in shallow baking pan, drizzle with olive oil and sprinkle with cheese. Broil for a few minutes until cheese is melted and just starting to brown. Serve immediately.

YUM!

THE Panzanella

PANZANELLA

It’s toasted bread! It’s veggies! It’s panzanella coming to the rescue!

First off, apologies all around for the technical difficulties last week, and to those of you who got a sad, gray, “Legacy IP DNS blah blah” message instead of a recipe for Watermelon Rosemary Lemonade. Thanks to a kind man named Piotr who desperately needs a vowel, we are back up and running. Now, on to this weekend.

Some recipes you just have to know. Ina Garten’s panzanella is one of them, especially in summer. In addition to being a way to use a whole lot of summer’s best produce, it’s easy to prep, easy to bring, easy to assemble and it’s DELISH. Plus, it’s a way to eat crispy bread and call it dinner (or breakfast if you can’t help yourself the morning after). Ina (AKA The Barefoot Contessa, and the goddess of bringing it) has many panzanellas in her repertoire, including an awesome greek version, but if you only master this one (and you will on your first try) the Kingdom of Picnic Greatness is yours. 

As I mentioned in the recipe for Asparagus Panzanella, you can use your imagination, your cravings and the contents of your produce bin to tweak panzanella in all kinds of ways. It’s a tasty go-to on some seriously hot days. And by the way, if you live in the Upper Valley and are looking for some places to cool off check out this post on Swimming Holes and Soft Serve.

Ok peeps, stay cool out there!

Ina’s Panzanella

Serves 12

INGREDIENTS

For the Salad:

  • 3 tablespoons good olive oil
  • 1 small French bread or boule, cut into 1-inch cubes (6 cups)
  • 1 teaspoon kosher salt
  • 2 large, ripe tomatoes, cut into 1-inch cubes (I have used halved cherry or grape tomatoes as well.)
  • 1 hothouse cucumber, unpeeled, seeded, and sliced 1/2 inch thick
  • 1 red bell pepper, seeded and cut into 1-inch cubes
  • 1 yellow bell pepper, seeded and cut into 1-inch cubes
  • 1/2 red onion, cut in half and thinly sliced
  • 20 large basil leaves, coarsely chopped
  • 3 tablespoons capers, drained

For the vinaigrette:

  • 1 teaspoon finely minced garlic
  • 1/2 teaspoon Dijon mustard
  • 3 tablespoons champagne vinegar
  • 1/2 cup good olive oil
  • 1/2 teaspoon kosher salt
  • 1/4 teaspoon freshly ground black pepper

Method:

Heat the oil in a large sauté pan. Add the bread and salt; cook over low to medium heat, tossing frequently, for 10 minutes, or until nicely browned. Add more oil as needed.

For the vinaigrette, whisk together the ingredients.

In a large bowl, mix the tomatoes, cucumber, red pepper, yellow pepper, red onion, basil, and capers. Add the bread cubes and toss with the vinaigrette. Season liberally with salt and pepper. Serve, or allow the salad to sit for about half an hour for the flavors to blend.

Bringing it:

You can prep the bread, veggies and vinaigrette in advance and store in their own containers. Mix it all up on site a half hour before serving.

Watermelon 911

 watermelon1

We’ve all been there. It’s the height of summer and you get a watermelon every time you go by the big bin of them in the store because it just seems like the right thing to do. You can get ambitious and whirl it into watermelon gazpacho or mix up some watermelon sangria or just cut it in cubes for snacks. Inevitably you reach the point where a watermelon hangs around a tad too long so you give it precious fridge space. And then by some crazy plot twist you end up with another watermelon. You’ve got yourself a watermelon emergency. What do you do?

Well you start drinking of course. And you drink watermelon juice. In the name of research I watched nearly all of a six minute video on making watermelon juice until I realized it was just an excuse for people to watch a hot yoga instructor with expressive hands talk breathily about her “watermelon secret.” I felt so violated. There is no secret here—just throw watermelon chunks in a blender and press the button. I should have used my time to watch this video, inspired by a facebook find from Sister B:


In honor of Sister A, I wanted to put my watermelon juice to good use by making a big batch of cocktails, but the week was young. Soooo, with inspiration from Sandy’s freezer dacquiris I froze the whole batch in my brilliant rectangular Tupperware pitcher. Now, my fridge has been freed, I’m still stone sober, and I’m ready for a weekend expedition without needing to find ice packs for the cooler. Boom!

A few details, as ever. This drink, inspired by Food52’s  Boozy Watermelon Lemonade, relies on rosemary simple syrup for sweetness. It’s well worth your time to make up batches of simple syrup, with various flavorings (mint, rosemary, citrus, peppercorns, etc, etc) and have them on hand to fancy up everything from iced tea and plain old seltzer to your firewater of choice. Inspired by my favorite Aveda shampoo, I added some mint to my rosemary syrup as it steeped because, why not?

This is an excellent non-alcoholic drink as well, but don’t freeze it without the booze or you’ll have one huge ice cube. I made this drink with gin because it has that little edge to it. But feel free to use vodka or whatever feels right to you. And finally, this recipe is easily scaled up or down, so if you’re on a date just change cups to ounces.

Now let’s get mixing. The weekend’s a comin’ and you need to free up that fridge for bacon and burrata!

Watermelon Rosemary Lemonade

Serves lots

Ingredients:

  • 5 cups watermelon juice *
  • I ½ cups rosemary simple syrup **
  • 1 ½ cup lemon juice, lime juice or any combo of the two, fresh squeezed (or use that frozen minute maid juice I won’t tell!)
  • 1 ½ cups seltzer
  • 3 cups gin

 Method:

Combine first four ingredients and stir well. Pour the mixture into a large pitcher. Add gin if using. Stir to combine. Serve over ice in jars garnished with a rosemary sprig or fresh mint or both. If freezing this for later, do not add seltzer and allow to freeze at least 8 hours and up to a day. Remove from freezer and stir/scrape it into Slurpee form. As it thaws it will get easier to pour. If there are leftovers just refreeze them. 

*To make Watermelon Juice (no thanks to Yoga woman)

Chunk up a watermelon and puree it in a blender in batches. Pour juice through strainer (if desired, and definitely if freezing) and into a wide bowl. Save yourself sticky anguish and do this over the sink. Transfer to a pourable container if not using it right away.

** To make Rosemary Simple Syrup (thanks to the Kitch’n)

Ingredients:

  • 1 cup sugar
  • 1 cup water
  • 4 fresh rosemary sprigs

Method:

Stir together first 3 ingredients in a medium saucepan over medium-high heat. Bring to a boil, stirring occasionally, and boil 1 minute or until sugar is dissolved. Remove from heat, and let stand 30 minutes. Pour liquid through a wire-mesh strainer into a cruet or airtight container, discarding rosemary sprigs. Cover and chill 4 hours. Garnish, if desired. Syrup may be stored in refrigerator up to 1 month.

Makes about 1 1/2 cups.

Mini Banana Muffins

Mini Banana Muffins III know it’s the height of summer and the gardens are bursting with fresh produce. I really wanted to write about kale or Swiss chard or basil.  My garden is overflowing with these greens and there are many other veggies and fruits on the scene as well. However, I felt I would be remiss in not posting this recipe for banana muffins. These are seriously the best banana muffins I have ever tasted. I kid you not! They are healthy too.

‘These muffins come to you from my friend Janeen. She is beyond talented in the kitchen and has a knack for creating her own twist (click here to check out her website for hand crafted cookies).  Next I promise, you’ll see a post with something from the summer bounty. But for now, make these muffins and count yourself lucky to be in Janeen’s circle. Some day when she’s a famous blogger and TV personality, you can say you first saw her on Bring It Eats.

Happy summer everyone!

Ingredients

2 cups almond meal
1/4 cup unsweetened coconut
3/4 tsp baking soda
1/2 tsp baking powder
1/4 tsp salt
2 very ripe bananas, mashed
2 eggs
1/4 cup pure maple syrup
3 Tbsp coconut oil, melted
1 tsp vanilla
1/2 cup chopped walnuts 

Method

Preheat oven to 350 degrees and line muffin tins with paper or foil liners (I used mini muffin pan).

In a large bowl, mix together dry ingredients – almond meal, coconut, baking soda, baking powder, and salt.

In a medium bowl, mix together wet ingredients – banana, eggs, melted coconut oil, maple syrup, vanilla.

Add dry ingredients, all at once, to wet ingredients. When batter is almost completely mixed add in walnuts. Mix to combine well but do not over mix.

Spoon into prepared muffins tins. Fill ¾ full. Bake 20 minutes, until toothpick inserted into the center of a muffin comes out clean. Serve warm and eat immediately. Store in plastic bags and eat over several days. Or freeze and pull them out as needed.

Beet Caviar—for the No Roe Gourmet


beet-caviar

Meaty, beety, sorta sweety. Keep some of this in your fridge to fancy up any toast or cracker.

Yes, summer should be about melons and berries and fruity deliciousness. But let’s have a moment with beets, shall we? They are hearty but also virtuous, sneakily sweet without being considered dessert. Put them with a few other secret ingredients (like dates, walnuts, and a dollop of creme fraiche) and they are downright decadent. Speaking of secret ingredients, a note here on the booze: When using bourbon I went a little overboard once and it was overpowering. Stick with the 2 Tbsp. And if you’re not into booze, try using some good apple cider instead.

Roast a load of beets, however you like to do them, and keep them in the fridge for this, or easy deconstructed salads, or beet hummus or pretty smoothies. And hang in there—fruity summer goodness is coming at you soon…I promise!

Beet Caviar

Lifted from 101 Cookbooks and adapted from The Eastern and Central European Kitchen: Contemporary and Classic recipes by Silvena Rowe (2007).

Prep time: 5 min – Cook time: 60 min

If you have bourbon or vodka on hand, you can use one of those in place of the cognac.

Ingredients:

  • 4 medium beets, washed and trimmed
  • 5 plump dates, pitted and chopped
  • 2 tablespoons cognac (bourbon, or vodka)
  • 4 garlic cloves, peeled and smashed
  • 2 tablespoons lemon juice, plus more to taste
  • 1/2 cup chopped toasted walnuts
  • 3/4 teaspoon fine grain sea salt
  • 3 tablespoons creme fraiche, plain yogurt, or sour cream
  • lots of freshly chopped chives

Method:

Preheat the oven to 400F with a rack in the center. Puncture the beets with a fork a few times, and roast for an hour, or until the beets are completely tender when you test by cutting into the center with a knife.

In the meantime, gently heat the cognac in a small saucepan. Place the dates in a glass bowl, and, when just hot, pour the alcohol over the dates. Jostle around a bit, and soak for at least 10 minutes.

When the beets are cooked and cool enough to peel, remove the skins and chop into cubes. Place in a food processor with the dates, cognac, and garlic. Puree until the texture is to your liking – I left a bit of texture here, but you can go smoother if you prefer.

Transfer to a serving bowl before adding the lemon juice, walnuts, and salt. Taste, and adjust the seasoning if needed. Serve swirled with the creme fraiche* (or on a creamy little mattress of it), and finished with chives.

Serves 6.

*buy creme fraiche, or make your own by one of these two methods, depending on what you have on hand:

Whisk together equal parts heavy cream and sour cream. Cover loosely with plastic wrap and let stand in the kitchen or other reasonably warm spot overnight, or until thickened. Cover and refrigerate for at least 4 hours. The tart flavor will continue to develop as the creme fraiche sits in the refrigerator.

or…Mix one cup of room temperature heavy or whipping cream with two tablespoons of butter milk in a glass jar and cover. Let it stand at room temperature for 8 to 24 hours, or until it thickens. Stir well and refrigerate for up to two weeks.

Spicy Salmon on a Stick

Fish on! Pure goodness on the grill…and a pro photo by Tania. The single skewer technique is for risk takers. Two skewers per kebab makes the grilling and flipping easier.

I know. It’s the 4th so you’re thinking burgers and dogs on the grill. It’s All American, it’s easy and it’s good. But one of many happy consequences of having the 4th fall on a Saturday is that it makes for a really long weekend. And that means more opportunities to get your grill game on. It is the perfect time to try something new. For me, that was salmon kebabs. I’m slightly intimidated by cooking fish on the grill in the first place, but cubed fish? With little lemon slices? This was a leap.

It was so worth it. This recipe came to me from my Rocky Mountain Correspondent Tania, purveyor of all things spicy and delicious. She also happens to be a fantastic photographer (of fast ski racers and food). She advised me to get the salmon skinned at the store which I did. My fish mongress tried to boss me otherwise (it was from a loving not lazy place, because she likes the skin) but I persevered and am so glad I did. Who wants bits of salmon skin at clean up time? Correct—not me.

I was nervous that the fish would fall apart, or be a pain to skewer or just not be that good, but it was pretty easy and very tasty. One slacker note: I wanted to skewer these a few hours ahead of time, so I did this before prepping the salmon with the oil and spices. Just before grilling I brushed them with oil and rolled them in the spice mixture which I had spread on a baking sheet. Second slacker note: I could not wade into the garden to find my fresh oregano so I used dried. Again, it was really good, but I know in my heart it could have been even better. These are the sacrifices we make.

Spiced Salmon on Skewers

By guest cook Tania Coffey via Bon Appetit

Ingredients

Servings: 4

  • 2 tablespoons chopped fresh oregano
  • 2 teaspoons sesame seeds
  • 1 teaspoon ground cumin
  • 1 teaspoon kosher salt
  • 1/4 teaspoon crushed red pepper flakes
  • 1 1/2 pounds skinless salmon fillet (preferably wild), cut into 1-inch pieces
  • 2 lemons, very thinly sliced into rounds
  • 2 tablespoons olive oil
  • 16 bamboo skewers soaked in water 1 hour

Method:

prep: 25 min total: 25 min

  • Prepare grill for medium heat. Mix oregano, sesame seeds, cumin, salt, and red pepper flakes in a small bowl to combine; set spice mixture aside.
  • Beginning and ending with salmon, thread salmon and folded lemon slices onto 8 pairs of parallel skewers to make 8 kebabs total. The parallel skewers are pretty key in keeping the fish stable. Brush with oil and season with reserved spice mixture (or brush and roll entire kebab as described above).
  • Grill, turning occasionally, until fish is opaque throughout, 5–8 minutes.

Serve these with lemon cauliflower couscous, a green salad with everything from your CSA and maybe even some watermelon sangria. Save the burgers for your next bbq—it’s right around the corner. Happy 4th to all!

Summer Salad with Maple Balsamic Dressing

Summer Salad with Maple Balsamic DressingGreens, greens, greens! They are everywhere.  Plus, strawberry season has been outstanding.  I can’t stay away from my local farm where they have pick-your-own strawberries.  You can easily pick 5 pounds of strawberries in about 15 minutes.  GREENS and STRAWBERRIES must be prioritized so do what you can to get those two items to the top of the list.  Then once you have all these fresh greens and berries at home, why not combine the two in this wonderful and easy summer salad.  
This salad that will take you 4 minutes to put together….yes, literally 4 minutes. You shred some fresh lettuce, slice some strawberries, sprinkle with nuts (I used salted, roasted pistachios), and add a little feta cheese. Voila, you’re done. Oh, right, you still have to make the dressing….okay, so maybe it will take you 15 minutes, tops.

Make the salad, cook some pasta with pesto, toast some bread on the grill and you have a quick easy summer meal that can’t be beat. I just ate this for dinner and it was so light and nice.

Enjoy the long days and all your beautiful salads!

Ingredients

12 cups fresh greens
1/2 cup crumbled feta cheese
3/4 cup toasted nuts (almonds, walnuts, pecans, pistachios, or whatever you like)
1 cup fresh strawberries, sliced

Vinaigrette:
1 Tbsp maple syrup
2 Tbsp balsamic vinegar
1 Tbsp soy sauce
1 clove garlic, crushed
1 Tbsp sesame oil
1 tsp fresh ground pepper
1/2 cup olive oil

Method

In a large bowl, toss fresh greens with cheese, nuts and fruit. To prepare the vinaigrette, mix together all ingredients except olive oil until well blended. Add oil in a slow, steady stream until incorporated. Toss greens with dressing.

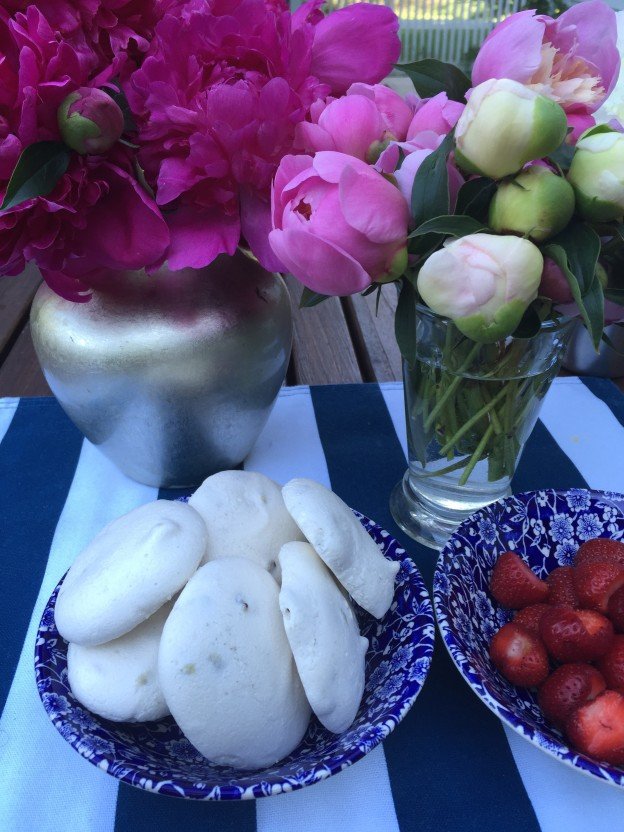
Ooh la la Vegan Meringues

And this just in from the land of weird food science… Don’t pour that chickpea liquid down the drain! That murky stuff has a name (Aquafaba) a purpose (egg white imposter), it’s own site and of course a few facebook pages, of which this is the prettiest.

Does it work in making edible confections? When it comes to edible, I am not the best one to ask (I eat pineapple cores, chunks of raw ginger and watermelon seeds), but trust the 16-year old boy who is skeptical of every “secret ingredient” and super food in his mother’s kitchen. In two days I made two batches of these, and only salvaged three to take to book group. He definitely approved!

So yes, this indeed works. Should you make them? Well heck yes! Here’s the thing. I’m, not really sure what is in chickpea juice, or if it is any better for you than egg whites. This recipe still involves all the same sugar you’d be using with the real thing.

BUT, it may save you: if you run out of eggs, because chances are pretty high you have a can of chickpeas in the pantry; if by dessert time you still need a conversation starter; if Vegans come a visitin’. They will be especially grateful specially if you whip up some coconut cream to go with the meringues.

In honor of French chef Joël Roessel the original aquafabaliste, I give you my version of…

Ooh la la Vegan Meringues

Yield: 30 to 35 meringues
Time: About 2 hours, mostly and happily unattended

Ingredients:

  • Liquid from one 15-ounce can of chickpeas (about ¾ cup)
  • 1 heaping cup granulated sugar
  • 1 tablespoon vanilla extract
  • ¾ cup mini chocolate chips (optional)

Method:

Heat the oven to 250°F and line 2-3 baking sheets with parchment paper. Pour the chickpea liquid (aquafaba) into the bowl of a stand mixer and beat with the whisk attachment until stiff peaks form, about 15 minutes. Gradually beat in the sugar, then the vanilla. Gently fold in chocolate chips, if using.

Scoop or pipe the aquafaba mixture into mounds onto the baking sheets and bake for up to 90 minutes. Start checking them at 1 hour, to make sure they do not start to brown. (The meringues will be hard to the touch.)

Let meringues cool on the baking sheet for 10 minutes, then serve. (Meringues can be stored in an airtight container for up to three days.)


Hot-cha-cha Pineapple Avocado Salad

A spicy little taste of the tropics

Sweet, spicy, juicy, creamy, crunchy…oh yeah baby. Serve me up some paradise!

Feeling hot hot hot? Wanna be cool cool cool? Yes my pretties, you can be both with this little taste of the tropics. This salad, when made exactly as directed, is on the spicy side, so use your discretion on the habanero. You can easily sub in jalapeno for less bite. You know your people. Or, if you live with a bunch of mild-mannered, mild-salsa-eating Yankees go for it with the habanero and get all the leftovers for yourself.

 Ingredients:

  • 1/4 cup olive oil
  • 2 Tbs. fresh lime juice
  • 1 Tbs. fresh orange juice
  • Kosher salt and freshly ground black pepper
  • 1/2 small red onion, thinly sliced crosswise
  • 1 habanero chile, seeded and finely chopped
  • 1 large Florida avocado or 2 medium Haas avocados, sliced 1/4 inch thick lengthwise, then cut crosswise into halves or thirds (here’s a clinic on finding ripe avocados)
  • 1 small pineapple (about 2-1/2 lb.), peeled, quartered, cored, and sliced crosswise 1/4 inch thick (and here’s what you need to know about selecting and prepping pineapple.) PS I am among the freaks who enjoy eating the fibrous core. 
  • scant handful of chopped, toasted almonds, cashews or macadamia nuts (optional)

Method:

Whisk the oil, lime and orange juices, 1/2 tsp. salt, and 1/4 tsp. pepper in a medium bowl. Add the onion and habanero and toss. Set aside at least 10 minutes and up to 45 minutes.

Meanwhile, shingle the pineapple and avocado on a very large flat platter or 2 smaller platters. Using a fork, scoop the onion slices out of the vinaigrette and scatter them over the avocado and pineapple. Drizzle the remaining vinaigrette over the entire platter. Sprinkle with nuts if desired.  Season with a little salt and serve within 1 hour.

Bringing it:

This salad is easy to bring anywhere, deconstructed. It’s also a great salad to bring and prep on a weekend away, because the whole elements travel well and do not need refrigeration. Yes, that means more room in the cooler for vitals.  (I’m looking at you, frozen daquiris and Hero Slaw.)


Banana Berry Smoothie

Banana Berry SmoothieThis recipe is really cool – both temperature cool and hipster cool. And just in time for the start of summer which is only a couple days away!  It is simply frozen bananas and berries in a blender with a touch of almond milk (or whatever milk you have on hand).  Yes, that’s right – bananas, berries, milk, blender. That’s it!  It’s smooth and frosty, light and healthy.  Not to mention good for all ages and can be served any time – breakfast, lunch, snack, or dessert.  What are you waiting for-  get that fruit in the freezer asap so you can make this smoothie soon.

And, wait, there is a bonus, you can add in anything like.  The frozen bananas are merely a vehicle for anything else that floats your smoothie boat.  You can add coconut, chocolate, cherries, strawberries, ginger, nuts, sprinkles, cinnamon, mint, cacao powder, vanilla, almond, Nutella, caramel, sprinkles, whipped cream, blueberries, carob, and oh gosh, I almost forgot – peanut butter (how could I almost forget peanut butter – shame on me!). The list goes on…  

And so, here you go, the recipe (although you don’t really need one -just throw the stuff in the blender, it practically makes itself!).

Rah, Rah Summer!

Ingredients

2 ripe bananas, peeled and chopped into 1 inch pieces
1 cup berries (I used a mixture of raspberries and blueberries)
1/4 cup almond milk, soy milk, coconut milk or any milk of your liking (more as needed)

Method

Place bananas and berries in freezer for at least 6 hours or overnight.

Take bananas and berries out of freezer and let thaw for approximately 45 minutes to an hour (they need to soften a bit before you put them in the food processor but you still want them to be somewhat frozen – you may have to experiment a bit to get the right consistency).

Place bananas, berries and almond milk in food processor and pulse until desired consistency. You will need to stop and scrape down the sides intermittently. Add more milk as needed.

Stir in any add ins such as chocolate chips or nuts, OR blend in any add ins such as peanut butter or vanilla extract.