Monthly Archives: January 2015

Super Snacking and Hail Mary Coconut

In honor of Super Bowl Sunday I’ve been searching for a mind-blowing, Super Bowl worthy, totally healthy snack for you to bring and enjoy in front of your TV of choice. Much of my energy and time (while procrastinating on the work I was supposed to be doing of course) was focused on creating the perfect version of Buffalo cauliflower “wings,” the faux meat snack of the moment. I tried making my cauliflower with Sriracha and with maple sweetened hot sauce. I tossed it in coconut oil before roasting, in butter-spiked sauce after roasting, tried it in batters of rice flour, corn flour and wheat flour and in no batter at all.

In the end I came up with some decent versions that I would happily eat. But I get that I have weird tastes. Just because I like something does not mean it’s good enough for prime time. For most people, any of my aforementioned creations would have ended up as a sad extra on a table of Super Bowl snack stars.

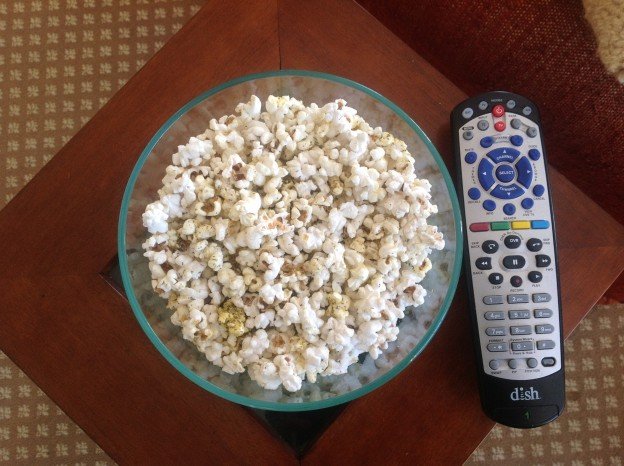
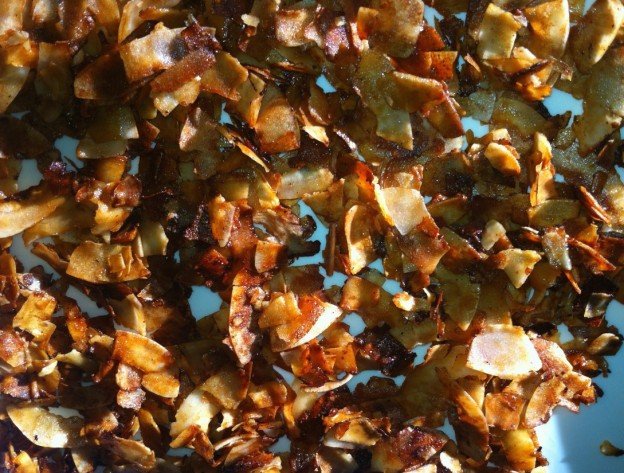
So what’s a girl with no Buffalo cauliflower to do? Why, break out the coconut of course. In a Hail Mary play of snack creation, I turned to toasted coconut flakes, the bacon of the Vegan world. Toasted coconut flakes are ridiculously good as is, and even better with a sprinkle of sugar and salt as they bake. This version, however—extracted from an overly fussy recipe for stuffed sweet potatoes, and made on a happy whim—elevates them to Super Bowl worthy heights.

But don’t trust me on that. Trust the teenage boys who ate these flakes of sweet, savory deliciousness by the handful even before they figured out how good they’d be on ice cream. (Ahem, they’re awesome on salads, stir fries, soups, rice, etc as well.)

Of course, man and woman cannot live on coconut alone, so scroll down and check out our list of favorite Super Bowl worthy Bring It! fare. And may the best team win, especially if they’re the Patriots.

Hail Mary Coconut

Ingredients

1 3/4 cups large, unsweetened coconut flakes
1 Tbsp maple syrup
1 Tbsp soy sauce
1/2 tsp freshly cracked black pepper
2 tsp Worcestershire sauce
2 tsp toasted sesame oil

Method

Preheat the oven to 350 degrees. Line a large, rimmed baking sheet with parchment paper. (you can go without parchment, but the coconut may brown faster on a dark pan and you’ll have a little cleanup.)

Toss the coconut in a large mixing bowl with the maple syrup, soy sauce, black pepper, Worcestershire and sesame oil until evenly coated.

Spread in a single layer (make sure you use the coating) on the baking sheet. *Bake for 10 minutes; stir it around and spread it back out on the baking sheet; bake for 5 minutes, until the coconut has browned.

*Set a timer and check on it. Burnt coconut is so sad!

Let it cool, during which time the coconut will crisp up and get all bacon-y. If you’re not going to use it right away, transfer the cooled coconut to an airtight container.

SPRING UPDATE

Here’s another version, a riff on the recipe on the back of Bob’s Red Mill coconut. Ironically, Bob’s coconut isn’t that great for this. Let’s Do Organic is way bigger and better.  The takeaway here is letting the seasoning soak into coconut for 10 minutes. That and the use of apple cider vinegar which makes it even Vermonty-er.

 Ingredients:

  • 3 cups unsweetened coconut flakes (the bigger the better.)
  • 2 Tbsp Olive oil
  • 2 Tsp Maple Syrup
  • 1 Tbsp soy sauce
  • 1 Tbsp cider vinegar
  • 1 tsp liquid smoke (optional, but a nice touch)
  • ½ tsp cayenne pepper

Method:

Preheat oven to 325°F. Line a rimmed baking sheet with parchment paper, a silicon pad or spray with pan spray.

Whisk together soy sauce, molasses, liquid smoke, olive oil and vinegar. Add Bob’s Red Mill Coconut Flakes and mix well. Let sit for 10 minutes so the coconut absorbs all the liquid.

Spread coconut in an even layer on the prepared baking sheet.

Bake at 325°F until deeply toasted, about 15 – 20 minutes. Stir often! (About every 3 – 5 minutes.)

Let “bacon” bits cool completely then store in an airtight container. They can easily be re-crisped in a low oven for 5 minutes.


Bring It! Super Bowl Can’t Go Wrong Picks

Game Day Chicken Wings

Game Day Pulled Pork

Chicken Taco Chili

People’s Choice Cornbread

Nootch Popcorn

Bacon Wrapped Dates

Funitella Bruscetta

Guinness Fondue

Nuts!

Game Day Chicken Wings

Chicken WingsThis is the time of year when many people are looking for game day food. I have to admit, I don’t follow professional sports, but regardless, I still like thinking about game day food and I know chicken wings are a tradition. I found this great recipe for Asian BBQ Chicken Wings made in a crockpot. The description had me at “Asian and BBQ”. Here’s why….

….my family loves both. When I met my husband, he asked me to come to his house for dinner. On our first date, when we were both trying to make good first impressions, he made me BBQ chicken pizza. It was great! The next dinner he made me BBQ grilled shrimp and then BBQ chicken. You don’t have to be a mental giant to see the common thread here. BBQ sauce went on everything!  I quickly took over in the kitchen so as to expand our dinner repertoire, but good for him for trying.  And his love of BBQ sauce has not abated over the past 20 years.  As for the Asian part of the sauce, well, no more need be said, Asian flavoring is always a winner.

Now that you have a little background on why I picked this recipe, I have one more note before we get started…. When I saw this listed as a crockpot recipe, I thought, easy peasy. Then I read the details and realized that you have to brown the wings after cooking them in the crockpot and make the sauce. Now, don’t get me wrong, this recipe is not complicated, but there are a couple steps after the crockpot. I just wanted to provide fair warning, and the extra steps are well worth it.  Have plenty of napkins on hand!

Ingredients

4 lbs chicken wings
8 medium scallions, thinly sliced
1 cup hoisin sauce
3 Tbsp Asian sesame oil
1 1/2 Tbsp minced fresh ginger
1 1/2 Tbsp sambal oelek
2 1/2 Tbsp cider vinegar
Asian chile oil (optional)

Method

In a 5-6 quart slow cooker, stir the chicken wings, all but 2 Tbsp of the scallions, hoisin sauce, sesame oil, ginger, and sambal oelek until the wings are evenly coated. Cover and cook until the wings are cooked through but not falling off the bone, 2 1/2 hours on high or 4 hours on low (the wings can stay in the crock pot on warm for up to 1 hour).

Use tongs to transfer the chicken wings to a large foil-lined rimmed baking sheet. Strain the sauce inot a fat separator and set aside for a few minutes. Pour the defatted sauce into a 2-quart saucepan, add the vinegar and boil over high heat, stirring occasionally, until reduced by half, about 15 minutes.

Position a rack 4 inches from broiler element and heat the broiler on high. Brush the wings with the sauce and broil until browned, about 3 minutes. Turn the wings over, brush them again, and broil until brown and crisp, about 3 minutes more. Brush with the sauce once more before serving and top with remaining scallions. Drizzle with chile oil if using. Serve any remaining sauce on the side for dipping.

Bring It

Place back in crock pot to bring or leave on rimmed baking sheet and cover with foil. It really depends where you are going and timing on when they will be devoured.

Lifechanging PITA crackers

Makes 2 baking sheets of crackers

  • 1 cup sunflower seeds
  • ½ cup flax seeds *
  • 1/3 cup pumpkin seeds
  • ¼ cup sesame seeds
  • 1 ½ cups 150g rolled oats
  • 2 Tbsp. chia seeds
  • 4 Tbsp. psyllium seed husks (3 Tbsp. if using psyllium husk powder)**
  • 1 ½ tsp. fine grain sea salt
  • 1 Tbsp. maple syrup
  • 3 Tbsp. melted coconut oil or ghee ***
  • 1 ½ cups water
  • 6 large dates or dried figs, chopped (optional but yummy)

Flavor variations: Go nutty here and mix in your choice of fresh or dried herbs and spices, like fresh rosemary + garlic powder, or lemon zest + thyme + cracked pepper, or paprika + chile powder + smoked sea salt or whatever!

* Once I ran out flax seeds so I used 1/4 cup hemp hearts and 1/4 cup ground flax. All good.

**I have seen a version without psyllium husks, so give it a whirl without if you don’t have them.

*** Butter works too as long the Vegans aren’t coming over

In a large bowl combine all dry ingredients and the dried fruit if using and stir well. Whisk maple syrup, oil and water together in a measuring cup. Add this to the dry ingredients and mix very well until everything is completely soaked and dough becomes very thick (if the dough is too thick to stir or looks too dry to hang together, add one or two teaspoons of water until the dough is manageable).

Divide the dough roughly in half, and set aside one half.

Place one half of the dough back into the bowl and add your flavorings of choice. Gather into a ball and place it between two sheets of baking paper, directly on your rolling surface (counter, table, whatever). Using a rolling pin, firmly roll out into a thin sheet, approximately the dimensions of your cookie sheet. Remove top layer of baking paper and using the tip of a knife, score the dough into shapes you like (rectangles, diamonds, squares). Repeat with remaining half of dough. Let both sheets sit out on the counter for at least 2 hours, or all day or overnight. Cat owners, plan appropriately.

Preheat oven to 350°. Using the baking paper, slide the dough onto a cookie sheet and bake for 20 minutes. Remove cookie sheet from oven, flip the whole cracker over (if it breaks a bit, don’t worry!) and peel the baking paper off of the back. (Honestly, this is where it gets a little complicated. My best system is to cover the baked crackers with the layer of parchment peeled off the top after the rolling out process. Then, cover that with a pizza peel or another baking sheet and flip the sheet over so the giant cracker is now on the pizza peel. Put the cookie sheet on the counter and slide the cracker off the pizza peel and back on to the cookie sheet. Peel off top layer of parchment and you should have a perfectly flipped cracker sheet). Return to oven to bake for another 10 minutes, until fully dry, crisp, and golden around the edges.

Let cool completely, then break crackers along their scored lines and store in an airtight container for up to 3 weeks.

These are great to snack on as is, or with any type of cheese or bruschetta toppings. Dip them in soup, hummus, fondue, nutella. You name it!


Nootch Popcorn: A short love story

The first time I went to Aspen I fell in love. I was 15, at a US Ski Team camp. In those days, US Ski Team camps were all expenses paid, which is to say, the skiing, lodging and group meals at the International Inn were covered. There was no stipend for shopping in Aspen. So, in my free time I wandered the side streets on the periphery of all the swishy boutiques and expensive restaurants. The two stores I frequented were Gracy’s Thrift Shop and the groovy health food store. After several visits, the only thing I got at Gracy’s was a $6 lavender cashmere sweater that I referred to as “The Lucky Sweater” for reasons totally unknown. But every time I visited the health food store I came away with a bag of the most deliciously savory popcorn I had ever tasted. It was the stuff that leads to obsessions, addictions and possibly health food store break-ins. As much as anything at the time, sadly, it was love.

Time went on, the lucky sweater lost its charm, but I never forgot that popcorn. In subsequent years of craving and searching I deduced that the addictive seasoning was nutritional yeast. And when I thought back to the dark spray bottle that lived next to the popcorn machine in the store, I figured it must have been filled with a tamari/soy sauce misting concoction.

When I was flipping through Thug Kitchen and saw the “Stovetop Herbed Popcorn” recipe, featuring “nootch” (what one calls Nutritional Yeast to make it sound way cooler than, say, Soilent Green), the craving came back all at once.

We’re heading into prime TV snacking season with the Oscars and the Super Bowl so you’ll want to be on your popcorn making A Game. Here’s what you’ll need to do.

Step 1: Make the popcorn. I know you. You have your own favorite way. Hopefully you have a method that does not involve a microwave because those packets add a lot of artificial ingredients and tastes to your popcorn. Some other options: Stovetop, using a heavy covered pot and high heat oil like peanut, grapeseed or coconut; Air pop if you must—it might even taste like something with all the good stuff on top; An actual popcorn maker, like the Mickey Mouse popcorn popper my son got for Christmas nearly ten years ago, around when our microwave broke for good; or do it like Alton Brown does here, in a foil topped metal mixing bowl, à la Jiffy Pop.

Just make a whole bunch. I use roughly 2 Tbsp oil to 2/3 cup corn in the Mickey Pop. Some go with 3 Tbsp oil to ½ cup corn. Whatevs.

Step 2: Make the topping. I love the recipe below, but don’t limit yourself. Spice it up, sweeten it up, toss in some garlic powder if you’re feeling it. It’s your night, baby. If you are using “nootch” for the first time, don’t confuse it with active forms of yeast, like the kind of yeasts bakers, winemakers and beer makers use. Nutritional yeast flakes or powder have a nutty-cheesy flavor and are packed with amino acids, protein and B vitamins. If it comes in a little packet or looks like tiny white pellets you’ve got the wrong stuff. If it’s yellow, flaky and looks alarmingly like goldfish food you’ve hit the jackpot.

Step 3: Do the drizzle. It can be melted butter or olive oil or even truffle oil if that’s your thing. This is what will make your topping stick to the popcorn. True pros infuse the oil with the herbs and hot peppers first. Slackers (ahem, like moi) do not. A spray bottle of Tamari with a little oil mixed in may have been the secret in Aspen. Someday I’ll get myself a mister and find out.

Step 4: Shake it baby. Pour your popped corn into a big paper bag or (less fun but totally ok) a huge bowl so you can add the topping and really mix it in.

Step 5: Grab the remote and enjoy!

The Popcorn

Alton Brown’s way, or use the same amounts in a heavy, covered pot. Makes about a gallon

Ingredients:

3 tablespoons peanut oil
3 ounces popcorn kernels, approximately 1/2 cup
1/2 teaspoon popcorn salt

Method:

Place the oil, popcorn and salt in a large, 6-quart, metal mixing bowl. Cover with heavy-duty aluminum foil and poke 10 slits in the top with a knife. (if using a covered pot leave a gap once the corn starts popping so the steam can escape.

Place the bowl over medium heat and shake constantly using a pair of tongs to hold the bowl. Continue shaking until the popcorn finishes popping, approximately 3 minutes.

Remove the bowl from the heat and carefully remove the foil. Stir in any salt that is on the side of the bowl.

The Topping:

  • 1-2 Tbsp olive oil or melted butter
  • 1 tablespoon dried oregano
  • 2 teaspoons dried dill
  • 1 teaspoon dried thyme
  • 1/2 teaspoon crushed red pepper flakes (or a pinch of cayenne)
  • 1/4 cup nutritional yeast (or substitute finely grated Parmigiano-Reggiano cheese)
  • Fine sea salt, popcorn salt or food processor pulsed kosher salt (all optional)

Method:

Mix herbs, spices and nootch in a small bowl or container.

Pour popped corn into a paper bag (or a big mixing bowl if that’s what you’ve got). While popcorn is still warm, drizzle the oil over it, close the bag and shake to coat the popcorn. Sprinkle on the topping mixture (use your judgment on how much), close the bag and shake to combine. Taste, and add salt if needed. If you have leftover topping store it airtight for the next batch. If not, make a whole bunch more.

Note: Get creative here. If all you manage is nutritional yeast and salt you’ll get the gist. If you can add some herbs and something with a little kick you’ll get the full effect. It’s all good. And I mean really good.


The Mickey Pop doing its thing.

The Mickey Pop doing its thing.

.