Category Archives: Salads and Sides

Cranberries For All

Spicy on the left, straight up classic on the right.

Spicy on the left, straight up classic on the right.

I’m making a bet here. I’m betting you’ve bought some cranberries in the past few days. (Ahem, I did tell you to do that a few days ago.) Perhaps you will use them for Sue’s cranberry apple galette, or maybe, just maybe you are keeping them at the ready for a to-be-determined cranberry sauce.

Trying to decide on the right cranberry sauce is one of those things that should not take up much brainspace. And yet it does. Here’s your answer. Make two sauces: one spicy and odd enough for foodies, and one straight up sweet with just a whiff of sophistication from Meyer lemon zest. Lucky for you, you already have candied ginger and Meyer lemon from your test run of Thanksgiving cocktails.

If you don’t need two batches of sauce (but c’mon, you know you do), just halve each recipe and make everyone happy.

The first recipe comes from my Rocky Mtn Correspondent and favorite cowgirl Tania. The second is a standard cranberry sauce recipe with the cha-cha of our favorite lemon. I have pleaded before but will do so again: Use real Meyer lemons for this. They’re just plain better. If you must substitute just don’t tell me about it and everyone wins.

Cranberry Chutney

Ingredients

2 tart apples peeled, cored and chopped into 1/4″ dice
2 cups cranberries coarsely chopped (or pulsed a few times in the the food processor)
3/4 cup brown sugar
1/2 cup golden raisins
1/2 medium onion diced
3 T crystallized ginger chopped
1 T mustard seeds
2 cloves garlic minced
1 t grated lemon zest
1 t curry powder
1/2 t salt
1/2 t cayenne pepper

Method

Put all ingredients in a pot. Bring to a boil stirring occasionally. Lower heat and cook for about 15 min. Cool and refrigerate.  Can be made a day or two ahead of Thanksgiving.

Note from Tania: I always double and go heavy on all spices because this is so good on leftovers.

Meyer Lemon Cranberry Sauce

Ingredients

Zest of 1 to 2 Meyer Lemons
1 bag of fresh or frozen whole cranberries
1 cup of water
1 cup of sugar
Healthy squeeze or two of Meyer lemon juice

Method

For each 12-oz bag of cranberries (or 12 oz bulk freshies if you have them), heat 1 cup of water and 1 cup of sugar until the sugar has dissolved. Once the sugar is dissolved, bring the mixture to a boil for 5 minutes. Add the cranberries, lemon juice and  lemon zest. Continue boiling for 10 or so minutes until the cranberries start making a popping sound and they are flirting with mushiness. Turn off the heat, and let the sauce cool. Transfer it to a serving container or small mason jars. Let it cool a bit, then stick it in the fridge until you’re ready to use it. It will thicken up as it cools.

Happy Thanksgiving to all!


Butternut Squash Casserole

Savory squash brings out the goodness of fall.

Savory squash brings out the goodness of fall.

For the October Ingredient of the Month, we quickly settled on butternut squash.  It is a perfect fall vegetable and something I always want to cook this time of year.  This recipe is called a casserole.  I always have trouble with this word. I can’t help but think of Cream of Mushroom soup spread over something mushy and unrecognizable.  To help overcome my issue with this word, I looked up the definition and here is what I found:

“A casserole, from the French word for “saucepan”, is a large, deep dish used both in the oven and as a serving vessel. The word is also used for the food cooked and served in such a vessel, with the cookware itself called a casserole dish or casserole pan”.

With this information, I was able to let go of my old definition , which was bringing me down and embrace this new definition. I was now thinking easy.  Who doesn’t want the cook vessel and serving vessel to be the same. The only thing that could make this better is if it were also the eating vessel too! 

I’m glad I forged ahead because this recipe combines some of the great flavors of fall with great flavors of New England – butternut squash, apple cider, and maple syrup. How can you not love this dish?  It’s like candy!  And if you are not already thinking of Thanksgiving side dishes, here is a start. This is definitely going on the list.  Enjoy this easy, tasty dish.

Ingredients

1 small butternut squash, peeled, halved, seeded and thinly sliced
1 small red onion, thinly sliced
1/3 cup apple juice
2 Tbsp olive oil
2 Tbsp maple syrup

Method

Combine squash and onion in 9×13 inch pan. In a small bowl, whisk together apple juice, olive oil, and maple syrup. Pour over squash and onions. Cover with foil and bake 30 minutes. Uncover, bake for 15 more minutes or until tender.

To Peel and Cut a Butternut Squash

Click here to view a You Tube video of how to peel and cut a butternut squash

Sautéed Cabbage with Crisp Apples

Warm cabbage salad

Warm cabbage salad

I can’t stop with the apples! Here’s another recipe to help you use up all those great tart apples you have on hand. It also uses apple cider vinegar and apple cider – so all the bases are covered!

This coleslaw is vibrant, just like the foliage right now…perfect for a fall gathering with friends. You can sauté the cabbage to your liking – wilted, soft, or quite crispy. It’s up to you. And this is quite easy to make so go grab the ingredients and whip this up.

To give full credit, this recipe is from Clean Start, by Terry Walters. I’ve posted other recipes from her cookbooks. They have such beautiful food photos and they are all about “enjoying healthy, delicious, clean food every day”.  

Ingredients

1 medium onion, cut into thin wedges
2 Tbsp Olive Oil
3 cups thinly sliced red cabbage
3 cups thinly sliced green cabbage
1 cup dried cranberries
2 Tbsp mirin
1 apple (tart, firm variety)
Salt

Dressing:
2 Tbsp mustard seeds
2 Tbsp brown rice syrup
1 1/2 tsp apple cider vinegar
2 Tbsp apple cider

Method

In a Dutch oven over medium heat, sauté onion in oil 6 minutes or until very soft. Stir in cabbage and mirin and continue sautéing until cabbage starts to soften (about 4 minutes or to your liking). Remove from heat, add cranberries and set aside.

In a small dry skillet over low heat, lightly toast the mustard seeds for 2 minutes or until fragrant, being careful not to burn. Add brown rice syrup, apple cider vinegar, and apple cider and whisk 1 minute. Remove from heat and set aside.

Core apple and cut into thin slices. Return cabbage to medium heat, add apples, drizzle with dressing and fold to coat evenly through. Season to taste with salt, remove from heat and serve.

Bring It

Easy, just throw it in a bowl and BRING IT! J

Stuffed Spaghetti Squash

Squash goodness is always worth the effort!

Squash goodness is always worth the effort!

With the start of fall, who doesn’t want to enjoy the fall vegetables to their fullest?  I thought what better way to start the season than with spaghetti squash.  However, when you buy a spaghetti squash, it is a commitment. Not only do you have to haul the thing home, but once you get it into your kitchen, you actually have to do something with it. If you are like me, it sits on the counter for a day or so while you think, eh, I’ll deal with that another day. But once you roll up your sleeves and dig in you realize, it’s not that bad. You cut it, cook it, and then savor the goodness of your efforts.

There are a million things you can do with spaghetti squash. It is one of the more versatile vegetables out there. It makes a great side dish no matter what you are serving and you can pair it with just about anything.  I choose to make this stuffed spaghetti squash with curry seasoning and chick peas, but really, anything goes! Try this recipe out or send us your favorite.  Enjoy the squash, enjoy the start of fall, and here’s to a fun transition into all the goodness this season has to offer.

Ingredients

2 small spaghetti squash (about 1 1/2 lbs each)
1 cup cooked chick peas
1 small red onion, sliced
1/2 cup oil-packed sun-dried tomatoes, drained and thinly sliced
1/3 cup golden raisins
1 Tbsp finely chopped jalapeno chili
1/2 cup light coconut milk
1 1/2 tsp curry powder
2 Tbsp thinly sliced basil, optional

Method

Preheat oven to 375 degrees.

Pierce squash in several places with knife. Microwave on high for 3 minutes to soften. Slice off ends, and stand squash upright. Cut straight down length of squash. Remove seeds with spoon. Place halves cut side down on rimmed baking sheet and add 1 1/2 cups water to cover surface. Bake 30 minutes or until squash yields when pressed.

Cool squash cut side up 10 minutes. Scrape squash halves with fork to release strands. Transfer strands to a large bowl and stir in chick peas, onion, sun-dried tomatoes, raisins, and jalapeno. 

Whisk together coconut milk and curry powder in bowl. Stir into squash mixture and toss to combine. Season with salt and pepper to taste.

Fill squash shells with mixture and return to baking sheet, cut side up.  Bake 20 minutes or until heated through. Top with basil and serve.

Bring It!

Wrap each half in foil and ask host if you can place in oven when you get there.


Corn a plenty! Charred and Raw Corn Salad


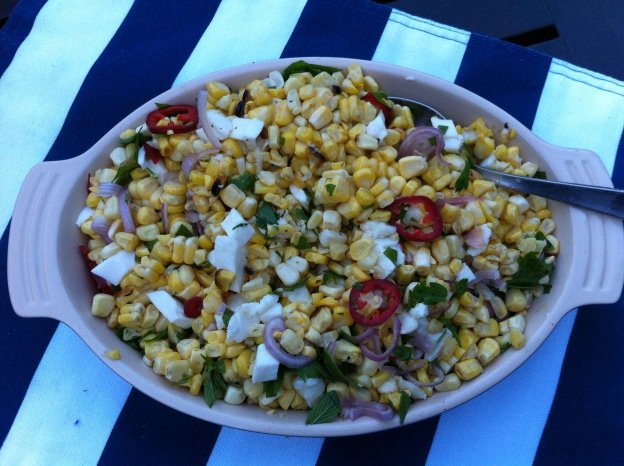
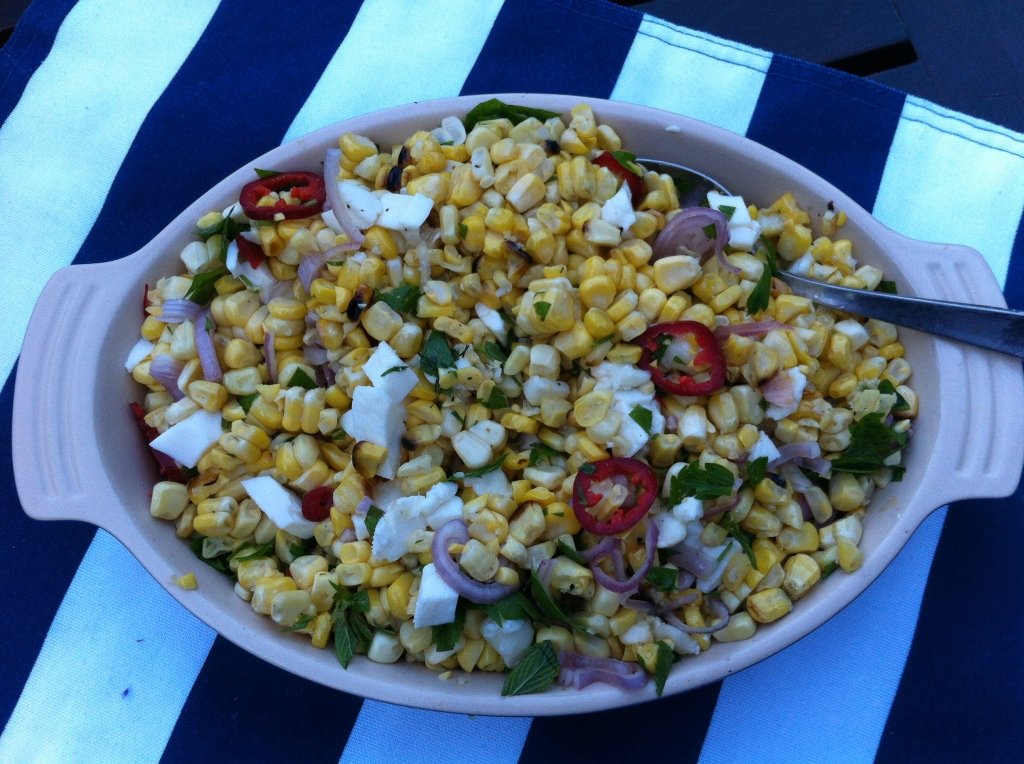
When you can't quite make it to your favorite Mexican food truck, try this.

Can’t quite make it to your favorite Mexican food truck? I feel your pain. But try this and you’ll feel better.

This just in: You can refrigerate fresh tomatoes with no ill effects to their taste or texture. I realize this may seem of little consequence to many. But for those of you who have pounds of luscious fresh tomatoes on your counter tops, diligently saving them from “ruin” in the fridge while trying to think of ways to use them before they rot…for you this is a revelation. Read all about the science of it here at Serious Eats, or just take my word for it and reclaim your counter space right now. You’re welcome.

And now, on to the pure gold of the late summer harvest. Fresh corn. Oooh baby do we have fresh corn and is it ever good! Around this time every year my kids ask when we are going to stop having fresh corn every night. My answer is always the same: “Until it’s gone.”

In my search for a fabulous recipe using fresh corn, I made some pretty good savory corn pancakes and explored all the “easiest ways to grill corn” including soaking and removing the silk but not the husks (got an update for you: not that easy!), but none of the recipes really seemed blog worthy. My very favorite uses for fresh corn are inevitably not recipes but impulses: adding it to jarred salsa; making it the star if its own salsa with leftover guacamole fixings; or just tossing it into a salad or frittata. It sort of becomes a happy, use-me-capriciously-while-I’m-here condiment.

Indeed, no fresh corn recipe really spoke to me until Tania, my Rocky Mountain correspondent, sent me this Charred and Raw Corn recipe from Bon Appetit, which has all the goodness of fully-loaded Mexican grilled corn without the hand-held mess. After making it four times in a week I can say it is one of my faves, in taste and in method. It features a truly easy way to grill corn, for use in salads or salsa or for just plain eating off the cob, which to me is still the best way to eat fresh corn.

So, enjoy this totally portable side/salad in the glow of Indian Summer, and get yourself some extra cilantro and peppers just in case you find yourself making it a few more times than you anticipated.

Ingredients

4 ears of corn, husked
1 large shallot, thinly sliced into rings
½ red chile (such as Holland or Fresno), with seeds, thinly sliced into rings
¼ cup fresh lime juice
Kosher salt and freshly ground black pepper
4 tablespoons vegetable oil, divided
2 oz. fresh Cotija cheese or queso fresco, crumbled (I used goat cheese. (*LTOYW)
¼ cup cilantro leaves with tender stems

Method

  • Prepare grill for medium heat. Cut kernels from 1 corn cob and toss with shallot, chile, and lime juice in a large bowl; season with salt and pepper and set aside.
  • Brush remaining 3 ears of corn with 2 Tbsp. oil and grill, turning occasionally, until very tender and charred in spots, 10–12 minutes. Let cool.
  • Cut kernels from cobs and add to reserved corn mixture along with cheese, cilantro, and remaining 2 Tbsp. oil. Toss to combine; season with salt and pepper.

Bring it

Tupperware baby! This dish all about picnics and tailgates.

*I use this often enough that it deserves it’s own acronym. Love The One You’re With. As in, embrace what you’ve got. As in don’t let a few missed ingredients spoil the moment. As in, when you live in New Hampshire you won’t find Mexican specialty cheese at the corner store.

It’s Labor Day. So g’wan, Beet It!


End of summer yum-fest.

End of summer yum-fest.

I don’t want to be the one to say it, but Labor Day is coming. Too soon too soon! I know. I feel your pain. School has started, signaling the best weather of the summer. That is just so wrong. And that linen you barely got a chance to wear? It’s days away from being banished to plastic bins (if you pay attention to the fashion police that is.)

But here’s the bright side, and the bright side always wins. We’ve got a whole long weekend to pretend it’s still summer, and that homework doesn’t really matter and that we really don’t have to respond right away to every work email. Instead, we will play. And then we will eat, and drink, and we will not worry about what to bring to any gathering because we have so many fabulous dishes to choose from (scroll all the way down for a list of no-fail ideas).

At the top of the list, I propose beets. My friends Ron and Lisa have the Vermont garden everyone dreams about, minus the weeds and deer. On a recent evening they served these beets along with homegrown bounty like purple and blood red tomatoes, and even home grown pork.

The original recipe serves this salad deconstructed into its various elements: greens, beets, cheese, nuts. I took Lisa’s cue and put it all together for ease and deliciousness. Feel free to sub feta for goat cheese. I’ve had both and they are both fantastic. Now, go find a good friend with a garden and beet it!

Ingredients

4 medium beets – scrubbed, trimmed and cut in half
1/3 cup chopped walnuts
3 tablespoons maple syrup
1 (10 ounce) package mixed baby salad greens
1/2 cup frozen orange juice concentrate
1/4 cup balsamic vinegar
1/2 cup extra-virgin olive oil
2 ounces goat cheese

Method

Place beets into a saucepan, and fill with enough water to cover. Bring to a boil, then cook for 20 to 30 minutes, until tender. (Or, as I prefer, wrap in foil, spatter with olive oil ans salt and roast in hot oven until tender). Drain and cool, then cut in to cubes.

While the beets are cooking, place the walnuts in a skillet over medium-low heat. Heat until warm and starting to toast, then stir in the maple syrup. Cook and stir until evenly coated, then remove from the heat and set aside to cool.

In a small bowl, whisk together the orange juice concentrate, balsamic vinegar and olive oil to make the dressing.

Place a large helping of baby greens onto each of four salad plates, divide candied walnuts equally and sprinkle over the greens. Place equal amounts of beets over the greens, and top with dabs of goat cheese. Drizzle each plate with some of the dressing. (Or, throw it all together, toss and enjoy!)


A serious summer spread, complete with fresh caught Nantucket tuna (cooked by blow torch on a Vermont stone wall). Some things just end up working out.

An All Star Summer Revue and Review:

Beets not your bag, baby? Here are some other fabulous brings. Of course, there is THE SLAW, aka Hero Slaw, which is welcome any season at any gathering but is especially excellent as a barbecue co-star…and the lovely Funitella Bruschetta, so brilliant in its simplicity, ease of preparation and universally appreciated tastiness. Never underestimate the power of Bruschetta Deconstructed when you make your toasts from Easiest French Bread Ever. (It’s not even fair how many points you get for making your own toasts with homemade bread, and it’s soooo easy. Top them with fresh tomatoes and burrata and your point total quadruples.)

Keeping it simple you can never go wrong with an armful of fresh farmers market corn, or really anything from the holy trinity of late summer produce (corn, tomatoes and zucchini). It doesn’t get much fresher or easier than zucchini, corn summer swansong salad. Oh, and don’t forget the drinks. A pitcher of Freezer daquiris or watermelon sangria will help you and your friends achieve Hakuna Matata Nirvana one more time.


Bulgur Salad with Fresh Veggies

Fresh from the garden

Fresh from the garden

With the theme of the month being tomatoes, I had my tomato game on. I went to my local farm stand and bought the most beautiful cherry tomatoes. I selected 2 pints of cherry tomatoes that came in vibrant colors — reds, yellows, oranges, and various shades in between. I tasted just a few, as I knew I wanted to use them in my bulgur salad which I would be making that evening. I brought them home, placed them on the counter and went to work on something unrelated to food and the kitchen. My bad! I got back and the tomatoes were gone. I found only remnants of the tomatoes which included a few green stems, a couple odd shaped misfits, and essentially empty containers. I can only blame myself for this rookie mistake. In my house, if I want to make sure something does not get eaten, I put a note on it that says “Do not eat” or I hide it. Neither measure is fail-safe, but rather my feeble attempt at preserving food that might be needed at another time. With my cherry tomatoes gone and my desire to post this luscious salad, I carried on using the two vine tomatoes I had bought a couple days earlier. Not that they were castaways by any stretch, but more a way of saying, beware of hungry family members because they are always out there lurking, ready to grab anything they find that is quick and easy. And who wouldn’t want to eat these beautiful tomatoes. I know they were tempting me.  I will come back another day soon with a tomato post. The consolation prize is that at least the offender was eating healthy instead of tapping into a less healthy snack option!

Now, on to the main event, the bulgur salad…

For this salad, use any grain you have on hand or use your favorite. This recipe happened to call for bulger, but I could have easily used brown rice, quinoa, amaranth, couscous or a variety of other options. What I learned about bulgur is that it is wheat that has been parboiled, dried and cracked into small bits. It cooks quickly and can be added to soups, stews, salads, and more. Use a gluten-free option if you can’t eat wheat.

I got this recipe from one of my newest favorite cookbooks, Forks over Knives, which is just great. It is a collection of plant-based recipes that will keep me entertained for a long time. 

Ingredients

1 1/2 cups bulgur
1 cup cherry tomatoes, halved
1 medium cucumber, halved, seeded, and diced
3 cloves garlic, peeled and minced
4 green onions (white and green parts), thinly sliced
Zest and juice of 2 lemons
2 Tbsp red wine vinegar
1/4 cup rosemary and parsley, finely chopped
Salt and pepper to taste

Method

  1. Bring 3 cups of water to a boil in a medium pot and add bulgur. Remove the pot from the heat, cover with a tight fitting lid, and let it sit until the water is absorbed and the bulgur is tender which will take about 15 minutes.
  2. Spread the bulgur on a baking sheet and let it cool to room temperature.
  3. Transfer cooled bulgur to a bowl and add all the remaining ingredients.   Mix well and let sit for 1 hour before serving so that flavors have some time to blend.
Bulger is a great grain if you want to switch it up

Bulgur is a great grain if you want to switch it up


Cauliflower Couscous

Cauliflower, really?

Cauliflower, really?


This dish is definitely a sleeper. It doesn’t’ look like much but tastes great and nobody can guess that it’s cauliflower. They think it is rice. It looks like rice and is soft like rice, so that is not a bad guess.  And cauliflower rice is all the rage with the Paleo dieters these days, so you’ll be spot on should you serve it to someone on that diet. Also, cauliflower can be used as a pizza crust – who knew?   You can click here for a cauliflower pizza crust recipe, which by the way, I’m going to try next.

I brought this dish to a lacrosse party last night and it was a perfect complement to the plethora of side dishes. We had the standard green salads and pasta salads and potato salads, which were all delicious, and it would have been disappointing not to have them. But nobody had a cauliflower salad. It was fun to have something different and it was fun to play the game of “guess the main ingredient”. So, bust a move and make this for your next party.  It will be both delicious and a conversation piece for sure!

I got this recipe from Green Kitchen Stories and made some very small tweaks. Green Kitchen Stories is a great site and the little girl, Elsa, who helps her mom and dad with the website is just so darn cute! Enjoy the side dish and enjoy Green Kitchen Stories website (beautiful photos too!).

Ingredients

 1 head of raw cauliflower
2 handfuls of parsley and basil (I used cilantro)
1/2 cup toasted pumpkin seeds (I used sunflower seeds)
Juice of 1/2 lemon
Drizzle of olive oil
Salt and pepper
2 cups frozen (thawed) or fresh peas
1 cup feta cheese, crumbled
1/2 red pepper, chopped

Method

Bring saucepan with water to a boil. Meanwhile coarsely chop cauliflower and place florets and stem in a feed processor or blender and process until it is a rice-like texture (don’t process too long or it will be too mushy). You may need to process in 2 batches. Pour blended cauliflower in boiling water and boil 2 minutes. While cauliflower is cooking, chop herbs. Drain the cauliflower ‘couscous’ in a sieve and place in a large serving bowl, toss with olive oil and cool. Once cool to room temperature, add herbs, lemon juice, salt, pepper, and mix well. Then add peas, pumpkin seeds, feta cheese and toss to mix. Garnish with red pepper or whatever you have on hand that has some color. Serve warm or chilled.


Potato Salad with Dijon Vinaigrette, hold the mayo

Picnic basket-Check. Fresh fruit- Check. Potato salad-Check. Rhubarb lemonade. Stay tuned.

Picnic basket-Check. Fresh fruit- Check. Potato salad-Check. Rhubarb lemonade- Stay tuned.

It’s summah! Time to take your dining show on the road. Yeah yeah, like we don’t always do that anyway. But I’m not talking about eating in the car on the way to and from sports practices and games. I’m talking about the almighty picnic. There’s something about putting a bunch of food in a basket that makes it all taste better. (Ok, the one exception is grapes at a sandy beach with kids. That never works out.)

If you’re going to picnic with purpose, you’re going to need some go-to dishes that travel well and stand up to some pretty imprecise serving times. And as it gets hotter you’re going to need a solid potato salad without mayo. This one will do it, and the bonus is that it’s originally from Cook’s Illustrated so every aspect it has been exhaustively tested. What’s even better than a Cooks Illustrated recipe is a Cooks Illustrated has been further tweaked and streamlined by a real world foodie with actual time constraints. For instance, the original version of this involves grilling potatoes. Deal killer. This version is quite easy and quick with pretty basic ingredients. It came right from the top of Food 52’s list of 10 Picnic Dishes To Know, one of many lists I am working my way through. So far it is my favorite. Happy picnicking.

Serves 6 to 8

Ingredients

1/2 small red onion, peeled and roughly chopped
2 lbs new potatoes, scrubbed and cut into bite-sized pieces
Salt
1 Tbsp rice vinegar
Freshly ground black pepper
2 Tbsp finely chopped chives
3 cups arugula, stems removed, washed and dried and very roughly chopped
2 Tbsp red wine vinegar
1 Tbsp Dijon mustard
5 Tbsp good olive oil

 Method

  1. Put the onion in a small bowl and cover with cold water (this will remove some of the bite). Put the potatoes in a large pot of generously salted water. Bring to a boil over high heat.
  2. Lower the heat so the water is barely simmering and cook for about 10 minutes, until you can pierce the potatoes with the tip of a sharp knife and it slips out easily. Drain the potatoes well and pour them into a large bowl.
  3. Gently toss the warm potatoes with the rice vinegar, 1/4 teaspoon salt, and 1/2 teaspoon pepper. Add the chives, arugula and red onion and stir through.
  4. Whisk together the red wine vinegar, mustard and olive oil in a small bowl. Add salt and pepper to taste. Pour over the potato mixture and toss to combine. Serve warm or keep covered at room temperature for up to an hour. 

Shaved Asparagus Salad

Beautiful asparagus ribbons

Beautiful asparagus ribbons

This post is in honor of my dad who taught me everything I know about gardening…

I have been diligently working on growing an asparagus patch for 4 years now. I felt almost self-actualized the other night when I picked enough asparagus from my patch without a supplemental bunch from the grocery store. It was blissful to see all those stalks coming out of the ground in my very own patch. Alas, the ability to pick a whole meal’s worth was short lived, but it was great while it lasted and the asparagus just keeps coming so it’s all good. 

What to do with this treasured vegetable?  I searched websites and cookbooks and talked to friends about their favorite asparagus recipes in order to come up with something interesting. Then I stumbled upon this shaved asparagus salad recipe from a blog called The First Mess.  At first I thought, what a shame to shave all those beautiful asparagus spears. Then I thought, what the heck, let’s give it a try. And oh, was it worth it.  The shaved asparagus spear is such a great way to enjoy this treasured spring vegetable, and it’s always fun to try something new.  As an aside, the shaving technique had a bit of a steep learning curve, but after a few spears-gone-bad, I had it down (NOTE: the key to shaving asparagus is to lay the asparagus flat on the cutting board while you shave, and not try to hold it in the air and peel it like a carrot).

So, here it is, in all it’s spring glory…a modified version of the shaved asparagus salad recipe found at The First Mess.

Ingredients

Dressing
1 small clove garlic, minced
1 inch fresh ginger, peeled and minced
Zest and juice of 1 lime
2 tsp chili paste
1 Tbsp Agave nectar (or honey)
1 Tbsp rice vinegar (if seasoned skip salt below)
Salt and pepper to taste
1 tsp toasted sesame oil
2 Tbsp grapeseed or canola oil

Salad
1 bunch asparagus, ends trimmed and stalks peeled to ribbon size
1/2 red pepper, cut into very thin strips (First Mess used cabbage)
1/2 cup fresh cilantro, chopped (First Mess used mint)
1 scallion, thinly sliced
1/4 cup toasted pine nuts (First Mess used peanuts)

Method

To make the dressing, combine the garlic, ginger, lime zest, lime juice, chili paste, agave nectar, vinegar, salt (if using) and pepper in a jar with a tight fitting lid.   Stir to mix well, then add the sesame and grapeseed (or canola oil). Put lid on jar and shake vigorously to combine. Set aside.

Combine shaved asparagus, red pepper, cilantro, and scallions in a bowl. Pour dressing on salad and combine. Garnish with pine nuts.

Bring It!

When bringing this salad to your favorite party or event, keep nuts and dressing separated until right before serving. The asparagus can start to turn brown and get soggy if you dress too early.